Node
Node.js 是一个基于 Chrome V8 引擎的 JavaScript 运行时环境,它允许你使用 JavaScript 构建高性能的网络应用程序。
功能特点
事件驱动和非阻塞 I/O:Node.js 使用事件驱动和非阻塞 I/O 模型,使得它能够处理大量并发请求而不阻塞线程,提高应用程序的响应能力和吞吐量。
单线程:在 Node.js 中,所有的 I/O 操作都是非阻塞的,这意味着它可以在单个线程上处理大量的并发连接。尽管 Node.js 是单线程的,但它通过异步编程模型能够有效地利用系统资源。
轻量和高效:Node.js 的运行时环境相对较轻量,启动快速,内存消耗相对较低。它以高性能著称,并且具有良好的扩展性,能够处理大规模的并发请求。
服务器端应用程序:Node.js 在服务器端领域广泛应用,特别适合构建实时应用程序,如聊天应用、博客平台、实时通知等。它也可以作为代理服务器或 API 中间层使用。
JavaScript 开发:由于 Node.js 使用 JavaScript 作为开发语言,开发人员可以通过前后端共用一套语言和代码库,提高开发效率和代码复用性。
大型社区支持:Node.js 拥有活跃的开源社区,有大量的第三方模块和工具可供使用。这使得开发人员能够快速解决问题,并且在开发过程中受益于其他人的经验和贡献。
总的来说,Node.js 在轻量级高并发场景下表现出色,特别适合构建实时、高性能的网络应用程序。它的事件驱动和非阻塞 I/O 模型以及与 JavaScript 的紧密结合使得它成为许多开发人员首选的技术栈之一。
node环境
安装node的版本管理工具nvm:
保证电脑上没有node, 有node就卸载干净
下载nvm压缩文件:nvm-setup.zip
执行里面的setup.exe即可
安装路径可自行选择, 必须与环境变量保持一致
nvm ls //查看已下载的node版本
nvm install vX.X.X //安装node对应的版本
nvm use X.X.X //使用对应版本的node
注意:
安装node时若npm不成功, 在nvm下的setting.txt文件加入下面内容
做淘宝镜像
node_mirror: https://npm.taobao.org/mirrors/node/
npm_mirror: https://npm.taobao.org/mirrors/npm/
npm使用
查看镜像地址:
npm get registry
切换淘宝源:
npm config set registry http://registry.npm.taobao.org/
yarn config set registry http://registry.npm.taobao.org/
切回npm源:
npm config set registry=http://registry.npmjs.org
npm源管理工具nrm:
cnpm i nrm -g //安装
nrm ls //查看源
nrm current //查看当前使用源
nrm use taobao //切换源
nrm add cnpm http://r.cnpmjs.org //添加源
nrm del cnpm //删除源
注意
报错:_cacache is not a legal HTTP header value
解决: 改善网络或者换版本
报错: throw new ERR_INVALID_ARG_TYPE(name, 'string', value)
原因: 操作系统是32位的
解决: 修改node\node_modules\nrm\cli.js文件
const NRMRC = path.join(process.env.HOME, '.nrmrc');
//改为
const NRMRC = path.join(process.env.USERPROFILE, '.nrmrc');
node原理
Node本身能够做到如此高性能的根本原因在于事件(event)的使用,以及对于事件监听者(listener,callback)的调用上。

    Node本身是基于事件循环机制的。

    本质上,当Node启动一个文件或者服务器后,Node实际上是运行在一个死循环中的。

    while(true) {
        ...
    }

    在这个死循环当中,Node会不断发射事件、监听事件并且执行回调逻辑。

    事件来源主要有两种:一是Node自身所发射出的事件,二是来自于Node自身所运行的环境。
    监听事件:回调都是要依附于相应的事件的。
    执行回调逻辑:本质上都是由底层来执行的。

    关于IO操作的异步执行逻辑:

    1. 同步模式:
    2. 异步模式:poll epoll

    IOCP,libuv

    Node的单线程:所谓单线程,指的是Node的逻辑执行主线程是单线程的,即JavaScript代码运行所处的线程,这是个单线程,因为JavaScript
    本身只能执行在单线程当中。

    当我们在程序中引入了某个第三方模块时,那么整体的全部执行逻辑如下所示:

    Node -> 第三方模块 -> 原生模块 -> 原生模块内部的实现 -> C++模块 -> libuv -> 线程池 -> 线程 -> 执行底层的IO操作(涉及到操作系统调用)

    当Node在执行过程中,它会判断当前的操作系统类型:

    Node完整的事件循环逻辑:

    1. 启动Node运行时
    2. 检测是否有待处理的事件
    3. 如果没有,回到循环开始
    4. 如果有,那么从事件队列中取出一个事件
    5. 判断当前这个事件有没有与之关联的事件处理器(回调)
    6. 如果没有,回到循环开始
    7. 如果有,则执行事件的回调逻辑
    8. 回到循环开始,开始新一轮的事件检测流程

    整个Node的执行过程实际上是由完整的事件循环机制 + 底层的操作系统异步IO调用 + 线程池(底层库实现或由操作系统提供)共同配合来完成的。

    对于单线程的Node来说,是否无法利用到多核的优势呢?

    对于Node主线程来说,它只能运行在一个核心上面。
    对于底层的线程池来说,他们却可以运行在多个核心上面,当然也可以同时运行,因此他们是完全可以利用到多核的优势的。
http模块
服务创建以及周期事件
const http = require('http');

const server = http.createServer(function(request, response) {
    response.writeHead(200, {'Content-Type': 'text/plain'});
    response.end('Hello Node.js');
});

server.listen(3000, 'localhost');

server.on('listening', function() {
    console.log('Server is listening');
    // server.close();
});

server.on('connection', function() {
    console.log('Client is connected');
});

server.on('close', function() {
    console.log('Server is closed');
});

console.log('Node Server started on port 3000');
第二种方式
const http = require('http');
const httpServer = new http.Server();

httpServer.on('request', function (request, response) {
    response.writeHead(200, {'Content-Type': 'text/plain'});
    response.end('Hello Node.js');
});

httpServer.listen(3000, function () {
    console.log('Node Server started on port 3000');
});
当浏览器访问后端服务时返回请求头及其他版本信息
const http = require('http');

const server = http.createServer(function (request, response) {
    let data = '';

    request.on('data', function (chunk) {
        data += chunk;
    });

    request.on('end', function () {
        let method = request.method;
        let headers = JSON.stringify(request.headers);
        let httpVersion = request.httpVersion;
        let requestUrl = request.url;

        response.writeHead(200, {'Content-Type': 'text/html'});

        let responseData = method + ", " + headers + ", " + httpVersion + ", " + requestUrl;

        response.end(responseData);
    });
});

server.listen(3000, function () {
    console.log('Node Server started on port 3000');
});
模拟发送请求
const http = require('http');

let responseData = '';

http.request({
    'host': 'localhost',
    'port': '3000',
    'method': 'get',
    'path': '/login?username=zhangsan&password=hello'
}, function (response) {
    response.on('data', function (chunk) {
        responseData += chunk;
    });

    response.on('end', function () {
        console.log(responseData);
    });
}).end();
模拟GET请求
const http = require('http');

let responseData = '';

http.get({
    'host': 'localhost',
    'port': '3000'
}, function(response) {
    response.on('data', function(chunk) {
        responseData += chunk;
    });

    response.on('end', function() {
        console.log(responseData);
    });
}).end();
第二种方式
const http = require('http');

let responseData = '';

const option = {
    'host': 'localhost',
    'port': '3000'
};

const request = http.request(option);

request.on('response', function (response) {
    response.on('data', function (chunk) {
        responseData += chunk;
    });

    response.on('end', function () {
        console.log(responseData);
    });
}).end();
url模块
获取url上的所有信息
const url = require('url');

const urlString = 'http://www.test.com?orderId=12345';
const urlObject = url.parse(urlString);

console.log(urlObject);
配置组合成url
const url = require('url');

const urlObject = {
    'host': 'www.test.com',
    'port': 80,
    'protocol': 'http',
    'search': '?order=12345',
    'query': 'order=12345',
    'path': '/'
};

let realAddress = url.format(urlObject);

console.log(realAddress);
通过方法组合
const url = require('url');

const urlAddress = url.resolve('http://www.test.com', 'order');

console.log(urlAddress);
querystring模块
转路由上的参数为对象格式
const querystring = require('querystring');

const str = 'name=zhangsan&address=xiamen';

const obj = querystring.parse(str);

console.log(obj);
反转为路由参数格式
const querystring = require('querystring');

const obj = {
    name: 'zhangsan',
    address: 'xiamen'
};

const result = querystring.stringify(obj);

console.log(result);
util模块
带有高亮效果的
const util = require('util');

const obj = {
    name: 'zhangsan',
    address: 'nanchang',
    age: 25,
    married: false,
    getAge: function () {
        return this.age;
    }
};

const str = util.inspect(obj, {
    'colors': true
});

console.log(str);
path模块
拼接文件路径
const path = require('path');

const outputPath = path.join(__dirname, 'myDir', 'hello.js');

console.log(outputPath);
获取文件后缀名
const path = require('path');

const extInfo = path.extname(path.join(__dirname, 'myDir', 'hello.js'));

console.log(extInfo);
以对象格式显示文件路径的各种信息
const path = require('path');

const filePath = '/Users/helloworld/node/test.js';

const obj = path.parse(filePath);

console.log(obj);
'..'可返回上一级目录
const path = require('path');

const myPath = path.join('/hello', 'world', 'test/welcome', 'helloworld', '..');

console.log(myPath);
dns模块
解析域名为IP地址
const dns = require('dns');

const domain = 'www.sohu.com';

dns.resolve(domain, function (error, address) {
    if (error) {
        console.log(error);
        return;
    }

    console.log(address);
});
通过IP查询出域名地址
const dns = require('dns');

dns.reverse('114.114.114.114', function (error, domain) {
    console.log(domain);
});
暴露方式
第一种
var myInfo = {
    name: 'zhangsan',
    age: 20
};

var myFunction = function (inputNumber) {
    return inputNumber + 5;
};

exports.myInfo = myInfo;
exports.myFunction = myFunction;
第二种
const myModule2 = {
    myInfo: {
        name: 'zhangsan',
        age: 20
    },

    myFunction: function (inputNumber) {
        return inputNumber + 5;
    }
};

// exports.myModule2 = myModule2;
module.exports = myModule2;
模拟登录
login接口获取前端路由上的参数并解析为对象格式
const http = require('http');
const querystring = require('querystring');
const url = require('url');

const userService = require('./UserService');


const server = http.createServer(function (request, response) {
    let data = '';

    request.on('data', function (chunk) {
        data += chunk;
    });

    request.on('end', function () {
        const requestUrl = request.url;
        const requestMethod = request.method;

        if (requestUrl.includes('login') && requestMethod === 'GET') {
            const requestParams = url.parse(requestUrl);
            console.log(requestParams);

            const queryObject = querystring.parse(requestParams.query);
            console.log(queryObject);

            const loginResult = userService.login(queryObject.username, queryObject.password);
            console.log('loginResult: ' + loginResult);

            response.writeHead(200, {'Content-Type': 'text/plain'});
            response.end('username: ' + queryObject.username + ', password: ' + queryObject.password);
        }
    });
});

server.listen(3000, function () {
    console.log('Server is listening on port 3000');
});
封装用户方法
class UserService {

    login(username, password) {
        console.log('entered UserService login method');
        console.log('info from UserService.login: ' + username + ', ' + password);

        return true;
    }
}

module.exports = new UserService();
fs模块
对于fs中的绝大多数api来说,Node都提供了相同功能的两个版本:同步版本与异步版本
尽最大可能去使用异步版本const fs = require('fs');
//同步
try {
const data = fs.readFileSync('test.txt', 'utf8');
console.log(data);
} catch (e) {
console.log(e);
}
//异步
fs.readFile('test.txt', 'utf8', function (error, data) {
if (error) {
console.log(error);
console.log('error occured')
} else {
console.log(data);
}
});
fs.writeFile('mytest.txt', 'hello world', function (error) {
if (error) {
console.log('write file error');
} else {
console.log('write file successful');
}
});
//flag:'a'表示文件不存在为自动创建
fs.writeFile('mytest2.txt', 'mytest2, node.js\r\n', {flag: 'a'}, function (error) {
if (error) {
console.log('write file error');
} else {
console.log('write file successful');
}
});打开一个文件
const fs = require('fs');

fs.open('test.txt', 'r+', function (error, fd) {
    if (error) {
        return console.error(error);
    }
    console.log('file is open');
});
打开并关闭文件
const fs = require('fs');

fs.open('test.txt', 'r+', function (error, fd) {
    if (error) {
        return console.error(error);
    }

    console.log('file is open');

    fs.close(fd, function (error) {
        if (error) {
            console.error(error);
        }
        console.log('file is closed');
    });
});
删除文件
const fs = require('fs');

fs.unlink('hello.txt', (error) => {
    if (error) {
        throw error;
    }

    console.log("success");
});
强制重命名并读取文件状态信息
const fs = require('fs');

fs.rename('world.txt', 'hello.txt', (error) => {
    if (error) {
        throw error;
    }

    fs.stat('hello.txt', (error, stats) => {
        if (error) {
            throw error;
        }

        console.log(JSON.stringify(stats));
    });
});
向指定文件中添加内容
const fs = require('fs');

fs.appendFile('info.txt', 'hello world', 'utf8', (error) => {
    if (error) {
        throw error;
    }

    console.log('success');
});
创建多级文件夹
const fs = require('fs');

fs.mkdir('mydir/hello/world', {recursive: true}, (error) => {
    if (error) {
        throw  error;
    }

    console.log('success');
});
获取当前目录下所有文件及文件夹名称
const fs = require('fs');

fs.readdir('./', (error, files) => {
    if (error) {
        throw error;
    }

    console.log(files);
});
判断文件或文件夹是否存在
const fs = require('fs');

fs.access('./app.js', (error) => {
    if (error) {
        throw error;
    }

    console.log('success');
});
获取指定文件的完整路径
const fs = require('fs');

fs.realpath('app0.js', (error, resolvedPath) => {
    if (error) {
        throw error;
    }

    console.log(resolvedPath);
});
删除文件夹, 多级文件夹
const fs = require('fs');

fs.rmdir('mydir', {recursive: true}, (error) => {
    if (error) {
        throw error;
    }

    console.log('success');
});
创建文件读取流, 读取流的各种事件
const fs = require('fs');

const readStream = fs.createReadStream('./app12.js', {encoding: 'utf8'});
//打开
readStream.on('open', (fd) => {
    console.log(fd);
});
//准备
readStream.on('ready', () => {
    console.log('ready');
});
//内容
readStream.on('data', (data) => {
    console.log(data);
});
//结束
readStream.on('end', () => {
    console.log('end');
});
//关闭
readStream.on('close', () => {
    console.log('close');
});
//错误
readStream.on('error', (error) => {
    console.log(error);
});
创建读取和写入流, 将读取流的目标文件内容写入到写入流的目标文件中
若文件不存在会自动创建
const fs = require('fs');

const readStream = fs.createReadStream('./app12.js', {encoding: 'utf8'});
const writeStream = fs.createWriteStream('mytest.js', {encoding: 'utf8'});

readStream.on('data', (data) => {
    writeStream.write(data, () => {
        console.log(data);
    });
});
buffer模块
创建缓存空间并写入内容
const buffer = Buffer.alloc(128);

const length = buffer.write('helloworld你好', 'utf8');

console.log('byte count: ' + length);
创建时便写入内容, 比较两个缓存空间内容是否相同
相同返回0 不同返回-1
const buffer1 = Buffer.from('hello');
const buffer2 = Buffer.from('hello');

const compareResult = buffer1.compare(buffer2);

console.log(compareResult);
通过索引加入内容, 数字对应ACSll码表中的字符
const buffer = Buffer.alloc(3);

buffer[0] = 65;
buffer[1] = 66;
buffer[2] = 67;

console.log(buffer.toString('utf8'));
一个文字占用3个字节, buffer中存的是ACSll码值与unicode字符码
使用tostring()可以转换为对应的字符
const str = 'abcde天';
const buffer = Buffer.from(str);

console.log(str.length);
console.log(buffer.length);

console.log(buffer);
console.log(buffer.toString('utf8'));
合并多个buffer为一个buffer
totalLength不填默认为所有buffer长度之和
若所填的字小于所有buffer长度之和会截断buffer并返回
const buffer1 = Buffer.from('hello');
const buffer2 = Buffer.from('world');
const buffer3 = Buffer.from('welcome');
const buffer4 = Buffer.from('你好');

const bufferArray = [buffer1, buffer2, buffer3, buffer4];

const bufferResult = Buffer.concat(bufferArray, 10);

console.log(bufferResult.length);

console.log(bufferResult.toString('utf8'));
JSON格式转换buffer
const buffer = Buffer.from('你好世界');
const jsonString = JSON.stringify(buffer);

console.log(jsonString);

const jsonObject = JSON.parse(jsonString);

console.log(jsonObject);

const buffer2 = Buffer.from(jsonObject);

console.log(buffer2.toString('utf8'));
判断是否为buffer支持的字符编码格式
const str = 'utf8';
const str2 = 'utf-8';
const str3 = 'UTF-8';
const str4 = 'utf9';
const str5 = 'gb2312';
const str6 = 'gbk';

console.log(Buffer.isEncoding(str));	//true
console.log(Buffer.isEncoding(str2));	//true
console.log(Buffer.isEncoding(str3));	//true
console.log(Buffer.isEncoding(str4));	//false
console.log(Buffer.isEncoding(str5));	//false
console.log(Buffer.isEncoding(str6));	//false
buffer是对象类型, isBuffer判断是否为一个buffer
const buffer = Buffer.from('hello');
const myObj = {};
const str = "aa";
const flag = true;
const count = 4;

console.log(typeof myObj);
console.log(typeof buffer);
console.log(typeof str);
console.log(typeof flag);
console.log(typeof count);

console.log(Buffer.isBuffer(myObj));	//false
console.log(Buffer.isBuffer(buffer));	//true
net模块
创建一个net服务
方式一
const net = require('net');

const server = net.createServer((socket) => {
    console.log('client connected');
    console.log(socket);
});

server.listen(8888, () => {
    console.log('server is listening');
});
方式二
const net = require('net');

const server = net.createServer((socket) => {
    console.log('client connected');
});

server.listen(8888);

server.on('listening', () => {
    console.log('server is listening');
});
net服务的事件机制
const net = require('net');

const server = new net.Server();

server.on('connection', (socket) => {
    console.log('client connected');
});

server.listen(8888);

server.on('listening', () => {
    console.log('server is listening');

    server.close();
});

server.on('close', () => {
    console.log('server closed');
});

server.on('error', (error) => {
    console.log('server error');
});
获取端口网络等信息
const net = require('net');

const server = net.createServer((socket) => {
    console.log('client connected');
});

server.listen(8888, () => {
    const address = server.address();

    console.log(address.port + ", " + address.address + ", " + address.family);
});
设置服务最大连接数
const net = require('net');

const server = net.createServer((socket) => {
    console.log('client connected');

    server.maxConnections = 2;

    server.getConnections((error, count) => {
        console.log('client count: ' + count);
    });
});

server.listen(8888, () => {
    console.log('server is listening');
});
data为请求连接的请求头信息
const net = require('net');

const server = net.createServer((socket) => {
    socket.on('data', (data) => {
        console.log(data.toString());
    });
});

server.listen(8888, () => {
    console.log('server is listening');
});
socket.bytesWritten发送的字节数
socket.bytesRead接收的字节数
const net = require('net');

const server = net.createServer((socket) => {
    const address = socket.address();
    const message = 'server address is ' + JSON.stringify(address);

    socket.write(message, () => {
        const writeSize = socket.bytesWritten;

        console.log(message);
        console.log('message size is: ' + writeSize);
    });

    socket.on('data', (data) => {
        console.log(data.toString());

        const readSize = socket.bytesRead;

        console.log('data size is: ' + readSize);
    });
});

server.listen(8888, () => {
    console.log('server is listening');
});
客户端连接过来的网络信息
const net = require('net');

const server = net.createServer((socket) => {
    console.log('local port: ' + socket.localPort);
    console.log('local address: ' + socket.localAddress);
    console.log('remote port: ' + socket.remotePort);
    console.log('remote family: ' + socket.remoteFamily);
    console.log('remote address: ' + socket.remoteAddress);
});

server.listen(8888, () => {
    console.log('server is listening');
});
创建socket客户端
const net = require('net');
const client = new net.Socket();

client.connect(8888, 'localhost', () => {
    console.log('connected to the server');
});
dgram模块
创建一个socket服务监听9999端口
无限循环互发消息
服务端
const dgram = require('dgram');

const message = Buffer.from('This message comes from server');

const socket = dgram.createSocket('udp4', (msg, info) => {
    //发送消息
    socket.send(message, 0, message.length, info.port, info.address, (error, bytes) => {
        if (error) {
            console.log(error);
            return;
        }

        console.log('Server has sent ' + bytes + ' bytes message');
    });
});
//监听
socket.bind(9999, 'localhost', () => {
    console.log('Server has binded to 9999');
});
//接收
socket.on('message', (msg, info) => {
    console.log('message event occured');
    console.log(msg.toString());
});
客户端
const dgram = require('dgram');

const message = Buffer.from('This message comes from client');
const socket = dgram.createSocket('udp4');
//发送消息,第一次发送
socket.send(message, 0, message.length, 9999, 'localhost', (error, bytes) => {
    if (error) {
        console.log(error);
        return;
    }

    console.log('client has sent ' + bytes + ' bytes message');
});
//接收消息
socket.on('message', (msg, info) => {
    console.log(msg.toString())
    const message2Send = 'hello world';
    //发送消息
    socket.send(message2Send, 0, message2Send.length, 9999, 'localhost');
});
socket.io
服务端
const http = require('http');
const io = require('socket.io');
const fs = require('fs');

const server = http.createServer((request, response) => {
    response.writeHead(200, {'Content-Type': 'text/html'});

    if (request.url === '/') {
        fs.readFile('./client.html', 'utf8', (error, data) => {
            if (error) {
                console.log('error occured');
                return;
            } else {
                response.end(data.toString());
            }
        });
    } else {
        response.end('<html><body>Error</body></html>');
    }
});

server.listen(3000, 'localhost');

const socket = io.listen(server);

socket.on('connection', (socket) => {
    console.log('connection has been established');

    socket.on('message', (message) => {
        console.log('message: ' + message);
    });

    socket.on('disconnect', () => {
        console.log('connection has lost');
    });

    socket.emit('serverEvent', 'this is serverEvent');

    socket.on('clientEvent', (data) => {
        console.log(data.address + ", " + data.age);
    });

    socket.on('broadcastEventClient', (message) => {
        console.log(message);
        socket.broadcast.emit('broadcastEventServer', 'you are good!');
    });

    socket.send('hello client');
});
客户端
<!DOCTYPE html>
<html lang="en">
<head>
    <meta charset="UTF-8">
    <title>Title</title>

    <script src="/socket.io/socket.io.js"></script>

    <script type="text/javascript">
        const socket = io('http://localhost:3000');
        //接收消息
        socket.on('message', (message) => {
            console.log('data from server: ' + message);
        });
        //断开连接
        socket.on('disconnect', () => {
            console.log('disconnect');
        });
        //接收服务端对应事件消息
        socket.on('serverEvent', (data) => {
            console.log('serverEvent: ' + data);
            //发送对应事件消息给服务端
            socket.emit('clientEvent', {address: 'taiyuan', age: 20});
        });
        //发给服务端的广播消息
        socket.emit('broadcastEventClient', 'take care');
        //接收服务端广播消息
        socket.on('broadcastEventServer', (message) => {
            console.log(message);
        });


    </script>

</head>
<body>

</body>
</html>
events模块
const http = require('http');
const events = require('events');

const httpServer = http.createServer();
//设置最大事件监听器
httpServer.setMaxListeners(2);

httpServer.on('request', (request, response) => {
    if (request.url === '/') {
        console.log('addListener');
        response.end('end');
    }
});

const listener = (request, response) => {
    if (request.url === '/') {
        console.log('hello world');
        response.end('welcome');
    }
};

const listener2 = (request, response) => {
    if (request.url === '/') {
        console.log('hello world');
        response.end('welcome');
    }
};

const listener3 = (request, response) => {
    if (request.url === '/') {
        console.log('hello world');
        response.end('welcome');
    }
};
//默认每个事件最多注册10个监听器
console.log('default max listener count: ' + events.EventEmitter.defaultMaxListeners);

httpServer.on('request', listener);
httpServer.on('request', listener2);
httpServer.on('request', listener3);


httpServer.listen(3000, () => {
    console.log('listening to port 3000');
});
单个事件的多次触发监听
const EventEmitter = require('events');
const emitter = new EventEmitter();

emitter.on('myEvent', function myListener() {
    console.log('myListener');
});

emitter.on('myEvent', function myListener2(param1, param2) {
    console.log(`myListener2: ${param1}, ${param2}`);
});

emitter.on('myEvent', function myListener3(...params) {
    const values = params.join(', ');
    console.log(`myListener3: ${values}`);
});

console.log(emitter.listeners('myEvent'));

emitter.emit('myEvent', 'a', 'b', 'c', 'd', 'e', 'f');
emitter.once只触发一次并且下单触发时会先移除该事件
const EventEmitter = require('events');
const emitter = new EventEmitter();
//单次监听一个新事件
emitter.once('newListener', (event, listener) => {
    if (event === 'myEvent') {
        //接收事件
        emitter.on('myEvent', () => {
            console.log('hello');
        });
    }
});

emitter.on('myEvent', () => {
    console.log('world');
});

emitter.emit('myEvent');
process模块
进程信息及事件监听
console.log(process.version);

console.log(process.versions);

console.log(process.platform);

console.log(process.execPath);

console.log(process.config);

console.log(process.pid);

console.log(process.title);

console.log(process.arch);

console.log(process.memoryUsage());

console.log(process.cwd());

process.chdir('../');

console.log(process.cwd());

console.log(process.env);

console.log(process.uptime());

process.on('exit', () => {
    console.log('node process exited');
});

// process.exit(0);

process.on('beforeExit', () => {
    console.log('node process before exited');
});

process.on('uncaughtException', (error) => {
    console.log(error);
    console.log('=======');
    console.log('uncaughtException occured');
});

process.on('SIGINT', () => {
    console.log('received SIGINT info');
});

setTimeout(() => {
    console.log('timeout');
}, 100000);
nextTick会在异步之前执行
const fs = require('fs');

const myFunction = () => {
    console.log('myFunction invoked');
};
//nextTick会在异步之前执行
process.nextTick(myFunction);
//同步读取
console.log(fs.readFileSync('./app1.js').toString('utf8'));
//异步读取
fs.readFile('./app1.js', (error, data) => {
    console.log(data.toString('utf8'));
});
child_process模块
创建子进程执行命令
const childProcess = require('child_process');
//创建子进程执行命令
const lsChildProcess = childProcess.spawn('cmd', ['-al', './']);

lsChildProcess.stdout.on('data', (data) => {
    console.log(data.toString());
    //子进程的pid
    console.log(`child process id: ${lsChildProcess.pid}`);
});
//关闭事件
lsChildProcess.on('exit', (code, signal) => {
    console.log(code);
});
创建子进程执行node运行其他文件
const childProcess = require('child_process');

const nodeChildProcess = childProcess.spawn('node', ['app2']);

nodeChildProcess.stdout.on('data', (data) => {
    console.log(data.toString());
    console.log(`child process id: ${nodeChildProcess.pid}`);
});

nodeChildProcess.on('exit', (code, signal) => {
    console.log(code);
});
silent: true 只获取接收到的消息: 下面只输出welcome
此为./app5.js代码
[1, 2, 3, 4, 5].forEach(i => {
    console.log(i);
});
//接收
process.on('message', (message) => {
    console.log(message);
//发送
    process.send('welcome');
});
此为执行子进程命令代码
const childProcess = require('child_process');
//在子进程中运行
const forkProcess = childProcess.fork('./app5', {silent: true});
//接收消息
forkProcess.on('message', (message) => {
    console.log(message);
});
//发送消息
forkProcess.send('hello world');
exec执行命令
const childProcess = require('child_process');

childProcess.exec('node app7', (error, stdout, stderr) => {
    if (error) {
        console.log(error);
        throw error;
    } else {
        console.log(stdout.toString());
    }
});

//app7代码
['hello', 'world', 'hello world', 'welcome'].forEach((str) => {
    console.log(str);
});
execFile执行命令
const childProcess = require('child_process');

childProcess.execFile('node', ['app9'], (error, stdout, stderr) => {
    if (error) {
        console.log(error);
        throw error;
    } else {
        console.log(stdout.toString());
    }
});
//app9代码
const addFunction = (a, b) => {
    return a + b;
};

console.log(addFunction(5, 8));
os与cluster模块
操作系统与集群
const cluster = require('cluster');
const http = require('http');
const os = require('os');

const cpuCount = os.cpus().length;
console.log(cpuCount)

//cluster.schedulingPolicy = cluster.SCHED_RR;

/*
    Master - Worker 模式
 */
//是否为主线程
if (cluster.isMaster) {
    for (let i = 0; i < cpuCount; ++i) {
        cluster.fork();//启动工作进程
    }
    //工作进程关闭时触发
    cluster.on('exit', (worker, code, signal) => {
        console.log(worker.process.pid);
    })
} else {
    const httpServer = http.createServer((request, response) => {
        let data = '';

        request.on('data', (chunk) => {
            data += chunk;
        });

        request.on('end', () => {
            response.writeHead(200, {'Content-Type': 'text/plain'});

            response.end(`${process.pid}`);
        });
    });

    httpServer.listen(3000, () => {
        console.log('listening to port 3000');
    });
}
koa特性
洋葱模型
const Koa = require('koa');
const app = new Koa();

app.use(async (ctx, next) => {
    console.log('myFunction started');
    await next();
    console.log('myFunction finished');
});

app.use(async (ctx, next) => {
    console.log('myFunction2 started');
    await next();
    console.log('myFunction2 finished');
});


app.use(async (ctx, next) => {
    console.log('myFunction3 started');
    await next();
    console.log('myFunction3 finished');
});

app.use(async (ctx) => {
    // ctx.body = 'Hello Koa';

    ctx.response.type = 'text/html';
    ctx.response.body = '<h2>Hello Koa</h2>';
});

app.listen(3000);
服务监听与接口数据传输的简单实现
const Koa = require('koa');
const app = new Koa();

app.use(async (ctx) => {
    ctx.response.type = 'application/json';

    const responseBody = {
        result: {
            code: 0,
            description: 'success'
        }, data: {
            username: 'zhangsan',
            address: 'taiyuan',
            age: 20
        }
    };

    ctx.body = JSON.stringify(responseBody);
});

app.listen(4000);
Node 手写 WebSocket 协议
WebSocket 严格来说和 HTTP 没什么关系,是另外一种协议格式。但是需要一次从 HTTP 到 WebSocket 的切换过程。
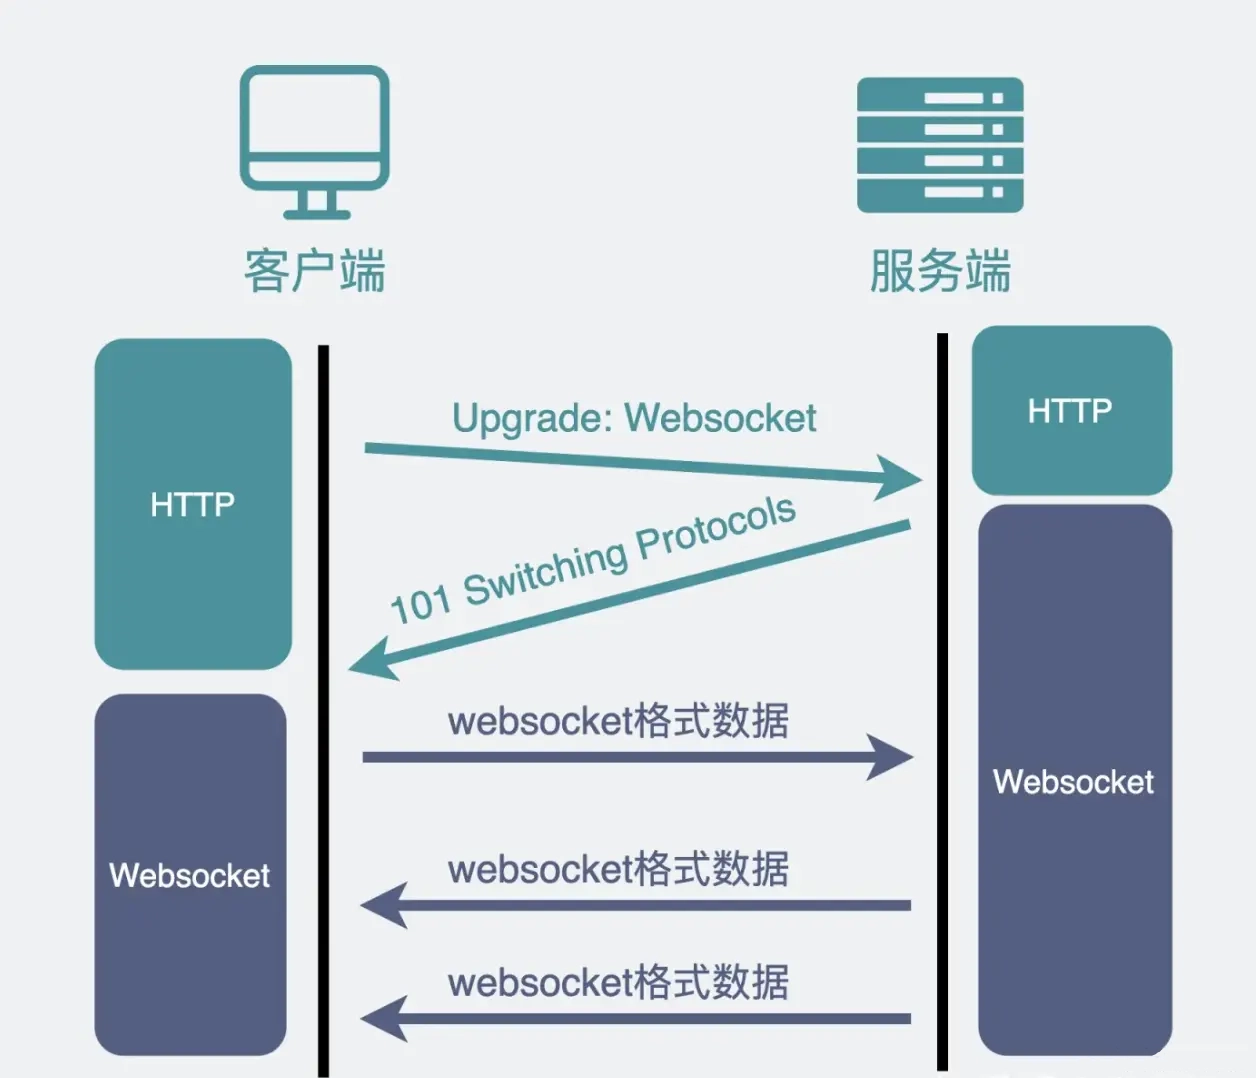
切换过程
请求时要带上的 header:
# 链接升级
Connection: Upgrade
# 升级目标为websocket
Upgrade: websocket
# 保证安全的KEY
Sec-WebSocket-Key: Ia3dQjfWrAug/6qm7mTZOg==
服务端返回的 header:
HTTP/1.1 101 Switching Protocols
Connection: Upgrade
Upgrade: websocket
# Sec-WebSocket-Accept 是对请求带过来的 Sec-WebSocket-Key 处理之后的结果
# 加入这个 header 的校验是为了确定对方一定是有 WebSocket 能力的
Sec-WebSocket-Accept: JkE58n3uIigYDMvC+KsBbGZsp1A=
实现对 Sec-WebSocket-Key 处理:
const crypto = require('crypto');

function hashKey(key) {
  const sha1 = crypto.createHash('sha1');
  sha1.update(key + '258EAFA5-E914-47DA-95CA-C5AB0DC85B11');
  return sha1.digest('base64');
}
用客户端传过来的 key,加上一个固定的字符串,经过 sha1 加密之后,转成 base64 的结果
websocket 是二进制协议,一个字节可以用来存储很多信息:
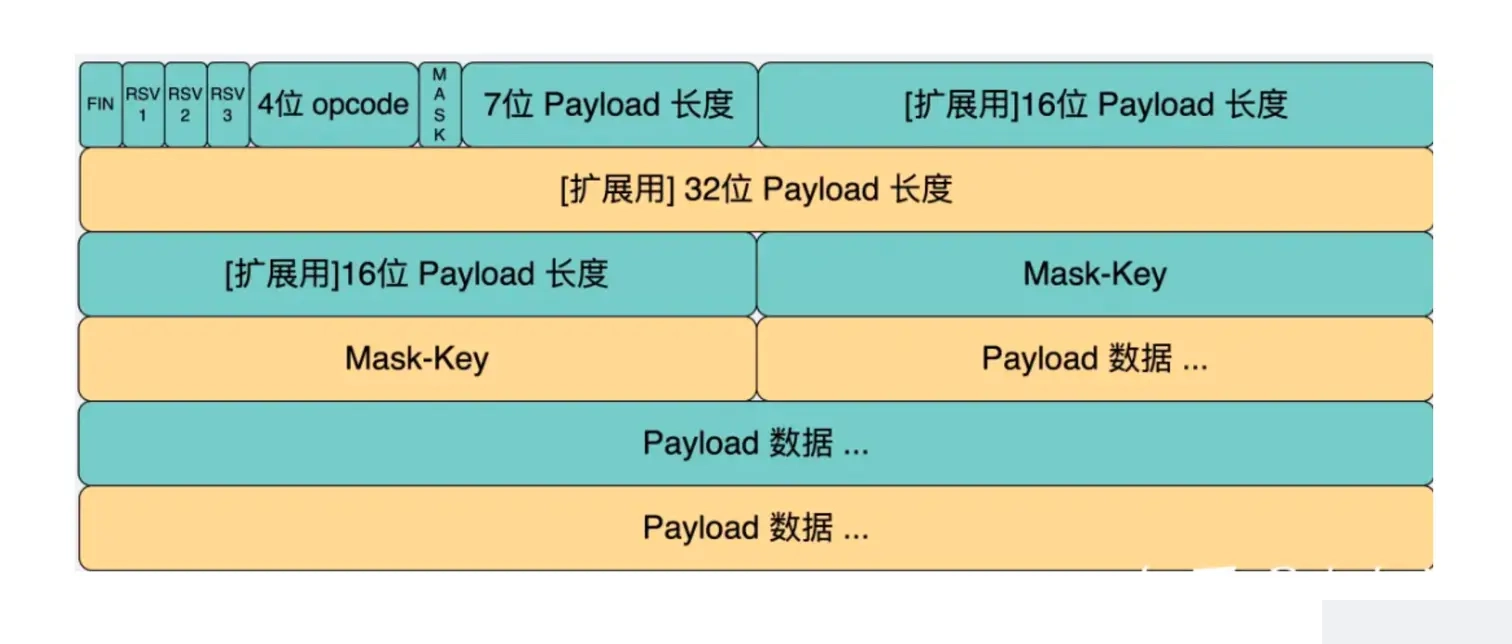
在 WebSocket 协议中,有几个关键的字段定义了消息的结构和处理方式:
FIN(1 bit):
- 表示消息是否是最后一个分片的标记位。
- 若为 1,表示这是消息的最后一个分片;若为 0,表示还有后续分片。
- 用于处理较大消息的分片传输。
RSV1/RSV2/RSV3(各占 1 bit):
- 保留位,暂时未被使用,在未来的扩展中可能会用到。
- 目前应设置为 0,表示保留状态。
Opcode(4 bits):
- 标识消息的类型,定义了如何解析和处理负载数据。
- 常见的 Opcode 包括:
- 0x0:表示继续分片
- 0x1:表示文本消息
- 0x2:表示二进制消息
- 0x8:表示连接关闭
- 0x9:表示心跳 Ping
- 0xA:表示心跳 Pong
- 通过不同的 Opcode 可以区分处理不同类型的消息。
Payload Length(7 bits 或 7+16 bits 或 7+64 bits):
- 标识负载数据的长度。
- 若长度小于 126,使用 7 位表示。
- 若长度大于等于 126 且小于 65536,使用 7 位加 16 位表示。
- 若长度大于等于 65536,使用 7 位加 64 位表示。
Masking Key(0 或 4 bytes):
- 用于掩码处理数据,保证数据传输的安全性。
- 若 Masking Key 存在,它占据了 4 字节并位于负载数据长度后面。
- 若 Masking Key 不存在,则没有掩码处理。
Payload Data:
- 实际的负载数据,可能包含文本、二进制数据等。
- 如果存在 Masking Key,Payload Data 需要与之进行按位异或运算解码。
这些字段共同定义了 WebSocket 协议中消息的结构和含义。通过解析和理解这些字段,可以正确处理和构建 WebSocket 消息。
新建个项目:
mkdir my-websocket

cd my-websocket

npm init -y
在 src/ws.js 定义个 MyWebSocket 的 class:
const { EventEmitter } = require('events');
const http = require('http');

class MyWebsocket extends EventEmitter {
  constructor(options) {
    super(options);

    const server = http.createServer();
    server.listen(options.port || 8080);

    server.on('upgrade', (req, socket) => {

    });
  }
}
继承 EventEmitter 是为了可以用 emit 发送一些事件,外界可以通过 on 监听这个事件来处理。
我们在构造函数里创建了一个 http 服务,当 ungrade 事件发生,也就是收到了 Connection: upgrade 的 header 的时候,返回切换协议的 header。
返回的 header 前面已经见过了,就是要对 sec-websocket-key 做下处理。
function hashKey(key) {
  const sha1 = crypto.createHash('sha1');
  sha1.update(key + '258EAFA5-E914-47DA-95CA-C5AB0DC85B11');
  return sha1.digest('base64');
}

server.on('upgrade', (req, socket) => {
  this.socket = socket;
  socket.setKeepAlive(true);

  const resHeaders = [
    'HTTP/1.1 101 Switching Protocols',
    'Upgrade: websocket',
    'Connection: Upgrade',
    'Sec-WebSocket-Accept: ' + hashKey(req.headers['sec-websocket-key']),
    '',
    ''
  ].join('\r\n');
  socket.write(resHeaders);

  socket.on('data', (data) => {
    console.log(data)
  });
  socket.on('close', (error) => {
      this.emit('close');
  });
});
新建 src/index.js,引入我们实现的 ws 服务器,跑起来:
const MyWebSocket = require('./ws');
const ws = new MyWebSocket({ port: 8080 });

ws.on('data', (data) => {
  console.log('receive data:' + data);
});

ws.on('close', (code, reason) => {
  console.log('close:', code, reason);
});
然后新建这样一个 index.html:
<!DOCTYPE HTML>
<html>
<body>
    <script>
        const ws = new WebSocket("ws://localhost:8080");

        ws.onopen = function () {
            ws.send("发送数据");
            setTimeout(() => {
                ws.send("发送数据2");
            }, 3000)
        };

        ws.onmessage = function (evt) {
            console.log(evt)
        };

        ws.onclose = function () {
        };
    </script>
</body>

</html>
在浏览器中打开 index.html,打开 devtools 你就会发现协议切换成功了,服务端也收到了消息,不过是 Buffer 的,也就是二进制的,接下来只要按照协议格式解析这个 Buffer,并且生成响应格式的协议数据 Buffer 返回就可以收发 websocket 数据了。
我们需要第一个字节的后四位,也就是 opcode:
const byte1 = bufferData.readUInt8(0);
let opcode = byte1 & 0x0f;
读取 8 位无符号整数的内容,也就是一个字节的内容。参数是偏移的字节,这里是 0。通过位运算取出后四位,这就是 opcode 了。
然后再处理第二个字节,第一位是 mask 标志位,后 7 位是 payload 长度。:
const byte2 = bufferData.readUInt8(1);
const str2 = byte2.toString(2);
const MASK = str2[0];
let payloadLength = parseInt(str2.substring(1), 2);
还是用 buffer.readUInt8 读取一个字节的内容。先转成二进制字符串,这时第一位就是 mask,然后再截取后 7 位的子串,parseInt 成数字,这就是 payload 长度了。
后面咋还有俩 payload 长度呢?这是因为数据不一定有多长,可能需要 16 位存长度,可能需要 32 位。 于是 websocket 协议就规定了如果那个 7 位的内容不超过 125,那它就是 payload 长度。 如果 7 位的内容是 126,那就不用它了,用后面的 16 位的内容作为 payload 长度。 如果 7 位的内容是 127,也不用它了,用后面那个 64 位的内容作为 payload 长度。 其实还是容易理解的,就是 3 个 if else。 用代码写出来就是这样的:
let payloadLength = parseInt(str2.substring(1), 2);

let curByteIndex = 2;

if (payloadLength === 126) {
  payloadLength = bufferData.readUInt16BE(2);
  curByteIndex += 2;
} else if (payloadLength === 127) {
  payloadLength = bufferData.readBigUInt64BE(2);
  curByteIndex += 8;
}
这里的 curByteIndex 是存储当前处理到第几个字节的。
- 如果是 126,那就从第 3 个字节开始,读取 2 个字节也就是 16 位的长度,用
buffer.readUInt16BE方法。 - 如果是 127,那就从第 3 个字节开始,读取 8 个字节也就是 64 位的长度,用
buffer.readBigUInt64BE方法。
这样就拿到了 payload 的长度,然后再用这个长度去截取内容就好了。但在读取数据之前,还有个 mask 要处理,这个是用来给内容解密的:
读 4 个字节,就是 mask key。再后面的就可以根据 payload 长度读出来。
let realData = null;

if (MASK) {
  const maskKey = bufferData.slice(curByteIndex, curByteIndex + 4);
  curByteIndex += 4;
  const payloadData = bufferData.slice(curByteIndex, curByteIndex + payloadLength);
  realData = handleMask(maskKey, payloadData);
} else {
  realData = bufferData.slice(curByteIndex, curByteIndex + payloadLength);;
}
然后用 mask key 来解密数据。这个算法也是固定的,用每个字节的 mask key 和数据的每一位做按位异或就好了:
function handleMask(maskBytes, data) {
  const payload = Buffer.alloc(data.length);
  for (let i = 0; i < data.length; i++) {
    payload[i] = maskBytes[i % 4] ^ data[i];
  }
  return payload;
}
但是传给处理程序之前,还要根据类型来处理下,因为内容分几种类型,也就是 opcode 有几种值:
const OPCODES = {
  CONTINUE: 0,
  TEXT: 1, // 文本
  BINARY: 2, // 二进制
  CLOSE: 8,
  PING: 9,
  PONG: 10,
};
我们只处理文本和二进制就好:
handleRealData(opcode, realDataBuffer) {
    switch (opcode) {
      case OPCODES.TEXT:
        this.emit('data', realDataBuffer.toString('utf8'));
        break;
      case OPCODES.BINARY:
        this.emit('data', realDataBuffer);
        break;
      default:
        this.emit('close');
        break;
    }
}
文本就转成 utf-8 的字符串,二进制数据就直接用 buffer 的数据。
至此,我们 websocket 协议的解析成功了!这样的协议格式的数据叫做 frame,也就是帧,接下来我们再实现数据的发送。发送也是构造一样的 frame 格式。定义这样一个 send 方法:
send(data) {
    let opcode;
    let buffer;
    if (Buffer.isBuffer(data)) {
      opcode = OPCODES.BINARY;
      buffer = data;
    } else if (typeof data === 'string') {
      opcode = OPCODES.TEXT;
      buffer = Buffer.from(data, 'utf8');
    } else {
      console.error('暂不支持发送的数据类型')
    }
    this.doSend(opcode, buffer);
}

doSend(opcode, bufferDatafer) {
   this.socket.write(encodeMessage(opcode, bufferDatafer));
}
根据发送的是文本还是二进制数据来对内容作处理。然后构造 websocket 的 frame:
function encodeMessage(opcode, payload) {
  //payload.length < 126
  let bufferData = Buffer.alloc(payload.length + 2 + 0);;

  let byte1 = parseInt('10000000', 2) | opcode; // 设置 FIN 为 1
  let byte2 = payload.length;

  bufferData.writeUInt8(byte1, 0);
  bufferData.writeUInt8(byte2, 1);

  payload.copy(bufferData, 2);

  return bufferData;
}
我们只处理数据长度小于 125 的情况。第一个字节是 opcode,我们把第一位置 1 ,通过按位或的方式。 服务端给客户端回消息不需要 mask,所以第二个字节就是 payload 长度。 分别把这前两个字节的数据写到 buffer 里,指定不同的 offset:
bufferData.writeUInt8(byte1, 0);
bufferData.writeUInt8(byte2, 1);
之后把 payload 数据放在后面:
payload.copy(bufferData, 2);这样一个 websocket 的 frame 就构造完了。
完整代码如下:
//ws.js
const { EventEmitter } = require('events');
const http = require('http');
const crypto = require('crypto');

function hashKey(key) {
  const sha1 = crypto.createHash('sha1');
  sha1.update(key + '258EAFA5-E914-47DA-95CA-C5AB0DC85B11');
  return sha1.digest('base64');
}

function handleMask(maskBytes, data) {
  const payload = Buffer.alloc(data.length);
  for (let i = 0; i < data.length; i++) {
    payload[i] = maskBytes[i % 4] ^ data[i];
  }
  return payload;
}

const OPCODES = {
  CONTINUE: 0,
  TEXT: 1,
  BINARY: 2,
  CLOSE: 8,
  PING: 9,
  PONG: 10,
};

function encodeMessage(opcode, payload) {
  //payload.length < 126
  let bufferData = Buffer.alloc(payload.length + 2 + 0);;

  let byte1 = parseInt('10000000', 2) | opcode; // 设置 FIN 为 1
  let byte2 = payload.length;

  bufferData.writeUInt8(byte1, 0);
  bufferData.writeUInt8(byte2, 1);

  payload.copy(bufferData, 2);

  return bufferData;
}

class MyWebsocket extends EventEmitter {
  constructor(options) {
    super(options);

    const server = http.createServer();
    server.listen(options.port || 8080);

    server.on('upgrade', (req, socket) => {
      this.socket = socket;
      socket.setKeepAlive(true);

      const resHeaders = [
        'HTTP/1.1 101 Switching Protocols',
        'Upgrade: websocket',
        'Connection: Upgrade',
        'Sec-WebSocket-Accept: ' + hashKey(req.headers['sec-websocket-key']),
        '',
        ''
      ].join('\r\n');
      socket.write(resHeaders);

      socket.on('data', (data) => {
        this.processData(data);
        // console.log(data);
      });
      socket.on('close', (error) => {
          this.emit('close');
      });
    });
  }

  handleRealData(opcode, realDataBuffer) {
    switch (opcode) {
      case OPCODES.TEXT:
        this.emit('data', realDataBuffer.toString('utf8'));
        break;
      case OPCODES.BINARY:
        this.emit('data', realDataBuffer);
        break;
      default:
        this.emit('close');
        break;
    }
  }

  processData(bufferData) {
    const byte1 = bufferData.readUInt8(0);
    let opcode = byte1 & 0x0f;

    const byte2 = bufferData.readUInt8(1);
    const str2 = byte2.toString(2);
    const MASK = str2[0];

    let curByteIndex = 2;

    let payloadLength = parseInt(str2.substring(1), 2);
    if (payloadLength === 126) {
      payloadLength = bufferData.readUInt16BE(2);
      curByteIndex += 2;
    } else if (payloadLength === 127) {
      payloadLength = bufferData.readBigUInt64BE(2);
      curByteIndex += 8;
    }

    let realData = null;

    if (MASK) {
      const maskKey = bufferData.slice(curByteIndex, curByteIndex + 4);
      curByteIndex += 4;
      const payloadData = bufferData.slice(curByteIndex, curByteIndex + payloadLength);
      realData = handleMask(maskKey, payloadData);
    }

    this.handleRealData(opcode, realData);
  }

  send(data) {
    let opcode;
    let buffer;
    if (Buffer.isBuffer(data)) {
      opcode = OPCODES.BINARY;
      buffer = data;
    } else if (typeof data === 'string') {
      opcode = OPCODES.TEXT;
      buffer = Buffer.from(data, 'utf8');
    } else {
      console.error('暂不支持发送的数据类型')
    }
    this.doSend(opcode, buffer);
  }

  doSend(opcode, bufferDatafer) {
    this.socket.write(encodeMessage(opcode, bufferDatafer));
  }
}

module.exports = MyWebsocket;// index.js
const MyWebSocket = require('./ws');
const ws = new MyWebSocket({ port: 8080 });
ws.on('data', (data) => {
console.log('receive data:' + data);
setInterval(() => {
ws.send(data + ' ' + Date.now());
}, 2000)
});
ws.on('close', (code, reason) => {
console.log('close:', code, reason);
});<!DOCTYPE HTML>
<html lang="zh">
<body>
<script>
const ws = new WebSocket("ws://localhost:8080");
ws.onopen = function () {
ws.send("发送数据");
setTimeout(() => {
ws.send("发送数据2");
}, 3000)
};
ws.onmessage = function (evt) {
console.log(evt)
};
ws.onclose = function () {
};
</script>
</body>
</html>