Vue
Vue.js 是一个渐进式的 JavaScript 前端框架,用于构建用户界面。它专注于视图层,并通过数据驱动和组件化开发的方式提供了简洁、灵活和高效的开发方式。
特点和功能
响应式数据绑定:
Vue.js使用双向数据绑定机制,通过将数据和DOM元素进行绑定,实现了数据和视图之间的自动同步。组件化开发:
Vue.js提供了组件化的开发方式,将UI拆分成独立的可重用组件,使得代码更加模块化、可维护性更好,同时也提高了开发效率。虚拟 DOM:
Vue.js使用虚拟DOM技术,通过在内存中构建和操作虚拟DOM树,最后再将变更应用到实际的DOM上,从而提高页面渲染性能。指令和过滤器:
Vue.js提供了很多内置指令和过滤器,可以方便地处理DOM操作、事件处理、样式绑定等常见的任务。插件系统:
Vue.js具有丰富的插件生态系统,可以通过插件扩展Vue.js的功能,如路由管理、状态管理、国际化等。简单易学:
Vue.js的API设计简单易懂,学习曲线较低,开发人员可以快速上手,并使用其进行快速原型设计和大规模应用开发。生态系统支持:
Vue.js拥有庞大的社区支持和丰富的生态系统,有大量的第三方库、工具和组件可供选择,以满足不同项目的需求。
全面拥抱 Vue 3
源码组织上的变化
Vue 3相对于Vue 2使用monorepo的方式进行包管理,使用monorepo的管理方式,使得Vue 3源码模块职责显得特别地清晰明了,每个包独立负责一块核心功能的实现,方便开发和测试。INFO
比如,
compiler-core专职负责与平台无关层的渲染器底层,对外提供统一调用函数,内部通过完整的测试用例保障功能的稳定性。而compiler-dom和compiler-ssr则依托于compiler-core分别实现浏览器和服务端侧的渲染器上层逻辑,模块核心职责清晰明了,提高了整体程序运行的健壮性!引入
Composition API
在Vue 2.7之前,我们去开发Vue应用,都是通过data、computed、methods……这样的选项分类的方式来实现一个组件的开发。其实这样对于没有大量状态逻辑维护、复用的组件来说,是比较直观的组织方式,但是一旦遇到需要大量维护、复用状态的组件来说,这无疑增加了维护的成本和风险。
组合式API (Composition API)是一系列API的集合,使我们可以使用函数而不是声明选项的方式书写Vue组件。INFO
但
Composition API也并不是“银弹”,它也有自己适合的场景,所以Vue 3也是在实现层面做到了兼容Options API的写法。相对而言,Composition API更适用于大型的项目,因为大型项目可能会产生大量状态逻辑的维护,甚至跨组件的逻辑复用;而对于中小型项目来说,Options API可以在你写代码时减少思考组织状态逻辑的方式,也是一种不错的选择。运作机制的变化
熟悉
Vue 2源码的同学大致清楚Vue 2的核心运作机制可以抽象为下图所示的样子: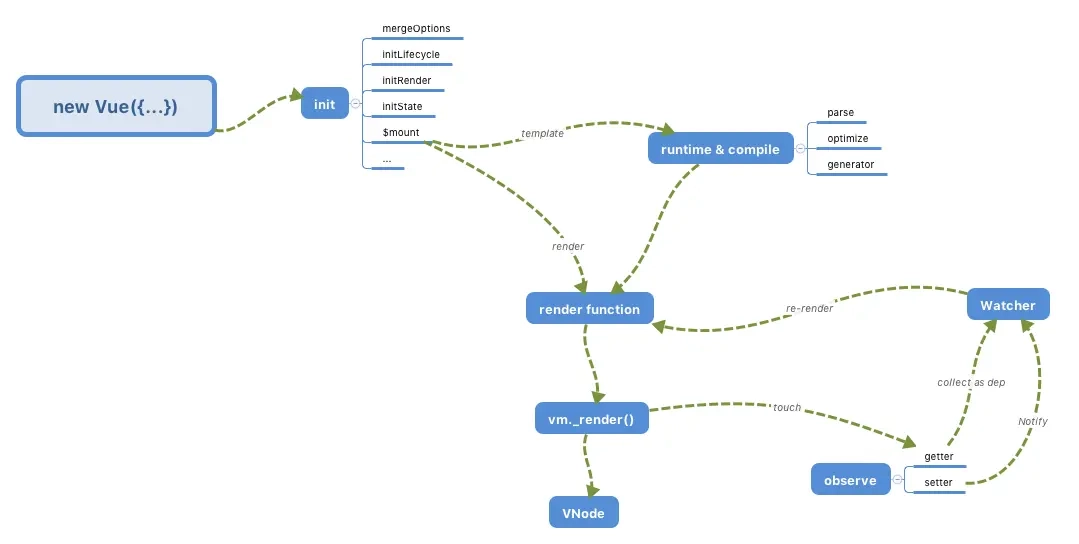
Vue 3则在底层实现中,摒弃了Vue 2的部分实现,采用全新的响应式模型进行重写:
- 首先,之前通过
new Vue()来创建 Vue 对象的方式已经变成了createApp; - 其次,在响应式部分也由原来的
Object.defineProperty改成了现在的Proxy API实现; - 另外,针对响应式依赖收集的内容,在
Vue 2.x版本中是收集了 Watcher,而到了Vue 3中则成了effect。
TIP
除了上面所说的这些变化外,
Vue 3不管是在编译时、还是在运行时都做了大量的性能优化。例如,在编译时,Vue 3通过标记 /#PURE/ 来为打包工具提供良好的Tree-Shaking机制,通过 静态提升 机制,避免了大量静态节点的重复渲染执行;在运行时,又通过批量队列更新机制优化了更新性能,通过PatchFlags和dynamicChildren进行了diff的靶向更新- 首先,之前通过
源码调试
- 克隆 Vue3 源码shell
git clone https://github.com/vuejs/core.git - 目录结构rust核心内容主要分布在 compiler-core、compiler-dom、reactivity、 runtime-core、runtime-dom 这几个包中。
├── packages │ ├── compiler-core # 与平台无关的编译器实现的核心函数包 │ ├── compiler-dom # 浏览器相关的编译器上层内容 │ ├── compiler-sfc # 单文件组件的编译器 │ ├── compiler-ssr # 服务端渲染相关的编译器实现 │ ├── global.d.ts # ts 相关一些声明文件 │ ├── reactivity # 响应式核心包 │ ├── runtime-core # 与平台无关的渲染器相关的核心包 │ ├── runtime-dom # 浏览器相关的渲染器部分 │ ├── runtime-test # 渲染器测试相关代码 │ ├── server-renderer # 服务端渲染相关的包 │ ├── sfc-playground # 单文件组件演练场 │ ├── shared # 工具库相关 │ ├── size-check # 检测代码体积相关 │ ├── template-explorer # 演示模板编译成渲染函数相关的包 │ └── vue # 包含编译时和运行时的发布包 - 启动运行shell只需要访问 packages/vue/examples/** 中的示例就可以在线调试 Vue 代码了。
npm run dev # 开启 vue dev 环境 watch
npm run serve # 启动 example 示例的服务器
渲染器:组件如何渲染成DOM
相对于传统的 jQuery 一把梭子撸到底的开发模式,组件化可以帮助我们实现 视图 和 逻辑 的复用,并且可以对每个部分进行单独的思考。对于一个大型的 Vue.js 应用,通常是由一个个组件组合而成
但是我们实际访问的页面,是由 DOM 元素构成的,而组件的 <template> 中的内容只是一个模板字符串而已。
初始化一个 Vue 3 应用
# 安装 vue cli
$ yarn global add @vue/cli

# 创建 vue3 的基础脚手架 一路回车
$ vue create vue3-demo
打开项目,可以看到 Vue.js 的入口文件 main.js 的内容如下:
import { createApp } from 'vue'
import App from './App.vue'

createApp(App).mount('#app')
这里就有一个根组件 App.vue,把 App.vue 根组件进行了一个简单的修改:
<template>
  <div class="helloWorld">
    hello world
  </div>
</template>
<script>
export default {
  setup() {
    // ...
  }
}
</script>
根组件模板编译
我们知道 .vue 类型的文件无法在 Web 端直接加载,我们通常会在 webpack 的编译阶段,通过 vue-loader 编译生成组件相关的 JavaScript 和 CSS,并把 template 部分编译转换成 render 函数添加到组件对象的属性中。
上述的 App.vue 文件内的模板其实是会被编译工具在编译时转成一个渲染函数,大致如下:
import { openBlock as _openBlock, createElementBlock as _createElementBlock } from "vue"

const _hoisted_1 = { class: "helloWorld" }

export function render(_ctx, _cache, $props, $setup, $data, $options) {
  return (_openBlock(), _createElementBlock("div", _hoisted_1, " hello world "))
}
现在我们只需要知道 <script> 中的对象内容最终会和编译后的模板内容一起,生成一个 App 对象传入 createApp 函数中:
{

  render(_ctx, _cache, $props, $setup, $data, $options) {
    // ...
  },
  setup() {
    // ...
  }
}
对象组件渲染成真实的 DOM
接着回到 main.js 的入口文件,整个初始化的过程只剩下如下部分了:
createApp(App).mount('#app')打开源码,可以看一下 createApp 的过程:
// packages/runtime-dom/src/index.ts
export const createApp = (...args) => {
  const app = ensureRenderer().createApp(...args);
  // ...
  return app;
};猜测一下,ensureRenderer().createApp(...args) 这个链式函数执行完成后肯定返回了 mount 函数,ensureRenderer 就是构造了一个带有 createApp 函数的渲染器 renderer 对象 :
// packages/runtime-dom/src/index.ts
function ensureRenderer() {
  // 如果 renderer 有值的话,那么以后都不会初始化了
  return (
    renderer ||
    (renderer = createRenderer(rendererOptions)
  )
}

// renderOptions 包含以下函数:

const renderOptions = {
  createElement,
  createText,
  setText,
  setElementText,
  patchProp,
  insert,
  remove,
}
这里返回的 renderer 对象,可以认为是一个跨平台的渲染器对象,针对不同的平台,会创建出不同的 renderer 对象,上述是创建浏览器环境的 renderer 对象,对于服务端渲染的场景,则会创建 server render 的 renderer:
// packages/runtime-dom/src/index.ts
let enabledHydration = false
function ensureHydrationRenderer() {
  renderer = enabledHydration
    ? renderer
    : createHydrationRenderer(rendererOptions)
  enabledHydration = true
  return renderer
}
再来看一下 createRenderer 返回的对象:
// packages/runtime-core/src/renderer.ts
export function createRenderer(options) {
  // ...
  // 这里不介绍 hydrate 模式
  return {
    render,
    hydrate,
    createApp: createAppAPI(render, hydrate),
  }
}可以看到,renderer 对象上包含了 createApp 和 render 方法。再来看一下 createApp 方法:
// packages/runtime-core/src/apiCreateApp.ts
function createAppAPI(render, hydrate) {
  // createApp createApp 方法接收的两个参数:根组件的对象和 prop
  return function createApp(rootComponent, rootProps = null) {
    const app = {
      // ... 省略很多不需要在这里介绍的属性
      _component: rootComponent,
      _props: rootProps,
      mount(rootContainer, isHydrate, isSVG) {
        // ...
      }
    }
    return app
  }
}
直到这里,我们才真正拨开了 Vue 3 初始化根组件的核心方法,也就是入口文件 createApp 真正执行的内容就是这里的 createAppAPI 函数中的 createApp 函数,该函数接收了 <App /> 组件作为根组件 rootComponent,返回了一个包含 mount 方法的 app 对象。
接下来再深入地看一下 mount 的内部实现:
// packages/runtime-core/src/apiCreateApp.ts
mount(rootContainer, isHydrate, isSVG) {
  if (!isMounted) {
    // ... 省略部分不重要的代码
    // 1. 创建根组件的 vnode
    const vnode = createVNode(
      rootComponent,
      rootProps
    )

    // 2. 渲染根组件
    render(vnode, rootContainer, isSVG)
    isMounted = true
  }
}
1. 创建根组件的 vnode
什么是 vnode 节点呢?其实它和 Virtual DOM 是一个意思,就是将真实的 DOM 以普通对象形式的数据结构来表达,简化了很多 DOM 中内容。
熟悉 JS DOM 编程的小伙伴都知道 JS 直接操作 DOM 往往会带来许多性能负担,所以 vnode 提供了对真实 DOM 上的一层虚拟映射,我们只需要操作这个虚拟的数据结构,那些真正费性能的活交给这些框架来操作就好了,框架会帮我们做很多性能优化的事情。这也是 vnode 带来的最大的优势之一。
其次,因为 vnode 只是一种与平台无关的数据结构而已,所以理论上我们也可以将它渲染到不同平台上从而达到跨平台渲染的目的。这个也是 weex、mpvue 等跨端渲染框架的核心基础。
上述例子中的 template 中的内容用 vnode 可以表示为:
const vnode = {
  type: 'div',
  props: {
    'class': 'helloWorld'
  },
  children: 'helloWorld'
}
说了这么多,那么根节点是如何被创建成一个 vnode 的呢?核心也就在 createVNode 函数中:
// packages/runtime-core/src/vnode.ts
function createBaseVNode(...) {
  const vnode = {
    type,
    props,
    key: props && normalizeKey(props),
    children,
    component: null,
    shapeFlag,
    patchFlag,
    dynamicProps,
    dynamicChildren: null,
    // ... 一些其他属性
  }
  // ...
  return vnode
}
function createVNode(type, props = null, children = null) {
  if (props) {
    // 如果存在 props 则需要对 props 进行一些处理,这里先省略
  }
  // ...
  // 处理 shapeFlag 类型
  const shapeFlag = isString(type)
    ? ShapeFlags.ELEMENT
    : __FEATURE_SUSPENSE__ && isSuspense(type)
    ? ShapeFlags.SUSPENSE
    : isTeleport(type)
    ? ShapeFlags.TELEPORT
    : isObject(type)
    ? ShapeFlags.STATEFUL_COMPONENT
    : isFunction(type)
    ? ShapeFlags.FUNCTIONAL_COMPONENT
    : 0

  // ...
  return createBaseVNode(
    type,
    props,
    children,
    patchFlag,
    dynamicProps,
    shapeFlag,
    isBlockNode,
    true
  )
}当进行根组件渲染的时候,createVNode 的第一个入参 type 是我们的 App 对象,也就是一个 Object,所以得到的 shapeFlag 的值是 STATEFUL_COMPONENT,代表的是一个有状态组件对象。(这里顺便提一下,如果传入的是个函数,那么就是一个函数式组件 FUNCTIONAL_COMPONENT,函数式组件和有状态的对象组件都是 Vue 可处理的组件类型,这个会在下面渲染阶段提及。)
到这里,Vue 完成了对根组件的 Vnode 对象的创建,接下来要做的就是将该组件渲染到页面中。
2. VNode 渲染成真实的组件
回到 mount 函数中,接下来一步就是对 vnode 的渲染工作,核心代码:
render(vnode, rootContainer);那么这里的 render 函数是什么呢?通过上面的代码我们发现,其实它是在调用 createAppAPI 时传入进来的,而 createAppAPI 则是在创建 renderer 渲染器的时候调用的。那么,接下来看看 render 函数的实现:
// packages/runtime-core/src/renderer.ts
const render = (vnode, container) => {
  if (vnode == null) {
    // 如果 vnode 不存在,表示需要卸载组件
    if (container._vnode) {
      unmount(container._vnode, null, null, true)
    }
  } else {
    // 否则进入更新流程(初始化创建也是特殊的一种更新)
    patch(container._vnode || null, vnode, container)
  }
  // 缓存 vnode
  container._vnode = vnode
}
很明显,对于初始化根组件的过程中,传入了一个根组件的 vnode 对象,所以这里会执行 patch 相关的动作。patch 本意是补丁的意思,可以理解成为更新做一些补丁的活儿,其实初始的过程也可以看作是一个全量补丁,一种特殊的更新操作。
// packages/runtime-core/src/renderer.ts
function patch(n1,n2,container = null,anchor = null,parentComponent = null) {
  // 对于类型不同的新老节点,直接进行卸载
  if (n1 && !isSameVNodeType(n1, n2)) {
    anchor = getNextHostNode(n1)
    unmount(n1, parentComponent, parentSuspense, true)
    n1 = null
  }
  // 基于 n2 的类型来判断
  // 因为 n2 是新的 vnode
  const { type, shapeFlag } = n2;
  switch (type) {
    case Text:
       // 处理文本节点
      break;
    // 其中还有几个类型比如: static fragment comment
    default:
      // 这里就基于 shapeFlag 来处理
      if (shapeFlag & ShapeFlags.ELEMENT) {
        // 处理普通 DOM 元素
        processElement(n1, n2, container, anchor, parentComponent);
      } else if (shapeFlag & ShapeFlags.COMPONENT) {
        // 处理 component
        processComponent(n1, n2, container, parentComponent);
      } else if {
        // ... 处理其他元素
      }
  }
}
patch 函数主要接收的参数说明如下:
n1表示老的vnode节点;n2表示新的vnode节点;container表示需要挂载的dom容器;anchor挂载的参考元素;parentComponent父组件。
这里我们主要关注前 3 个参数,因为是初始化的过程,所以 n1 本次值为空,核心看 n2 的值,n2 有一个 type 和 shapeFlag。当前 n2 的 type 是 App 组件对象,所以逻辑会进入 Switch 的 default 中。再比较 shapeFlag 属性,前面提到 shapeFlag 的值是 STATEFUL_COMPONENT。
这里需要注意的是
ShapeFlags是一个二进制左移操作符生成的对象,其中ShapeFlags.COMPONENT = ShapeFlags.STATEFUL_COMPONENT | ShapeFlags.FUNCTIONAL_COMPONENT, 所以shapeFlag & ShapeFlags.COMPONENT这里的值是true,关于二进制左移操作符对象在Vue 3中会大量使用,后面也会详细介绍。
接着也就进入了 processComponent 的逻辑了:
// packages/runtime-core/src/renderer.ts
function processComponent(n1, n2, container, parentComponent) {
  // 如果 n1 没有值的话,那么就是 mount
  if (!n1) {
    // 初始化 component
    mountComponent(n2, container, parentComponent);
  } else {
    updateComponent(n1, n2, container);
  }
}
同理,这里我们只看初始化的逻辑,所以 n1 此时还是个空值,那么就会进入 mountComponent 函数对组件进行初始挂载过程。
// packages/runtime-core/src/renderer.ts
function mountComponent(initialVNode, container, parentComponent) {
  // 1. 先创建一个 component instance
  const instance = (initialVNode.component = createComponentInstance(
    initialVNode,
    parentComponent
  ));

  // 2. 初始化 instance 上的 props, slots, 执行组件的 setup 函数...
  setupComponent(instance);

  // 3. 设置并运行带副作用的渲染函数
  setupRenderEffect(instance, initialVNode, container);
}
该函数实现过程还是非常清晰的,思考一下,一个组件的初始化要做哪些内容呢?
其实很容易想到,我们需要一个实例化的组件对象,该对象可以在 Vue 执行的运行时上下文中随时获取到,另外还需要对实例化后的组件中的属性做一些优化、处理、赋值等操作,最后,就是把组件实例的 render 函数执行一遍。
上面也是 mountComponent 核心做的事情,我们一个个来看。
第一步是组件实例化,在 Vue 3 中通过 createComponentInstance 的方法创建组件实例,返回的是一个组件实例的对象,大致包含以下属性:
// packages/runtime-core/src/component.ts
const instance = {
  // 这里是组件对象
  type: vnode.type,
  // 组件 vnode
  vnode,
  // 新的组件 vnode
  next: null,
  // props 相关
  props: {},
  // 指向父组件
  parent,
  // 依赖注入相关
  provides: parent ? parent.provides : {},
  // 渲染上下文代理
  proxy: null,
  // 标记是否被挂载
  isMounted: false,
  // attrs 相关
  attrs: {},
  // slots 相关
  slots: {},
  // context 相关
  ctx: {},
  // setup return 的状态数据
  setupState: {},
  // ...
};
上述实例属性,相对源码而言,已经省略了很多内容了,这些属性现在看着肯定不知所云,头皮发麻。但相应的属性是 vue 在特定的场景和功能下才会用到的。
然后是对实例化后的组件中的属性做一些优化、处理、赋值等操作,这里主要是初始化了 props、slots,并执行组件的 setup 函数,核心的实现和功能将在后面介绍。
// packages/runtime-core/src/component.ts
export function setupComponent(instance) {
  // 1. 处理 props
  // 取出存在 vnode 里面的 props
  const { props, children } = instance.vnode;
  initProps(instance, props);
  // 2. 处理 slots
  initSlots(instance, children);

  // 3. 调用 setup 并处理 setupResult
  setupStatefulComponent(instance);
}
最后是把组件实例的 render 函数执行一遍,这里是通过 setupRenderEffect 来执行的。我们再看一下这个函数的实现:
// packages/runtime-core/src/renderer.ts
const setupRenderEffect = (instance, initialVNode, container, anchor, parentSuspense, isSVG, optimized) => {
  function componentUpdateFn() {
    if (!instance.isMounted) {
      // 渲染子树的 vnode
      const subTree = (instance.subTree = renderComponentRoot(instance))
      // 挂载子树 vnode 到 container 中
      patch(null, subTree, container, anchor, instance, parentSuspense, isSVG)
      // 把渲染生成的子树根 DOM 节点存储到 el 属性上
      initialVNode.el = subTree.el
      instance.isMounted = true
    }
    else {
      // 更新相关,后面介绍
    }
  }
  // 创建副作用渲染函数
  instance.update = effect(componentUpdateFn, prodEffectOptions)
}
这里我们再看一下 componentUpdateFn 这个函数,核心是调用了 renderComponentRoot 来生成 subTree,然后再把 subTree 挂载到 container 中。其实 renderComponentRoot 的核心工作就是执行 instance.render 方法,该方法前面我们已经说了,组件在编译时会生成组件对象,包含了 render 函数,该函数内部是一系列的渲染函数的执行:
import { openBlock, createElementBlock } from "vue"

const _hoisted_1 = { class: "helloWorld" }

export function render(...) {
  return (openBlock(), createElementBlock("div", _hoisted_1, " hello world "))
}
那么只需要看一下 createElementBlock 函数的实现:
// packages/runtime-core/src/vnode.ts
export const createElementBlock = (...) => {
  return setupBlock(
    createBaseVNode(
      type,
      props,
      children,
      patchFlag,
      dynamicProps,
      shapeFlag,
      true /* isBlock */
    )
  )
};
可以看到本质还是调用了 createBaseVNode 创新 vnode。所以,我们可以推导出 subtree 就是调用 render 函数而生产的 vnode 节点。这里需要注意的一点是,因为 subtree 调用的 createBaseVNode 创建时,传入的 type = div 在这里是个 string,所以返回的 shapeFlags 的值是 ELEMENT。
渲染生成子树 vnode 后,接下来就是继续调用 patch 函数把子树 vnode 挂载到 container 中了,前面说过了 patch 的实现,再来简单看一下当传入的 vnode 的 shapeFlags 是个 ELEMENT 时,会调用 processElement 这个函数:
if (shapeFlag & ShapeFlags.ELEMENT) {
  processElement(n1, n2, container, anchor, parentComponent);
}
我们来看一下 processElement 的实现:
// packages/runtime-core/src/renderer.ts
function processElement(n1, n2, container, anchor, parentComponent) {
  if (!n1) {
    // 挂载元素节点
    mountElement(n2, container, anchor);
  } else {
    // 更新元素节点
    updateElement(n1, n2, container, anchor, parentComponent);
  }
}因为在初始化的过程中,n1 是 null,所以这里执行的是 mountElement 进行元素的初始化挂载。
// packages/runtime-core/src/renderer.ts
const mountElement = (vnode, container, anchor, parentComponent, parentSuspense, isSVG, optimized) => {
  let el
  const { type, props, shapeFlag, transition, patchFlag, dirs } = vnode
  // ...
  // 根据 vnode 创建 DOM 节点
  el = vnode.el = hostCreateElement(vnode.type, isSVG, props && props.is)
  if (props) {
    // 处理 props 属性
    for (const key in props) {
      if (!isReservedProp(key)) {
        hostPatchProp(el, key, null, props[key], isSVG)
      }
    }
  }
  // 文本节点处理
  if (shapeFlag & ShapeFlags.TEXT_CHILDREN) {
    hostSetElementText(el, vnode.children)
  } else if (shapeFlag & ShapeFlags.ARRAY_CHILDREN) {
    // 如果节点是个数据类型,则递归子节点
    mountChildren(vnode.children, el)
  }
  // 把创建好的 el 元素挂载到容器中
  hostInsert(el, container, anchor)
}
mountElemet 首先是通过 hostCreateElement 创建了一个 DOM 节点,然后处理一下 props 属性,接着根据 shapeFlag 判断子节点的类型,如果节点是个文本节点,则直接创建文本节点,如果子节点是个数组,比如这种情况:
return (openBlock(), createElementBlock("div", _hoisted_1, [
  hoisted_2,
  createVNode(_component_Hello)
]))
对于这种子节点是数组的情况时,它的 shapeFlag 将是一个数组类型 ARRAY_CHILDREN。此时会对该 vnode 节点的子节点调用 mountChildren 进行递归的 patch 渲染。
最后,处理完所有子节点后,通过 hostInsert 方法把缓存在内存中的 DOM el 映射渲染到真实的 DOM Container 当中。
// packages/runtime-dom/src/nodeOps.ts
insert: (child, parent, anchor) {
parent.insertBefore(child, anchor || null)
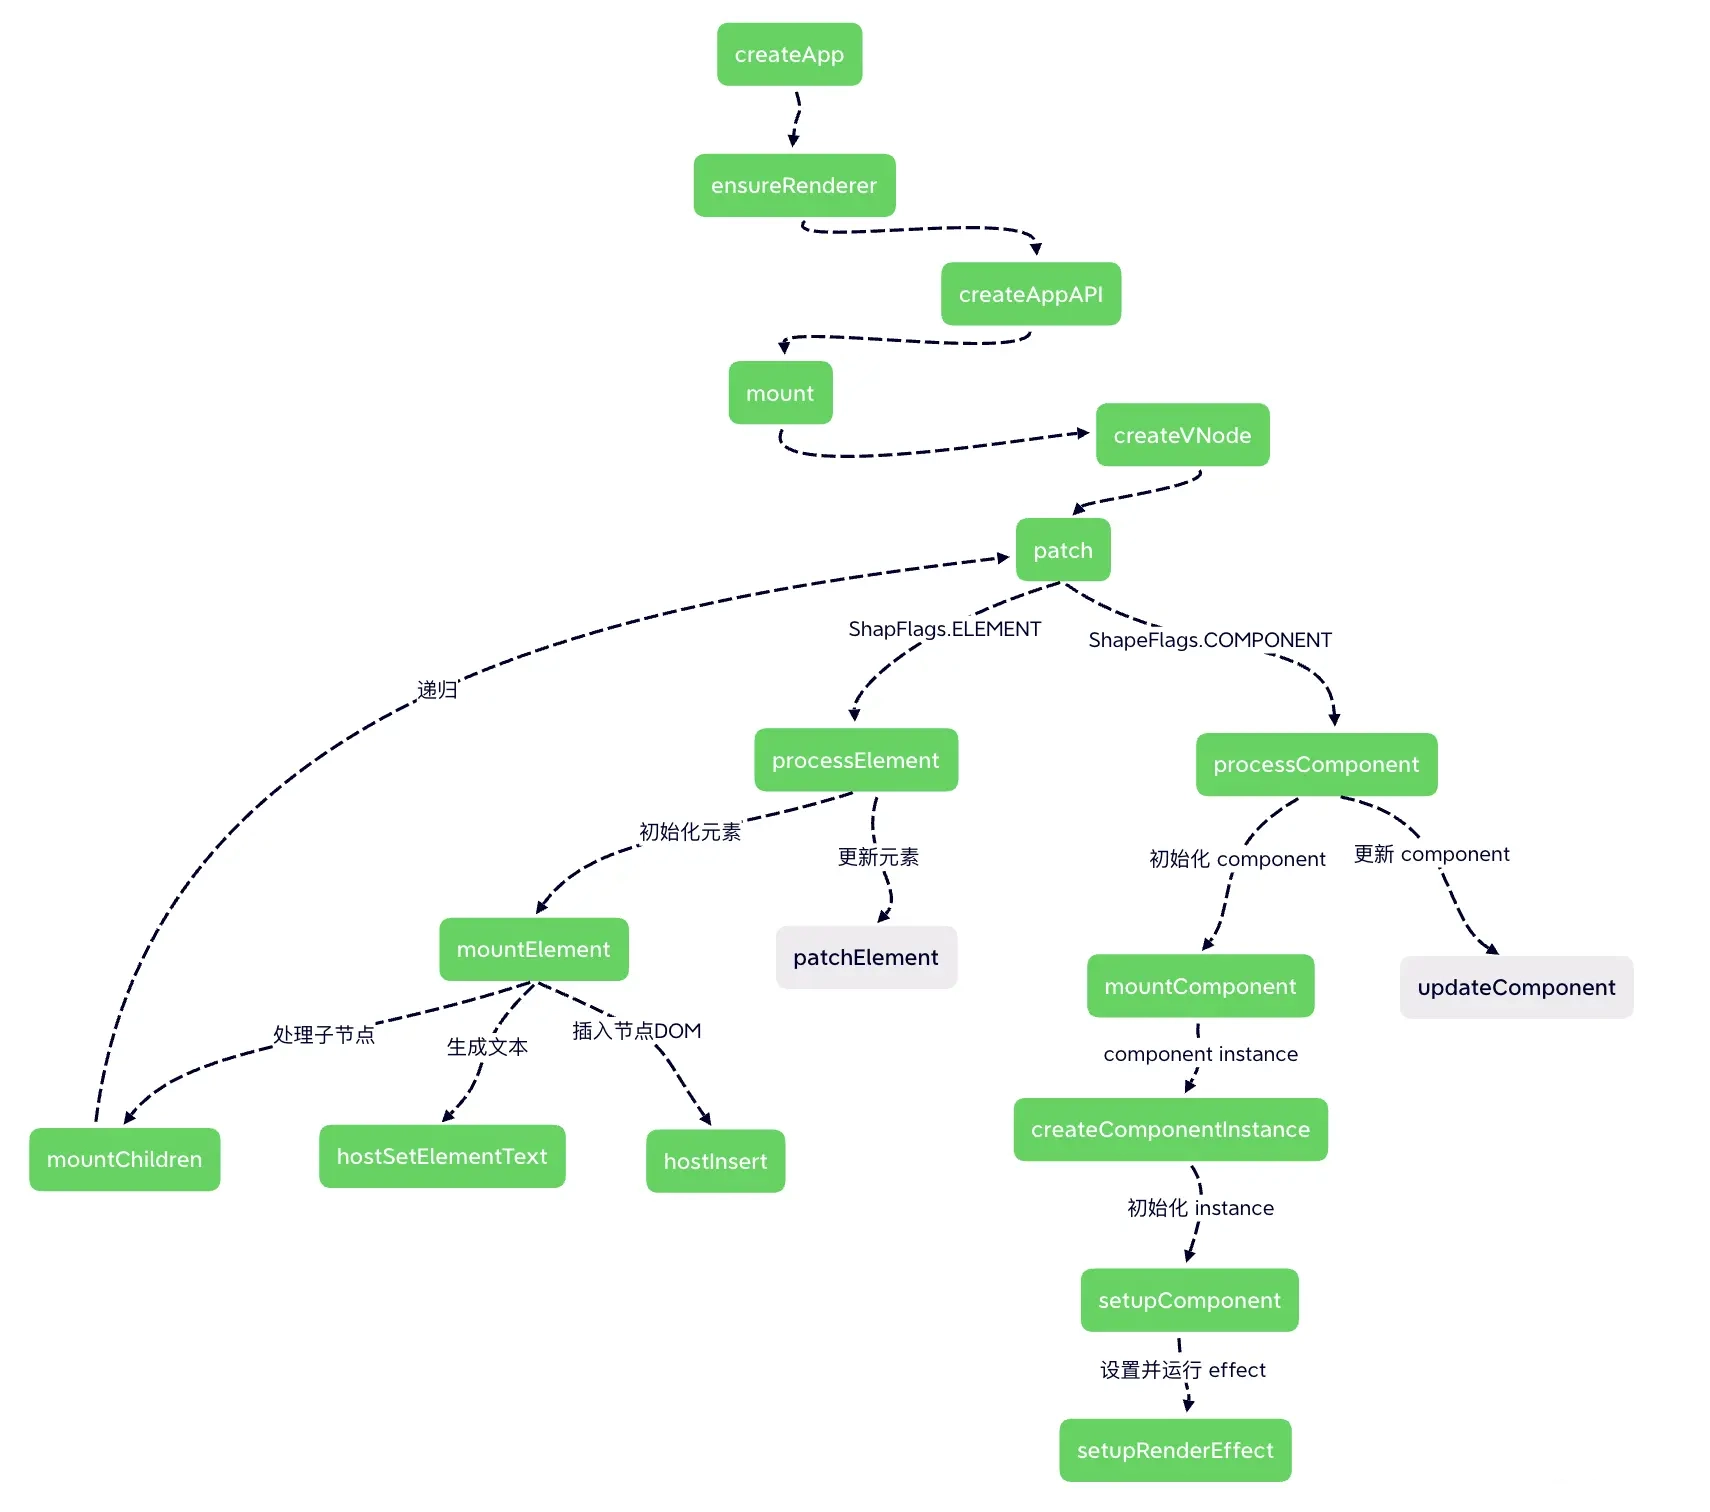
}到这里,我们已经完成了从入口文件开始,分析根组件如何挂载渲染到真实 DOM 的流程,再简单通过一张流程图回顾一下上述内容,绿色部分是初始化的过程,也是本小节的内容,灰色部分我们后面再做介绍。
然后我们再引用一下 Vue 官网上的一张渲染流程图:
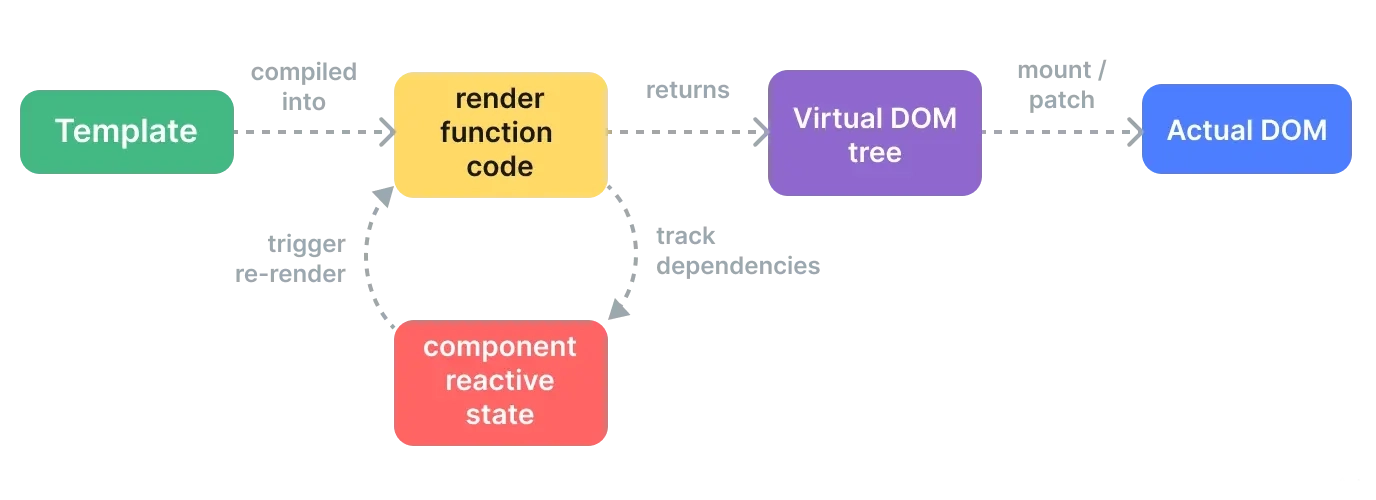
现在再来看这一张图,整体流程就会清晰了很多:在组件初始化挂载阶段,模板被编译成渲染函数的形式,交由渲染器执行,渲染器执行渲染函数得到 APP 组件对象的子树 vnode,子树 vnode 进行递归 patch 后生成不同类型的 DOM 节点,最后把这些 DOM 节点挂载到页面的 container 当中。
渲染器:数据访问如何被代理
我们先看一个有意思的示例,组件上有一个动态文本节点 ,但是却有 2 处定义了 msg 响应式数据;另外有一个按钮,点击后会修改响应式数据。
<template>
  <p>{{ msg }}</p>
  <button @click="changeMsg">点击试试</button>
</template>
<script>
  import { ref } from 'vue'
  export default {
    data() {
      return {
        msg: 'msg from data'
      }
    },
    setup() {
      const msg = ref('msg from setup')
      return {
        msg
      }
    },
    methods: {
      changeMsg() {
        this.msg = 'change'
      }
    }
  }
</script>
思考一下:
- 界面显示的内容是什么?
- 点击按钮后,修改的是哪部分的数据?是
data中定义的,还是setup中的呢?
上一节,我们知道了根组件在初始化渲染的过程中,会执行 mountComponent 的函数:
function mountComponent(initialVNode, container, parentComponent) {
  // 1. 先创建一个 component instance
  const instance = (initialVNode.component = createComponentInstance(
    initialVNode,
    parentComponent
  ));

  // 2. 初始化组件实例
  setupComponent(instance);

  // 3. 设置并运行带副作用的渲染函数
  setupRenderEffect(instance, initialVNode, container);
}
上文,我们简单介绍了关于 setupComponent 函数的作用是为了对实例化后的组件中的属性做一些优化、处理、赋值等操作。本小节我们将重点介绍 setupComponent 的内部实现和作用。
初始化组件实例
我们再来回顾一下 setupComponent 在源码中的实现:
export function setupComponent(instance, isSSR = false) {
  const { props, children } = instance.vnode

  // 判断组件是否是有状态的组件
  const isStateful = isStatefulComponent(instance)

  // 初始化 props
  initProps(instance, props, isStateful, isSSR)

  // 初始化 slots
  initSlots(instance, children)

  // 如果是有状态组件,那么去设置有状态组件实例
  const setupResult = isStateful
    ? setupStatefulComponent(instance, isSSR)
    : undefined

  return setupResult
}
setupComponent 方法做了什么?
- 通过
isStatefulComponent(instance)判断是否是有状态的组件; initProps初始化props;initSlots初始化slots;- 根据组件是否是有状态的,来决定是否需要执行
setupStatefulComponent函数。
其中, isStatefulComponent 判断是否是有状态的组件的函数如下:
function isStatefulComponent(instance) {
  return instance.vnode.shapeFlag & ShapeFlags.STATEFUL_COMPONENT
}前面我们已经说过了,ShapeFlags 在遇到组件类型的 type = Object 时,vnode 的shapeFlags = ShapeFlags.STATEFUL_COMPONENT。所以这里会执行 setupStatefulComponent 函数。
function setupStatefulComponent(instance, isSSR) {
  // 定义 Component 变量
  const Component = instance.type

  // 1. 创建渲染代理的属性访问缓存
  instance.accessCache = Object.create(null)
  // 2. 创建渲染上下文代理, proxy 对象其实是代理了 instance.ctx 对象
  instance.proxy = new Proxy(instance.ctx, PublicInstanceProxyHandlers);
  // 3. 执行 setup 函数
  const { setup } = Component
  if (setup) {
    // 如果 setup 函数带参数,则创建一个 setupContext
    const setupContext = (instance.setupContext =
      setup.length > 1 ? createSetupContext(instance) : null)
    // 执行 setup 函数,获取结果
    const setupResult = callWithErrorHandling(setup, instance, 0, [instance.props, setupContext])
    // 处理 setup 执行结果
    handleSetupResult(instance, setupResult)
  } else {
    // 4. 完成组件实例设置
    finishComponentSetup(instance, isSSR)
  }
}
setupStatefulComponent 字面意思就是设置有状态组件,那么什么是有状态组件呢?简单而言,就是对于有状态组件,Vue 内部会保留组件状态数据。相对于有状态组件而言,Vue 还存在一种函数组件 FUNCTIONAL_COMPONENT,一起看个示例:
import { ref } from 'vue';

export default () => {
  let num = ref(0);
  const plusNum = () => {
    num.value ++;
  };
  return (
    <div>
      <button onClick={plusNum}>
        { num.value }
      </button>
    </div>
  )
}
defineComponent 返回的是个对象类型的 type,所以就变成了有状态组件。
好了,搞清楚什么是有状态组件后,我们接着回到 setupStatefulComponent 实现中,来一步步地分析其核心实现的原理。
创建渲染上下文代理
首先我们看 1-2 两个步骤,关于第一点:为什么要创建渲染代理的属性访问缓存呢?这里先卖个关子,先看第二步:创建渲染上下文代理,这里为什么要对 instance.ctx 做代理呢?如果熟悉 Vue 2 的小伙伴应该了解对于 Vue 2 的 Options API 的写法如下:
<template>
  <p>{{ num }}</p>
</template>
<script>
export default {
  data() {
    num: 1
  },
  mounted() {
    this.num = 2
  }
}
</script>
Vue 2.x 是如何实现访问 this.num 获取到 num 的值,而不是通过 this._data.num 来获取 num 的值呢?其实 Vue 2.x 版本中,为 _data 设置了一层代理:
_proxy(options.data);

function _proxy (data) {
  const that = this;
  Object.keys(data).forEach(key => {
    Object.defineProperty(that, key, {
      configurable: true,
      enumerable: true,
      get: function proxyGetter () {
        return that._data[key];
      },
      set: function proxySetter (val) {
        that._data[key] = val;
      }
    })
  });
}
本质就是通过 Object.defineProperty 使在访问 this 上的某属性时从 this._data 中读取(写入)。
而 Vue 3 也在这里做了类似的事情,Vue 3 内部有很多状态属性,存储在不同的对象上,比如 setupState、ctx、data、props。这样用户取数据就会考虑具体从哪个对象中获取,这无疑增加了用户的使用负担,所以对 instance.ctx 进行代理,然后根据属性优先级关系依次完成从特定对象上获取值。
get
了解了代理的功能后,我们来具体看一下是如何实现代理功能的,也就是 proxy 的 PublicInstanceProxyHandlers 它的实现。先看一下 get 函数:
export const PublicInstanceProxyHandlers = {
  get({ _: instance }, key) {
    const { ctx, setupState, data, props, accessCache, type, appContext } = instance
    let normalizedProps
    if (key[0] !== '$') {
      // 从缓存中获取当前 key 存在于哪个属性中
      const n = accessCache![key]
      if (n !== undefined) {
        switch (n) {
          case AccessTypes.SETUP:
            return setupState[key]
          case AccessTypes.DATA:
            return data[key]
          case AccessTypes.CONTEXT:
            return ctx[key]
          case AccessTypes.PROPS:
            return props![key]
        }
      } else if (setupState !== EMPTY_OBJ && hasOwn(setupState, key)) {
        // 从 setupState 中取
        accessCache![key] = AccessTypes.SETUP
        return setupState[key]
      } else if (data !== EMPTY_OBJ && hasOwn(data, key)) {
        // 从 data 中取
        accessCache![key] = AccessTypes.DATA
        return data[key]
      } else if (
        (normalizedProps = instance.propsOptions[0]) &&
        hasOwn(normalizedProps, key)
      ) {
        // 从 props 中取
        accessCache![key] = AccessTypes.PROPS
        return props![key]
      } else if (ctx !== EMPTY_OBJ && hasOwn(ctx, key)) {
        // 从 ctx 中取
        accessCache![key] = AccessTypes.CONTEXT
        return ctx[key]
      } else if (!__FEATURE_OPTIONS_API__ || shouldCacheAccess) {
        // 都取不到
        accessCache![key] = AccessTypes.OTHER
      }
    }

    const publicGetter = publicPropertiesMap[key]
    let cssModule, globalProperties
    if (publicGetter) {
      // 以 $ 保留字开头的相关函数和方法
      // ...
    } else if (
      // css module
    (cssModule = type.__cssModules) && (cssModule = cssModule[key])
    ) {
      // ...
    } else if (ctx !== EMPTY_OBJ && hasOwn(ctx, key)) {
      // ...
    } else if (
      // 全局属性
      ((globalProperties = appContext.config.globalProperties),
      hasOwn(globalProperties, key))
    ) {
      // ...
    } else if (__DEV__) {
      // 一些告警
      // ...
    }
  }
}
这里,可以回答我们的第一步 创建渲染代理的属性访问缓存 这个步骤的问题了。如果我们知道 key 存在于哪个对象上,那么就可以直接通过对象取值的操作获取属性上的值了。如果我们不知道用户访问的 key 存在于哪个属性上,那只能通过 hasOwn 的方法先判断存在于哪个属性上,再通过对象取值的操作获取属性值,这无疑是多操作了一步,而且这个判断是比较耗费性能的。如果遇到大量渲染取值的操作,那么这块就是个性能瓶颈,所以这里用了 accessCache 来标记缓存 key 存在于哪个属性上。这其实也相当于用一部分空间换时间的优化。
接下来,函数首先判断 key[0] !== '$' 的情况($ 开头的一般是 Vue 组件实例上的内置属性),在 Vue 3 源码中,会依次从 setupState、data、props、ctx 这几类数据中取状态值。
这里的定义顺序,决定了后续取值的优先级顺序:setupState > data > props > ctx。
如果 key 是以 $ 开头,则首先会判断是否是存在于组件实例上的内置属性:
整体的获取顺序依次是:publicGetter > cssModule > ctx。最后,如果都取不到,那么在开发环境就会给一些告警提示。
set
接着继续看一下设置对象属性的代理函数:
export const PublicInstanceProxyHandlers = {
  set({ _: instance }, key, value) {
    const { data, setupState, ctx } = instance
    if (setupState !== EMPTY_OBJ && hasOwn(setupState, key)) {
      // 设置 setupState
      setupState[key] = value
      return true
    } else if (data !== EMPTY_OBJ && hasOwn(data, key)) {
      // 设置 data
      data[key] = value
      return true
    } else if (hasOwn(instance.props, key)) {
      // 不能给 props 赋值
      return false
    }
    if (key[0] === '$' && key.slice(1) in instance) {
      // 不能给组件实例上的内置属性赋值
      return false
    } else {
      // 用户自定义数据赋值
      ctx[key] = value
    }
    return true
  }
}
可以看到这里也是和前面 get 函数类似的通过调用顺序来实现对 set 函数不同属性设置优先级的,可以直观地看到优先级关系为:setupState > data > props。同时这里也有说明:就是如果直接对 props 或者组件实例上的内置属性赋值,则会告警。
has
最后,再看一个 proxy 属性 has 的实现:
export const PublicInstanceProxyHandlers = {
  has({_: { data, setupState, accessCache, ctx, appContext, propsOptions }}, key) {
    let normalizedProps
    return (
      !!accessCache![key] ||
      (data !== EMPTY_OBJ && hasOwn(data, key)) ||
      (setupState !== EMPTY_OBJ && hasOwn(setupState, key)) ||
      ((normalizedProps = propsOptions[0]) && hasOwn(normalizedProps, key)) ||
      hasOwn(ctx, key) ||
      hasOwn(publicPropertiesMap, key) ||
      hasOwn(appContext.config.globalProperties, key)
    )
  },
}
这个函数则是依次判断 key 是否存在于 accessCache > data > setupState > prop > ctx > publicPropertiesMap > globalProperties,然后返回结果。
has 在业务代码的使用定义如下:
export default {
  created () {
    // 这里会触发 has 函数
    console.log('msg' in this)
  }
}
至此,我们就搞清楚了创建上下文代理的过程。
调用执行 setup 函数
一个简单的包含 CompositionAPI 的 Vue 3 demo 如下
<template>
  <p>{{ msg }}</p>
</template>
<script>
  export default {
    props: {
      msg: String
    },
    setup (props, setupContext) {
      // todo
    }
  }
</script>
这里的 setup 函数,正是在这里被调用执行的:
// 获取 setup 函数
const { setup } = Component
// 存在 setup 函数
if (setup) {
  // 根据 setup 函数的入参长度,判断是否需要创建 setupContext 对象
  const setupContext = (instance.setupContext =
    setup.length > 1 ? createSetupContext(instance) : null)
  // 调用 setup
  const setupResult = callWithErrorHandling(setup, instance, 0, [instance.props, setupContext])
  // 处理 setup 执行结果
  handleSetupResult(instance, setupResult)
}
createSetupContext
因为 setupContext 是 setup 中的第二个参数,所以会判断 setup 函数参数的长度,如果大于 1,则会通过 createSetupContext 函数创建 setupContext 上下文。
该上下文创建如下:
function createSetupContext (instance) {
  return {
    get attrs() {
      return attrs || (attrs = createAttrsProxy(instance))
    },
    slots: instance.slots,
    emit: instance.emit,
    expose
  }
}可以看到,setupContext 中包含了 attrs、slots、emit、expose 这些属性。这些属性分别代表着:组件的属性、插槽、派发事件的方法 emit、以及所有想从当前组件实例导出的内容 expose。
这里有个小的知识点,就是可以通过函数的 length 属性来判断函数参数的个数(拥有默认值的参数的前面的参数的个数)
function foo() {};

foo.length // 0

function bar(a) {};

bar.length // 1

function bar(a = "123") {};

bar.length // 0
callWithErrorHandling
第二步,通过 callWithErrorHandling 函数来间接执行 setup 函数,其实就是执行了以下代码:
const setupResult = setup && setup(shallowReadonly(instance.props), setupContext);只不过增加了对执行过程中 handleError 的捕获。
在后续的阅读中,你会发现 Vue 3 很多函数的调用都是通过 callWithErrorHandling 来包裹的:
export function callWithErrorHandling(fn, instance, type, args = []) {
  let res
  try {
    res = args ? fn(...args) : fn()
  } catch (err) {
    handleError(err, instance, type)
  }
  return res
}
这样的好处一方面可以由 Vue 内部统一 try...catch 处理用户代码运行可能出现的错误。另一方面这些错误也可以交由用户统一注册的 errorHandler 进行处理,比如上报给监控系统。
handleSetupResult
最后执行 handleSetupResult 函数:
function handleSetupResult(instance, setupResult) {
  if (isFunction(setupResult)) {
    // setup 返回渲染函数
    instance.render = setupResult
  }
  else if (isObject(setupResult)) {
    // proxyRefs 的作用就是把 setupResult 对象做一层代理
    instance.setupState = proxyRefs(setupResult);
  }
  finishComponentSetup(instance)
}
setup 返回值不一样的话,会有不同的处理,如果 setupResult 是个函数,那么会把该函数绑定到 render 上。比如:
<script>
  import { createVnode } from 'vue'
  export default {
    props: {
      msg: String
    },
    setup (props, { emit }) {
      return (ctx) => {
        return [
          createVnode('p', null, ctx.msg)
        ]
      }
    }
  }
</script>
当 setupResult 是一个对象的时候,我们为 setupResult 对象通过 proxyRefs 作了一层代理,方便用户直接访问 ref 类型的值。比如,在模板中访问 setupResult 中的数据,就可以省略 .value 的取值,而由代理来默认取 .value 的值。
注意,这里
instance.setupState = proxyRefs(setupResult); 之前的 Vue 源码的写法是instance.setupState = reactive(setupResult); ,至于为什么改成上面的,Vue 作者也有相关说明:Template auto ref unwrapping for setup() return object is now applied only to the root level refs.
完成组件实例设置
最后,到了 finishComponentSetup 这个函数了:
function finishComponentSetup(instance) {
  // type 是个组件对象
  const Component = instance.type;

  if (!instance.render) {
    // 如果组件没有 render 函数,那么就需要把 template 编译成 render 函数
    if (compile && !Component.render) {
      if (Component.template) {
        // 这里就是 runtime 模块和 compile 模块结合点
        // 运行时编译
        Component.render = compile(Component.template, {
        isCustomElement: instance.appContext.config.isCustomElement || NO
      })
      }
    }

    instance.render = Component.render;
  }
  if (__FEATURE_OPTIONS_API__ && !(__COMPAT__ && skipOptions)) {
    // 兼容选项式组件的调用逻辑
  }
}
这里主要做的就是根据 instance 上有没有 render 函数来判断是否需要进行运行时渲染,运行时渲染指的是在浏览器运行的过程中,动态编译 <template> 标签内的内容,产出渲染函数。对于编译时渲染,则是有渲染函数的,因为模板中的内容会被 webpack 中 vue-loader 这样的插件进行编译。
另外需要注意的,这里有个 __FEATURE_OPTIONS_API__ 变量用来标记是否是兼容 选项式 API 调用,如果我们只使用 Composition Api 那么就可以通过 webpack 静态变量注入的方式关闭此特性。然后交由 Tree-Shacking 删除无用的代码,从而减少引用代码包的体积。
回答上面《思考一下》的答案
- 初始化渲染的时候,会从实例上获取状态
msg的值,获取的优先级是:setupState>data>props>ctx。setupState就是setup函数执行后返回的状态值,所以这里渲染的是:msg from setup。 - 点击按钮的时候,会更新实例上的状态,更新的优先级是:
setupState>data。所以会更新setup中的状态数据msg。
渲染器:组件是如何完成更新
接下来,我们将介绍组件的更新逻辑,这部分逻辑主要包含在 setupRenderEffect 这个函数中。
const setupRenderEffect = (instance, initialVNode, container, anchor, parentSuspense, isSVG, optimized) => {
  function componentUpdateFn() {
    if (!instance.isMounted) {
      // 初始化组件
    }
    else {
      // 更新组件
    }
  }
  // 创建响应式的副作用渲染函数
  instance.update = effect(componentUpdateFn, prodEffectOptions)
}
在前面的小节中,我们说完了关于 mounted 的流程。接下来我们将着重来看一下组件更新的逻辑:
const setupRenderEffect = (instance, initialVNode, container, anchor, parentSuspense, isSVG, optimized) => {
  function componentUpdateFn() {
    if (!instance.isMounted) {
      // 初始化组件
    }
    else {
      // 更新组件
      let { next, vnode } = instance
      // 如果有 next 的话说明需要更新组件的数组(props, slot 等)
      if (next) {
        next.el = vnode.el
        // 更新组件实例信息
        updateComponentPreRender(instance, next, optimized)
      } else {
        next = vnode
      }
      // 获取新的子树 vnode
      const nextTree = renderComponentRoot(instance)
      // 获取旧的子树 vnode
      const prevTree = instance.subTree
      // 更新子树 vnode
      instance.subTree = nextTree
      // patch 新老子树的 vnode
      patch(
        prevTree,
        nextTree,
        // 处理 teleport 相关
        hostParentNode(prevTree.el),
        // 处理 fragment 相关
        getNextHostNode(prevTree),
        instance,
        parentSuspense,
        isSVG)
      // 缓存更新后的 DOM 节点
      next.el = nextTree.el
    }
  }
  // 创建响应式的副作用渲染函数
  instance.update = effect(componentUpdateFn, prodEffectOptions)
}
这里的核心流程是通过 next 来判断当前是否需要更新 vnode 的节点信息,然后渲染出新的子树 nextTree,再进行比对新旧子树并找出需要更新的点,进行 DOM 更新。我们先来看一下 patch 的更新流程:
function patch(n1, n2, container = null, anchor = null, parentComponent = null) {
  // 对于类型不同的新老节点,直接进行卸载
  if (n1 && !isSameVNodeType(n1, n2)) {
    anchor = getNextHostNode(n1)
    unmount(n1, parentComponent, parentSuspense, true)
    n1 = null
  }
  // 基于 n2 的类型来判断
  // 因为 n2 是新的 vnode
  const { type, shapeFlag } = n2;
  switch (type) {
    case Text:
      processText(n1, n2, container);
      break;
    // 其中还有几个类型比如: static fragment comment
    case Fragment:
      processFragment(n1, n2, container);
      break;
    default:
      // 这里就基于 shapeFlag 来处理
      if (shapeFlag & ShapeFlags.ELEMENT) {
        processElement(n1, n2, container, anchor, parentComponent);
      } else if (shapeFlag & ShapeFlags.STATEFUL_COMPONENT) {
        processComponent(n1, n2, container, parentComponent);
      }
  }
}
首先判断当 n1 存在,即存在老节点,但新节点和老节点不是同类型的节点情况,那么执行销毁老节点,新增新节点。那么 Vue 如何判断是否是不同类型的节点呢?答案就在 isSameVNodeType 函数中:
export function isSameVNodeType(n1, n2) {
  // 新老节点的 type 和 key 都相同
  return n1.type === n2.type && n1.key === n2.key
}
这里比如从 div 变成了 p 标签,那么 isSameVNodeType 就会是个 false。
如果当新老节点是同类型的节点,则会根据 shapeFlag 不同走到不同的逻辑,如果是普通元素更新,那么就会走到 processElement 的逻辑中;如果是组件更新,则会走到 processComponent 中。
接下来分别看看这两种更新机制有什么不同。
processElement
这里我们也着重看一下 processElement 的更新流程:
const processElement = (n1, n2, container, anchor, parentComponent, parentSuspense, isSVG, optimized) => {
  isSVG = isSVG || n2.type === 'svg'
  if (n1 == null) {
    // 初始化的过程
  }
  else {
    // 更新的过程
    patchElement(n1, n2, parentComponent, parentSuspense, isSVG, optimized)
  }
}
processElement 更新逻辑调用 patchElement 函数:
const patchElement = (n1, n2, parentComponent, parentSuspense, isSVG, optimized) => {
  const el = (n2.el = n1.el)
  let { patchFlag, dynamicChildren, dirs } = n2
  // ...
  // 旧节点的 props
  const oldProps = (n1 && n1.props) || EMPTY_OBJ
  // 新节点的 props
  const newProps = n2.props || EMPTY_OBJ
  // 对比 props 并更新
  patchProps(el, n2, oldProps, newProps, parentComponent, parentSuspense, isSVG)
  // 先省略 dynamicChildren 的逻辑,后续介绍...
  // 全量比对子节点更新
  patchChildren(n1, n2, el, null, parentComponent, parentSuspense, areChildrenSVG)
}
可以看到普通元素的更新主要做的就是先更新 props ,当 props 更新完成后,然后再统一更新子节点。关于如何进行 patchProps 做节点的属性更新不是本小节的重点,这里先跳过。
这里省略了对
dynamicChildren存在时,执行patchBlockChildren的优化diff过程,我们直接先看全量diff也就是patchChildren函数。关于patchBlockChildren我们将在编译过程中的优化小节中进行详细介绍
接着来看 patchChildren 更新子节点的函数:
const patchChildren = (n1, n2, container, anchor, parentComponent, parentSuspense, isSVG, optimized = false) => {
  // c1 代表旧节点的子节点元素
  const c1 = n1 && n1.children
  const prevShapeFlag = n1 ? n1.shapeFlag : 0
  // c2 代表新节点的子节点元素
  const c2 = n2.children
  const { patchFlag, shapeFlag } = n2
  // 新节点是文本
  if (shapeFlag & ShapeFlags.TEXT_CHILDREN) {
    // 旧节点是数组
    if (prevShapeFlag & ARRAY_CHILDREN) {
      // 卸载旧节点
      unmountChildren(c1, parentComponent, parentSuspense)
    }
    if (c2 !== c1) {
      // 新旧节点都是文本,但内容不一样,则替换
      hostSetElementText(container, c2)
    }
  } else {
    // 新节点不为文本
    // 旧节点是数组
    if (prevShapeFlag & ARRAY_CHILDREN) {
      // 新节点也是数组
      if (shapeFlag & ARRAY_CHILDREN) {
        // 进行新旧节点的 diff
        patchKeyedChildren(c1, c2, container, anchor, parentComponent, parentSuspense, isSVG, optimized)
      } else {
        // 卸载旧节点
        unmountChildren(c1, parentComponent, parentSuspense, true)
      }
    } else {
      // 新节点不为文本
      // 旧节点不是数组
      // 旧节点是文本
      if (prevShapeFlag & TEXT_CHILDREN) {
        // 则把它清空
        hostSetElementText(container, '')
      }
      // 新节点是数组
      if (shapeFlag & ARRAY_CHILDREN) {
        // 挂载新节点
        mountChildren(c2, container, anchor, parentComponent, parentSuspense, isSVG, optimized)
      }
    }
  }
}
对于子节点来说,节点类型只会有三种可能,分别是:文本节点、数组节点、空节点。所以这个方法里所有的 if else 分支就是在考虑新旧节点可能的全部情况,并进行相应的处理。这里流程分支有点多,画个图大家就明白在做啥了:
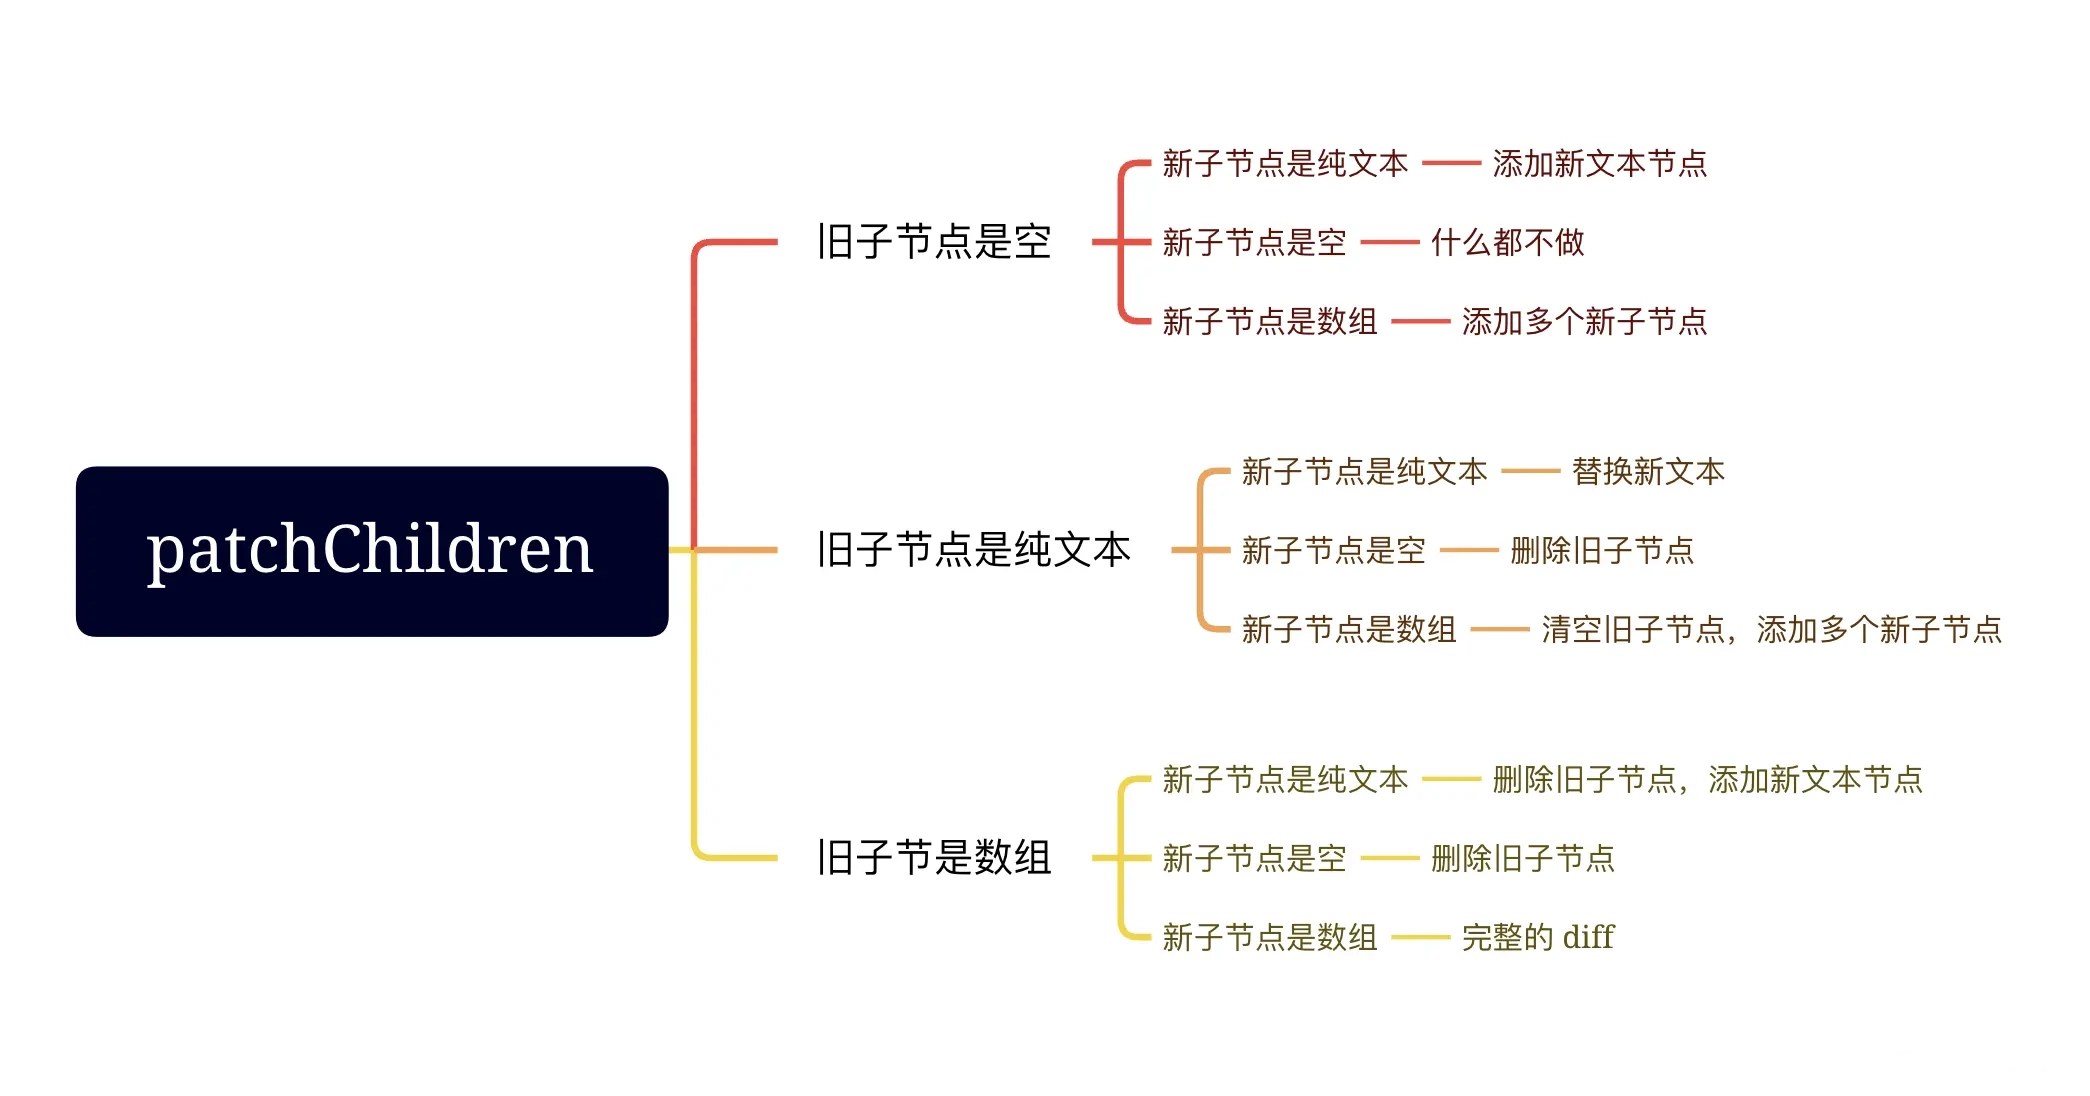
其中新旧节点都是数组的情况涉及到我们平常所说的 diff 算法,会放到后面专门去解析。
看完处理DOM元素的情况,接下来看处理vue组件。
processComponent
const processComponent = (n1, n2, container, anchor, parentComponent, parentSuspense, isSVG, optimized) => {
  if (n1 == null) {
    // 初始化的过程
  }
  else {
    // 更新的过程
    updateComponent(n1, n2, parentComponent, optimized)
  }
}
processComponent 更新逻辑调用 updateComponent 函数:
const updateComponent = (n1, n2, optimized) => {
  const instance = (n2.component = n1.component)!
   // 根据新老节点判断是否需要更新子组件
  if (shouldUpdateComponent(n1, n2, optimized)) {
    //...
    // 如果需要更新,则将新节点 vnode 赋值给 next
    instance.next = n2
    // 执行前面定义在 instance 上的 update 函数。
    instance.update()
  } else {
    // 如果不需要更新,则将就节点的内容更新到新节点上即可
    n2.el = n1.el
    instance.vnode = n2
  }
}
updateComponent 函数首先通过 shouldUpdateComponent 函数来判断当前是否需要更新。 因为有些 VNode 值的变化并不需要立即显示更新子组件,举个例子:
<template>
   <div>{{msg}}</div>
   <Child />
</template>
<script setup>
import { ref } from 'vue'

const msg = ref('hello')
</script>
因为子组件不依赖父组件的状态数据,所以子组件是不需要更新的。这也从侧面反映出 Vue 的更新不仅是组件层面的细粒度更新,更在源码层面帮我们处理了一些不必要的子节点更新!
最后执行的 instance.update,这个函数其实就是在 setupRenderEffect 内创建的。最终子组件的更新还会走一遍自己副作用函数的渲染,然后 patch 子组件的子模板 DOM,接上上面的流程。
回过头来再看这里我们多次出现了 next 变量。为了更好地理解整体的流程,我们再来看一个 demo:
<template>
  <div>
    hello world
    <hello :msg="msg" />
    <button @click="changeMsg">修改 msg</button>
  </div>
</template>
<script>
import { ref } from 'vue'
export default {
  setup () {
    const msg = ref('你好')
    function changeMsg() {
      msg.value = '你好啊,我变了'
    }
    return {
      msg,
      changeMsg
    }
  }
}
</script>

// hello.vue
<template>
  <div>
    {{msg}}
  </div>
</template>
<script>
export default {
  props: {
    msg: String
  }
}
</script>
这里有个 App.vue 组件,内部有一个 hello 组件,我们来从头再捋一下整体的流程,就清楚了 next 的作用。
- 当点击 修改
msg后,App组件自身的数据变化,导致App组件进入update逻辑,此时是没有next的,接下来渲染新的子组件vnode,得到真实的模板vnodenextTree,用新旧subTree进行patch。 - 此时
patch的元素类型是div,进入更新普通元素的流程,先更新props,再更新子节点,当前div下的子节点有Hello组件时,进入组件的的更新流程。 - 在更新
Hello组件时,根据updateComponent函数执行的逻辑,会先将Hello组件instance.next赋值为最新的子组件vnode,之后再主动调用instance.update进入上面的副作用渲染函数,这次的实例是Hello组件自身的渲染,且next存在值。
当 next 存在时,会执行 updateComponentPreRender 函数:
const updateComponentPreRender = (instance, nextVNode, optimized) => {
  // 新节点 vnode.component 赋值为 instance
  nextVNode.component = instance
  // 获取老节点的 props
  const prevProps = instance.vnode.props
  // 为 instance.vnode 赋值为新的组件 vnode
  instance.vnode = nextVNode
  instance.next = null
  // 更新 props
  updateProps(instance, nextVNode.props, prevProps, optimized)
  // 更新 slots
  updateSlots(instance, nextVNode.children)
}
updateComponentPreRender 函数核心功能就是完成了对实例上的属性、vnode 信息、slots 进行更新,当后续组件渲染的时候,得到的就是最新的值。
总而言之,next 就是用来标记接下来需要渲染的子组件,如果 next 存在,则会进行子组件实例相关内容属性的更新操作,再进行子组件的更新流程。
补齐一下流程图:

渲染器:数组子节点的 DIFF 算法
1. 从头比对
Vue 3 的 diff 算法第一步就是进行新老节点从头比对的方式来判断是否是同类型的节点:
const patchKeyedChildren = (c1, c2, container, parentAnchor, parentComponent, parentSuspense, isSVG, optimized) => {
  let i = 0
  const l2 = c2.length
  // 旧节点的尾部标记位
  let e1 = c1.length - 1
  // 新节点的尾部标记位
  let e2 = l2 - 1
  // 从头部开始比对
  // (a b) c
  // (a b) d e
  while (i <= e1 && i <= e2) {
    const n1 = c1[i]
    const n2 = (c2[i] = optimized
      ? cloneIfMounted(c2[i] as VNode)
      : normalizeVNode(c2[i]))
    // 如果是 sameVnode 则递归执行 patch
    if (isSameVNodeType(n1, n2)) {
      patch(n1, n2, container, parentAnchor, parentComponent, parentSuspense, isSVG, optimized)
    } else {
      break
    }
    i++
  }
}
这里有几个变量需要说明一下:
i代表的是头部的标记位;e1代表的是旧的子节点的尾部标记位;e2代表的是新的子节点的尾部标记位。
从头比对就是通过不断移动 i 这个头部标记位来判断对应的节点是否是 sameVnode。如果是,则进行递归 patch 操作,递归 patch 就是继续进入到我们上一小节的内容。如果不满足条件,则退出头部比对,进入从尾比对流程。
2. 从尾比对
const patchKeyedChildren = (c1, c2, container, parentAnchor, parentComponent, parentSuspense, isSVG, optimized) => {
  let i = 0
  const l2 = c2.length
  // 旧节点的尾部标记位
  let e1 = c1.length - 1
  // 新节点的尾部标记位
  let e2 = l2 - 1
  // 从头部开始比对
  // ...
  // 从尾部开始比对
  // a (b c)
  // d e (b c)
  while (i <= e1 && i <= e2) {
    const n1 = c1[e1]
    const n2 = (c2[i] = optimized
      ? cloneIfMounted(c2[i] as VNode)
      : normalizeVNode(c2[i]))
    // 如果是 sameVnode 则递归执行 patch
    if (isSameVNodeType(n1, n2)) {
      patch(n1, n2, container, parentAnchor, parentComponent, parentSuspense, isSVG, optimized)
    } else {
      break
    }
    e1--
    e2--
  }
}
从尾比对就是通过不断移动新旧节点 e1 和 e2 的尾部指针来判断对应的节点是否是 sameVnode。如果是则进行递归 patch 操作,递归 patch 也是继续进入到我们上一小节的内容。如果不满足条件,则退出头部比对,进入后续流程。
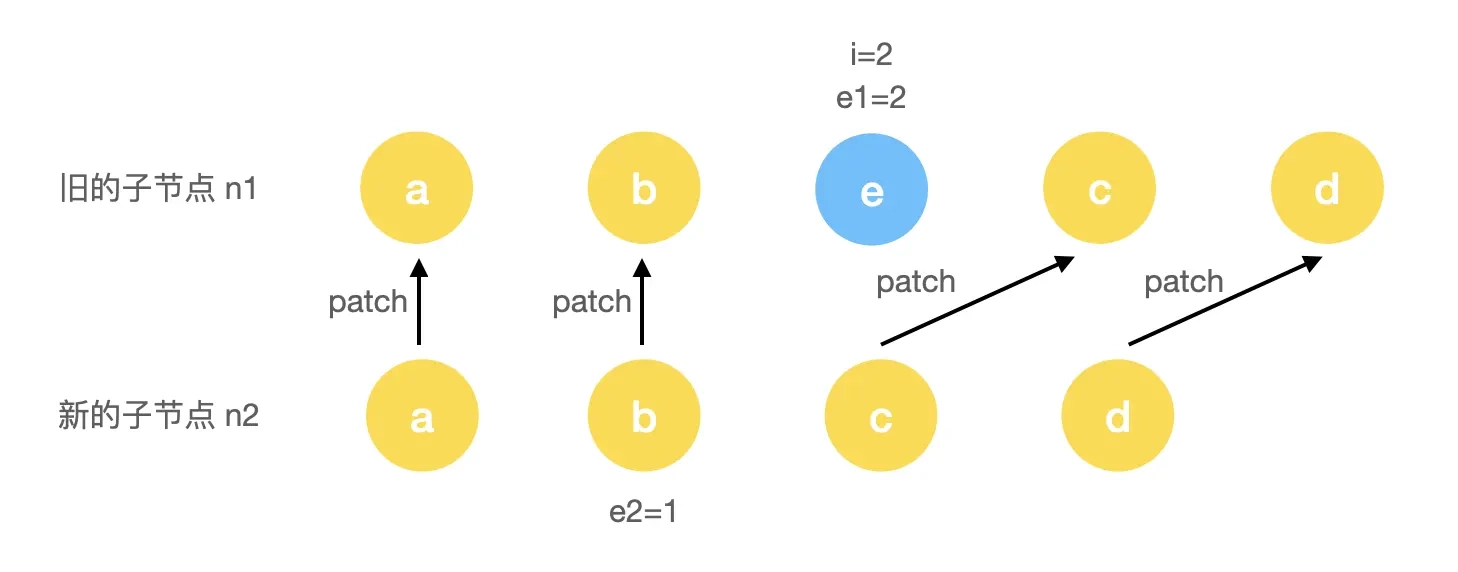
3. 新增节点
假设我们有这样一个旧列表:
<ul>
  <li key="a">a</li>
  <li key="b">b</li>
  <li key="c">c</li>
  <li key="d">d</li>
</ul>
新列表的变更是在中间插入了一个新节点:
<ul>
  <li key="a">a</li>
  <li key="b">b</li>
  <li key="b">e</li>
  <li key="c">c</li>
  <li key="d">d</li>
</ul>
那么先进入第一步头部比对流程:
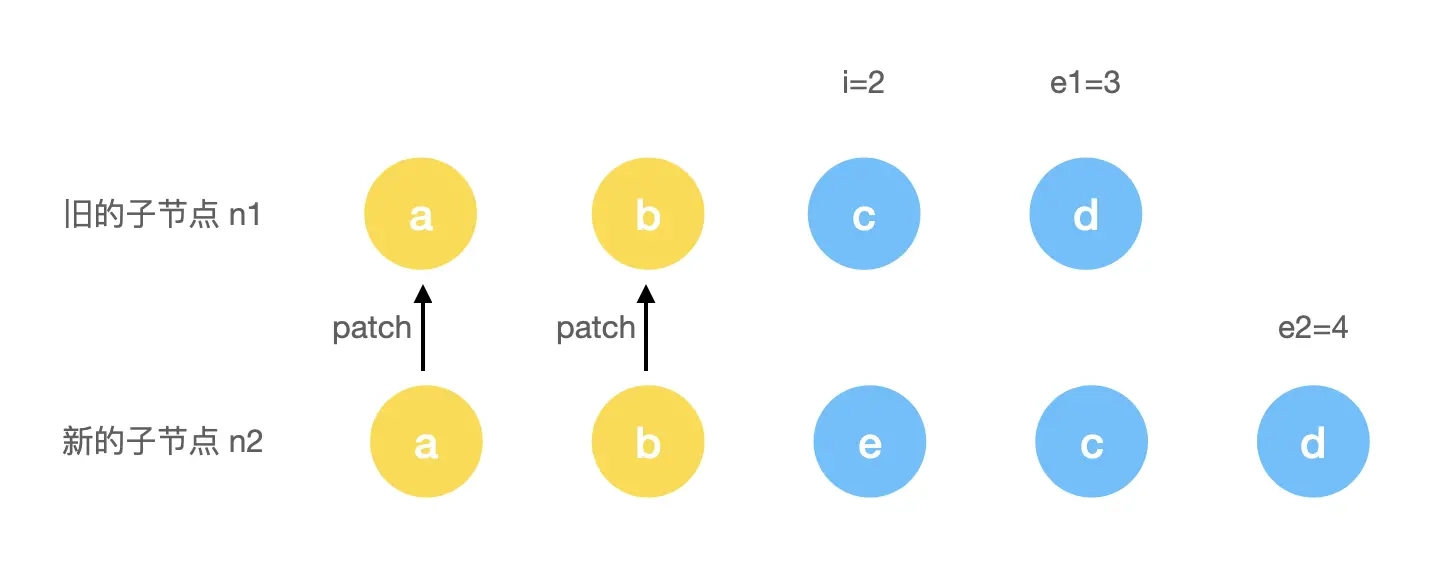
第一步执行时,会完成对 a 和 b 头部这 2 个节点进行 patch。当 i = 2 时,由于此时的 c 和 e 节点的 key 不一样,所以退出了头部比对流程,进入尾部比对:
第二步执行时,会完成对 c 和 d 尾部这 2 个节点进行 patch。当 e1 = 1 时,由于i > e1,所以退出了尾部比对流程。肉眼可见,此时的情况是新节点多了个 e 节点的情况,所以我们需要添加多余的剩余节点:
const patchKeyedChildren = (c1, c2, container, parentAnchor, parentComponent, parentSuspense, isSVG, optimized) => {
  let i = 0
  const l2 = c2.length
  // 旧节点的尾部标记位
  let e1 = c1.length - 1
  // 新节点的尾部标记位
  let e2 = l2 - 1
  // 从头部开始必须
  // ...
  // 从尾部开始比对
  // ...
  // 如果有多余的新节点,则执行新增逻辑
  if (i > e1) {
    if (i <= e2) {
      const nextPos = e2 + 1
      const anchor = nextPos < l2 ? c2[nextPos].el : parentAnchor
      while (i <= e2) {
        // 新增新节点
        patch(null, c2[i], container, anchor, parentComponent, parentSuspense, isSVG)
        i++
      }
    }
  }
}
4. 删除节点
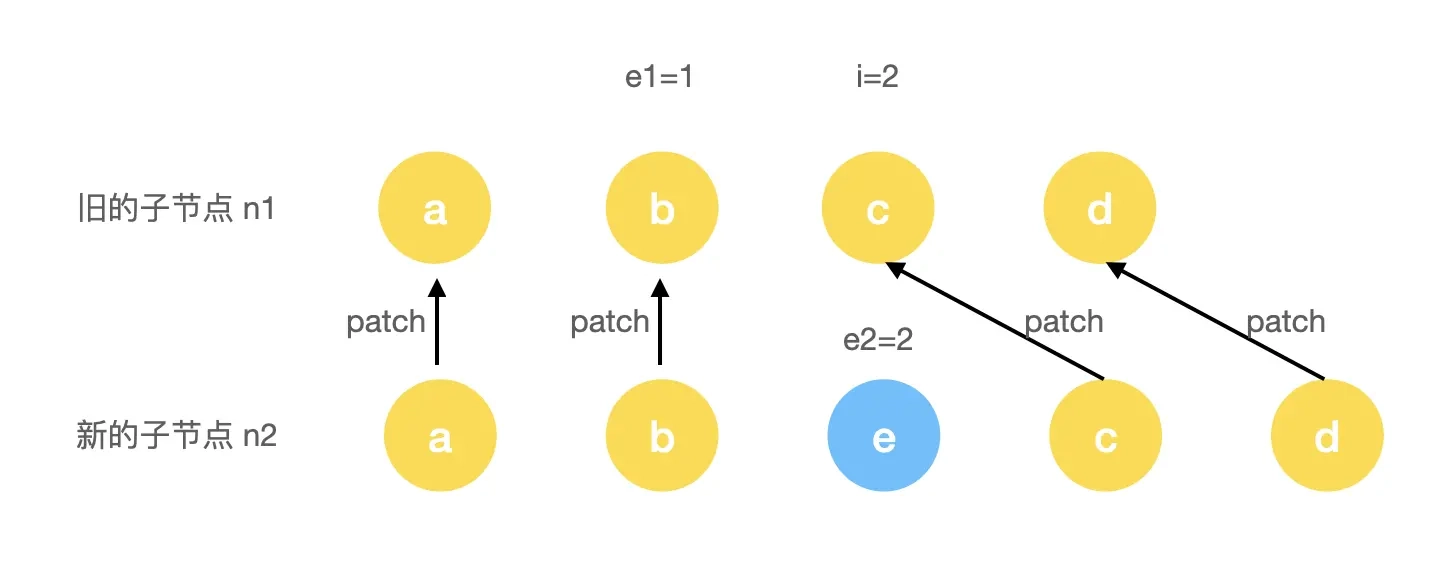
类比新增节点的情况,假设我们有这样一个旧列表:
<ul>
  <li key="a">a</li>
  <li key="b">b</li>
  <li key="b">e</li>
  <li key="c">c</li>
  <li key="d">d</li>
</ul>
新列表的变更是在中间删除了一个旧节点:
<ul>
  <li key="a">a</li>
  <li key="b">b</li>
  <li key="c">c</li>
  <li key="d">d</li>
</ul>
那么先进入第一步头部比对流程:
第一步执行时,会完成对 a 和 b 头部这 2 个节点进行 patch。当 i = 2 时,由于此时的 e 和 c 节点的 key 不一样,所以退出了头部比对流程,进入尾部比对:
第二步执行时,会完成对 c 和 d 尾部这 2 个节点进行 patch。当 e2 = 1 时,由于i > e2,所以退出了尾部比对流程。肉眼可见,此时的情况是新节点少了个 e 节点的情况,所以我们需要删除节点 e:
const patchKeyedChildren = (c1, c2, container, parentAnchor, parentComponent, parentSuspense, isSVG, optimized) => {
let i = 0
const l2 = c2.length
// 旧节点的尾部标记位
let e1 = c1.length - 1
// 新节点的尾部标记位
let e2 = l2 - 1
// 从头部开始比对
// ...
// 从尾部开始比对
// ...
// 如果有多余的新节点,则执行新增逻辑
// ...
// 如果有多余的旧节点,则执行卸载逻辑
else if (i > e2) {
while (i <= e1) {
// 卸载节点
unmount(c1[i], parentComponent, parentSuspense, true)
i++
}
}
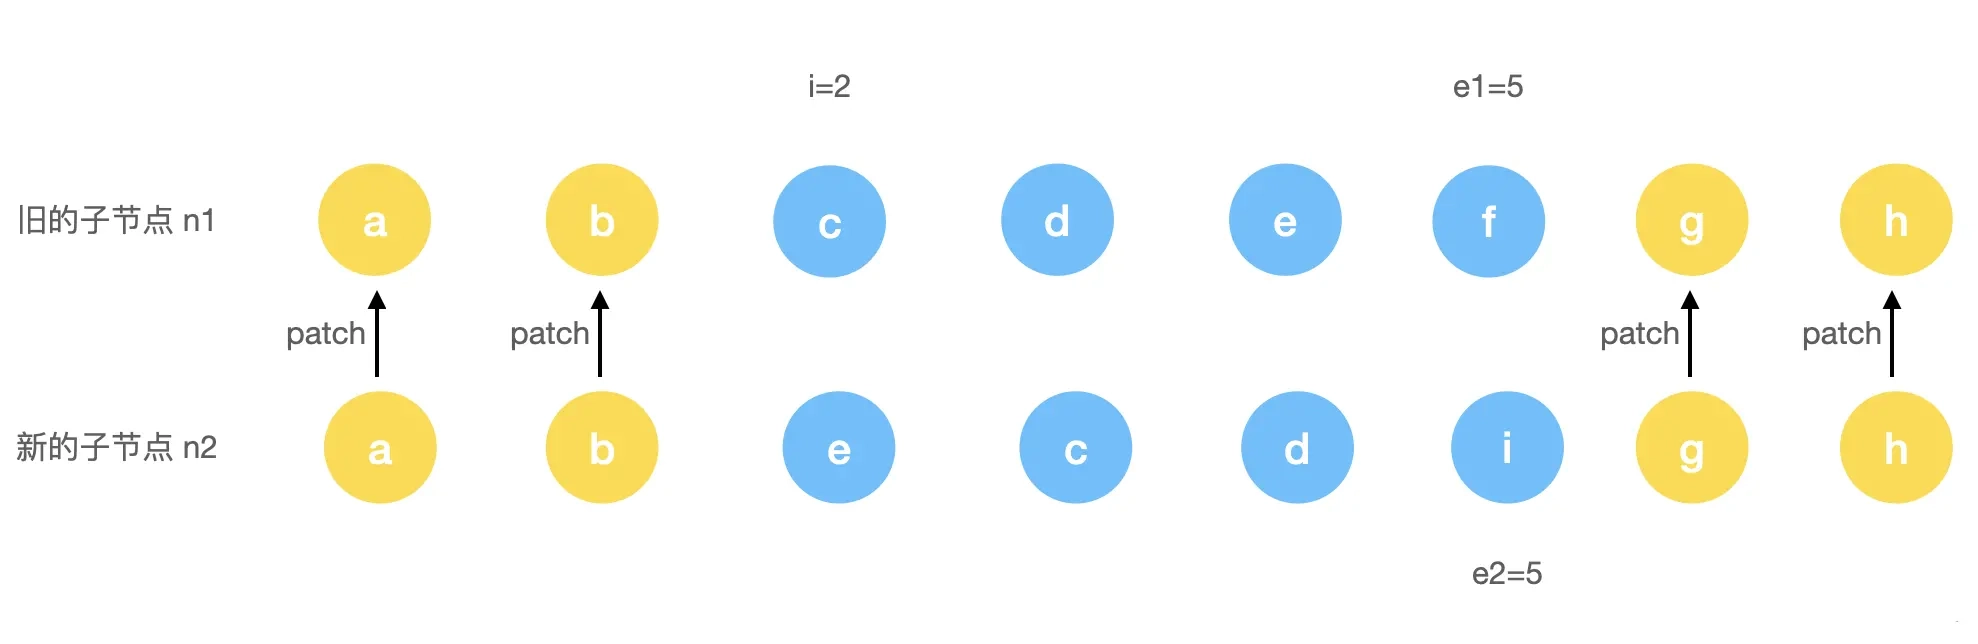
}5. 未知子序列
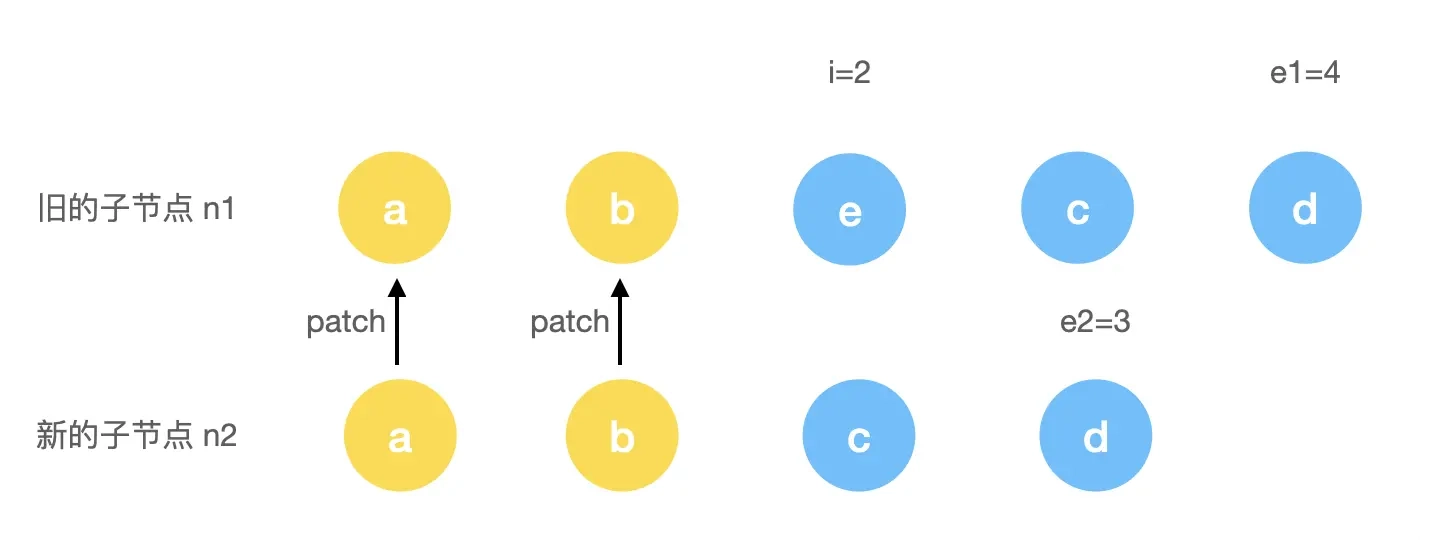
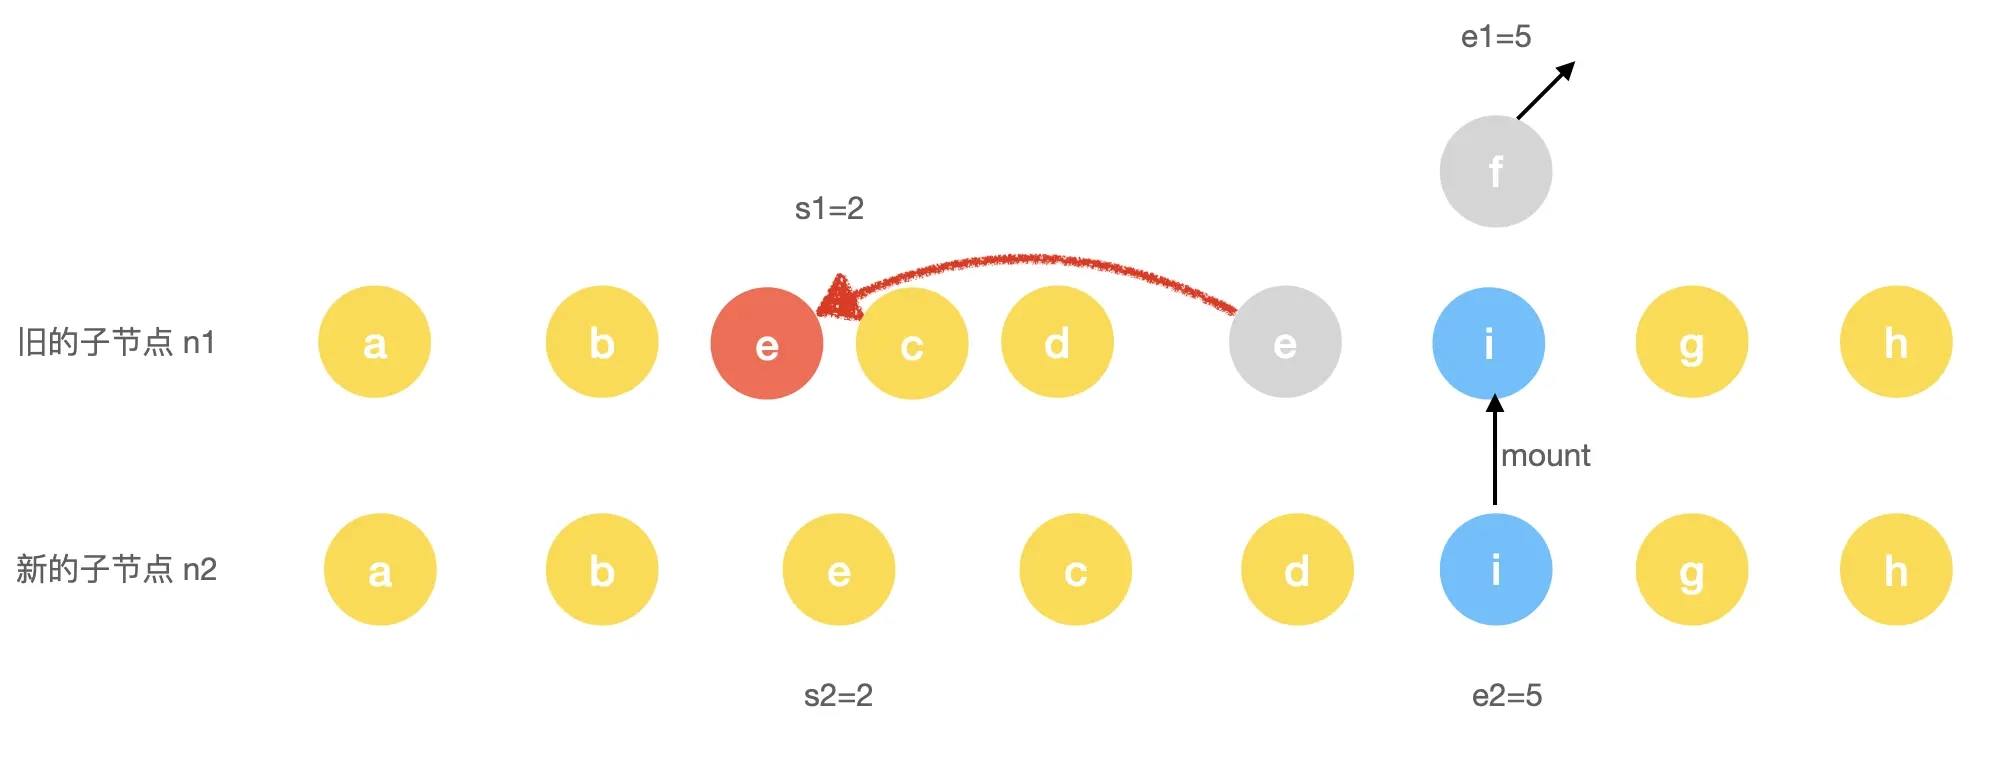
经过步骤 1、2 的操作后如果可以直接进入步骤 3、4 那是非常方便的操作了,直接进行多余删除缺少新增的操作。如果步骤 3、4 的条件都不满足的情况,那么 Vue 是如何处理的呢?再来看这样一个例子。
旧子节点:
<ul>
    <li key="a">a</li>
    <li key="b">b</li>
    <li key="c">c</li>
    <li key="d">d</li>
    <li key="e">e</li>
    <li key="f">f</li>
    <li key="g">g</li>
    <li key="h">h</li>
</ul>
新子节点:
<ul>
    <li key="a">a</li>
    <li key="b">b</li>
    <li key="e">e</li>
    <li key="c">c</li>
    <li key="d">d</li>
    <li key="i">i</li>
    <li key="g">g</li>
    <li key="h">h</li>
</ul>
此时经过步骤 1、2 后的结果可以表示为如下图:
这种情况,既不满足 i > e1 也不满足 i > e2 的条件,所以对于这种情况应该如何处理呢?我们知道 DOM 更新的性能优劣关系大致为:属性更新 > 位置移动 > 增删节点。所以,我们需要尽可能地复用老节点,做属性更新,减少移动次数和增删节点的次数。
那么上述更新策略假设有这样 2 种方式。
c和d节点不动,只做patch,e节点patch后移动到c节点前面,删除f节点,然后在d节点后面添加i节点。e节点不动,只做patch,c和d节点patch后移动到e节点后面,删除f节点,然后在d节点后面添加i节点。
根据上面的性能优劣关系,我们需要尽可能多地保障最多的公共子节点位置不变,只做 patch 更新。然后找出多余的节点删除,找出新的节点添加,找出有需要移动的节点移动。
当需要进行移动操作时,那么这个问题就变成了求取新旧子树上的最长公共子序列。当知道了最长公共子序列,所有的操作就可以简化为:
- 如果节点在新节点中,不在旧节点中,那么新增节点。
- 如果节点在旧节点中,不在新节点中,那么删除节点。
- 如果节点既在旧节点中,也在新节点中,那么更新。
- 如果节点需要移动,那么求取最长公共子序列后,进行最小位置移动。
接下来看看 Vue 是如何实现上述能力的。
构造新老节点位置映射 keyToNewIndexMap
// 旧子序列开始位置
const s1 = i
// 新子序列开始位置
const s2 = i

// 5.1 构建 key:index 关系索引 map
const keyToNewIndexMap = new Map()
for (i = s2; i <= e2; i++) {
  const nextChild = (c2[i] = optimized
    ? cloneIfMounted(c2[i] as VNode)
    : normalizeVNode(c2[i]))
  if (nextChild.key != null) {
    keyToNewIndexMap.set(nextChild.key, i)
  }
}
这里的新旧子节点开始位置通过 s1 和 s2 作为标记,然后开始进行构造新老节点位置映射,这里新节点 key -> index 关系的索引图是保存在了 keyToNewIndexMap 这样一个 Map 结构中,其中的 key 就是新节点的 key 值,而 value 则是旧节点对应的位置关系 index。这一步完成后,生成的 keyToNewIndexMap 结果可以表示为:
keyToNewIndexMap = {e: 2, c: 3, d: 4, i: 5}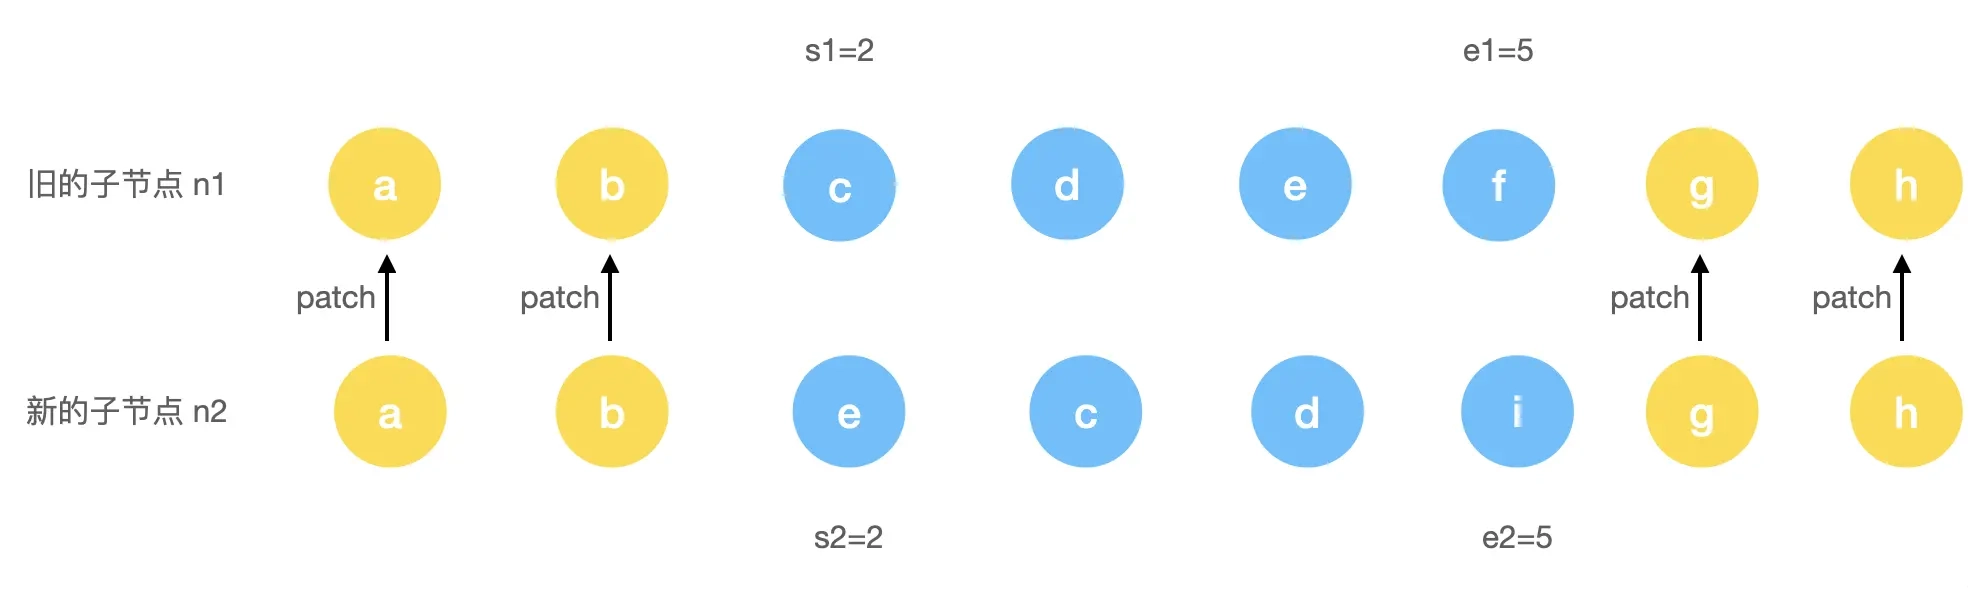
继续处理旧节点
有了上面的 keyToNewIndexMap 新节点的索引图,接下来我们就需要遍历旧的节点,寻找旧节点在新节点中对应的位置信息,如果找到则做更新,找不到则移除。
// 记录新节点已更新的数目
let patched = 0
// 记录新节点还有多少个没有更新
const toBePatched = e2 - s2 + 1
// 标记是否有必要进行节点的位置移动
let moved = false
// 标记是否有节点进行了位置移动
let maxNewIndexSoFar = 0
// 记录新节点在旧节点中的位置数组
const newIndexToOldIndexMap = new Array(toBePatched)
// newIndexToOldIndexMap 全部置为 0
for (i = 0; i < toBePatched; i++) newIndexToOldIndexMap[i] = 0
// 开始遍历旧子节点
for (i = s1; i <= e1; i++) {
  // prevChild 代表旧节点
  const prevChild = c1[i]
  // 还有多余的旧节点,则删除
  if (patched >= toBePatched) {
    unmount(prevChild, parentComponent, parentSuspense, true)
    continue
  }
  // 记录旧节点在新节点中的位置数组
  let newIndex = keyToNewIndexMap.get(prevChild.key)

  // 如果旧节点不存在于新节点中,则删除该节点
  if (newIndex === undefined) {
    unmount(prevChild, parentComponent, parentSuspense, true)
  } else {
    // newIndexToOldIndexMap 中元素为 0 表示着新节点不存在于旧节点中
    newIndexToOldIndexMap[newIndex - s2] = i + 1
    // 默认不移动的话,所有相同节点都是增序排列的
    // 如果有移动,必然出现节点降序的情况
    if (newIndex >= maxNewIndexSoFar) {
      maxNewIndexSoFar = newIndex
    } else {
      moved = true
    }
    // 更新节点
    patch(
      prevChild,
      c2[newIndex] as VNode,
      container,
      null,
      parentComponent,
      parentSuspense,
      isSVG,
      slotScopeIds,
      optimized
    )
    // 记录更新的数量
    patched++
  }
}
我们简单来总结一下这一步的一些核心操作。
Step 1: 定义一个初始长度为新节点数组长度且默认值全为 0 的变量 newIndexToOldIndexMap,记录新节点中的元素在旧节点中的位置关系。
Step 2: 遍历旧的节点数组,如果旧节点不存在于新节点中,则表示旧的节点其实是多余的节点,需要被移除。
Step 3: 如果旧节点存在于新节点数组中,则将它在旧子序列中的位置信息记录到 newIndexToOldIndexMap 中,同时根据 newIndex 是否大于 maxNewIndexSoFar 来判断是否有节点移动。
这里我们结合个例子来说明。假如旧节点信息为 abc、新节点为 cab,当旧节点遍历到 c 节点时,此时的newIndex 的值为 0 而 maxNewIndexSoFar 的值为 2。这就意味着此时的 c 节点并不是升序位于 ab 节点之后的,因此需要标记为有需要移动的节点。
Step 4: 更新相同节点。
经过上面的一系列操作,我们最终得到了一个 newIndexToOldIndexMap 和一个 moved 两个变量 ,这两个变量将在下文的移动和新增节点中被使用。
我们来看一下示例处理后的结果,如下图所示:
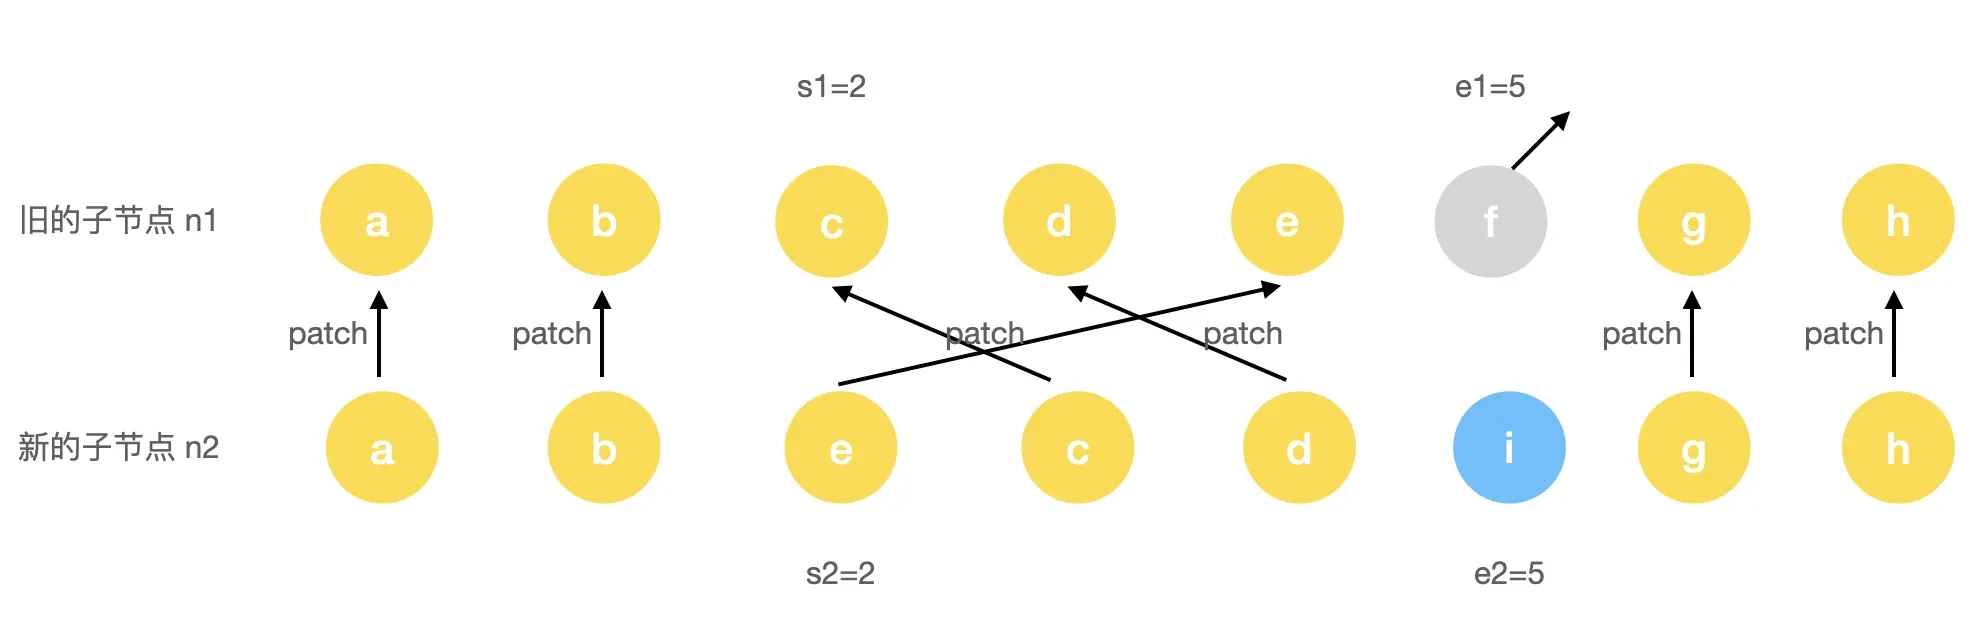
此时 c、d、e 因为是相同节点,所以进行 patch 更新,f 节点因为不存在于新的索引中,所以被删除。最后得到的 newIndexToOldIndexMap 数据结构大致如下:
newIndexToOldIndexMap = [5, 3, 4, 0]而且此时的 moved 也被标记为 true。
移动和增加新节点
通过前面的操作,我们完成了对旧节点的移除和更新,那么接下来就是需要进行对节点的移动和新节点的增加了:
// 根据 newIndexToOldIndexMap 求取最长公共子序列
const increasingNewIndexSequence = moved
  ? getSequence(newIndexToOldIndexMap)
  : EMPTY_ARR
// 最长公共子序列尾部索引
j = increasingNewIndexSequence.length - 1
// 从尾部开始遍历
for (i = toBePatched - 1; i >= 0; i--) {
  const nextIndex = s2 + i
  const nextChild = c2[nextIndex]
  const anchor = nextIndex + 1 < l2 ? c2[nextIndex + 1].el : parentAnchor
  // 如果新子序列中的节点在旧子序列中不存在,则新增节点
  if (newIndexToOldIndexMap[i] === 0) {
    patch(null, nextChild, container, anchor, parentComponent, parentSuspense, isSVG)
  } else if (moved) {
    // 如果需要移动且
    // 没有最长递增子序列
    // 当前的节点不在最长递增子序列中
    if (j < 0 || i !== increasingNewIndexSequence[j]) {
      move(nextChild, container, anchor, MoveType.REORDER)
    } else {
      j--
    }
  }
}
Step 1: 这里针对 moved 是 true 的情况,则会进行求取最长递增子序列的索引操作。
什么是最长递增子序列?简单来说指的是找到一个特定的最长的子序列,并且子序列中的所有元素单调递增。本例中,newIndexToOldIndexMap = [5, 3, 4, 0] 最长递增子序列的值为 [3, 4], 对应到 newIndexToOldIndexMap 中的索引即 increasingNewIndexSequence = [1, 2]。关于具体的算法细节,我们后面再详细探讨。
Step 2: 从尾部开始遍历新的子序列,在遍历的过程中,如果新子序列中的节点在旧子序列中不存在,也就是 newIndexToOldIndexMap[i] === 0,则新增节点。
Step 3: 判断是否存在节点移动的情况,如果存在的话则看节点的索引是不是在最长递增子序列中,如果不在,则将它移动到锚点的前面,否则仅移动最长子序列的尾部指针。
针对上述例子中,新的子序列为 e,c,d,i。最长递增子序列的索引为 [1, 2]。开始遍历到 i 节点时,因为 newIndexToOldIndexMap[i] = 0 所以新增,然后遍历到 c,d 节点,因为存在于最长子序列中,所以最后 j = -1。当遍历到 e 节点时,此时 j = -1 并且 e 节点不存在于最长递增子序列索引中,索引最后一步就是把节点 e 进行一次移动:
move(nextChild, container, anchor, MoveType.REORDER)其中 anchor 是参照物,记录着上一次更新的节点信息,也就是节点 c 的信息,所以这里的意思就是将节点 e 移动到节点 c 前面。
至此,完成了所有节点的增、删、更新、移动的操作,此次操作结果如下:
最长递增子序列
求最长递增子序列是 LeetCode 上的一道经典算法题,原题:300. 最长递增子序列。
什么是上升子序列?简单来说指的是找到一个特定的最长的子序列,并且子序列中的所有元素单调递增。
假设我们的序列为 [5, 3, 4, 9] ,那么最长的递增子序列是 [3, 4]。
那么如何找到最长的递增子序列呢?Vue 内部使用的是一套 贪心 + 二分查找 的算法,关于贪心和二分查找的解释如下。
- 贪心算法:贪心算法在每一步都做出了当时看起来最佳的选择,也就是说,它总是做出局部最优的选择,寄希望这样的选择能导致全局最优解。leetCode 455. 分发饼干。
- 二分查找:每次的查找都是和区间的中间元素对比,将待查找的区间缩小为一半,直到找到目标元素,或者区间被缩小为 0(没找到)。leetCode 704. 二分查找。
那么这里我们再结合一下贪心算法的思想,在求取最长上升子序列时,对于同样长度是二的序列 [2, 3] 一定比 [2, 5] 好,因为要想让子序列尽可能地长,那么上升得尽可能慢,这样潜力更大。
所以我们可以创建一个临时数组,用来保存最长的递增子序列,如果当前遍历的元素大于临时数组中的最后一个元素(也就是临时数组的最大值)时,那么将其追加到临时数组的尾部,否则,查找临时数组,找到第一个大于该元素的数并替换它,这样就保证了临时数组上升时最慢的。因为是单调递增的序列,我们也可以在临时数组中用二分查找,降低时间复杂度。
以输入序列 [1, 4, 5, 2, 8, 7, 6, 0] 为例,根据上面算法的描述,我们大致可以得到如下的计算步骤:
[1][1, 4][1, 4, 5][1, 2, 5][1, 2, 5, 8][1, 2, 5, 7][0, 2, 5, 6]
可以看到,如果单纯地按照上述算法的模式,得到的结果的长度虽然一致,但位置顺序和值并不符合预期,预期结果是 [1, 4, 5, 6]。那么在 Vue 中是如何解决这个顺序和值错乱的问题呢?
我们一起来看看源码的实现:
function getSequence (arr) {
  const p = arr.slice()
  const result = [0]
  let i, j, u, v, c
  const len = arr.length
  for (i = 0; i < len; i++) {
    const arrI = arr[i]
    // 排除等于 0 的情况
    if (arrI !== 0) {
      j = result[result.length - 1]
      // 与最后一项进行比较
      if (arr[j] < arrI) {
        // 存储在 result 更新前的最后一个索引的值
        p[i] = j
        result.push(i)
        continue
      }
      u = 0
      v = result.length - 1
      // 二分搜索,查找比 arrI 小的节点,更新 result 的值
      while (u < v) {
        // 取整得到当前位置
        c = ((u + v) / 2) | 0
        if (arr[result[c]] < arrI) {
          u = c + 1
        }
        else {
          v = c
        }
      }
      if (arrI < arr[result[u]]) {
        if (u > 0) {
          // 正确的结果
          p[i] = result[u - 1]
        }
        // 有可能替换会导致结果不正确,需要一个新数组 p 记录正确的结果
        result[u] = i
      }
    }
  }
  u = result.length
  v = result[u - 1]

  // 回溯数组 p,找到最终的索引
  while (u-- > 0) {
    result[u] = v
    v = p[v]
  }
  return result
}
其中 result 中存储的是长度为 i 的递增子序列最小末尾值的索引。p 是来存储在每次更新 result 前最后一个索引的值,并且它的 key 是这次要更新的 result 值:
// 插入
 p[i] = j
 result.push(i)
 // 替换
 p[i] = result[u - 1]
 result[u] = i
对于上述的实例,我们在进行最后一步回溯数组 p 之前,得到的数据机构如下:
result = [ 0, 3, 2, 6 ] // => [0, 2, 5, 6]

p = [1, 0, 1, 0, 2, 2, 2]
从 result 最后一个元素 6 对应的索引 6 开始回溯,可以看到 p[6] = 2,p[2] = 1,p[1] = 0,所以通过对 p 的回溯,得到最终的 result 值是 [0, 1, 2, 6],也就找到最长递增子序列的最终索引了。
番外
至此我们介绍完了关于 Vue3 的 diff 算法。接下来小伙伴们可以思考两个问题:
- 为什么
Vue 3不再沿用之前Vue 2的双端diff算法而改成现在的这种模式呢? - 我们使用
v-for编写列表时为什么不建议使用index作为key?
解答第一个问题
在 Vue2 里 diff 会进行:
- 头和头比
- 尾和尾比
- 头和尾比
- 尾和头比
- 都没有命中的对比
在 Vue3 里 diff 会进行:
- 头和头比
- 尾和尾比
- 基于最长递增子序列进行移动/添加/删除
在 Vue2 中,头尾比对和尾头比对就算发现新老节点是属于 sameVnode 时还是需要进行节点位置的移动。另外在没有命中 1-4 步骤的情况下进行新旧节点的映射关系查找再进行位置移动也不是性能最优的方式。最优的方式本小节已经讲解到,就是基于最长递增子序列进行移动/添加/删除。
在 Vue3 中,基于最长递增子序列进行移动/添加/删除 的diff更新,已经涵盖了 Vue2 的 3-5 步骤,而且性能是最优解。所以相对于 Vue2,Vue3 在diff算法方面做了很大的优化工作。
解答第二个问题
响应式原理:基于 Proxy 的响应式
我们先来了解一下 Vue3 中一个基于 Composition API 响应式应用的例子是如何编写的:
<template>
  <div>
    {{ state.msg }} {{ count }}
  </div>
</template>
<script>
  import { reactive, ref } from 'vue'
  export default {
    setup() {
      const state = reactive({
        msg: 'hello world'
      })

      const count = ref(0)

      const changeMsg = () => {
        state.msg = 'world hello'
      }

      return {
        state,
        count,
        changeMsg,
      }
    }
  }
</script>
此时我们通过 reactive API 或者 ref API 来定义响应式对象。
对于 reactive API 而言,核心是用来定义集合类型的数据,比如:普通对象、数组和 Map、Set。
对于 ref API 而言,可以用来对 string、number、boolean 这些原始类型数据进行响应式定义。
Reactive
找到源码中关于 reactive 部分的定义:
export function reactive(target: object) {
  // 不需要对 readonly 的对象进行响应式
  if (isReadonly(target)) {
    return target
  }
  return createReactiveObject(
    target,
    false,
    mutableHandlers,
    mutableCollectionHandlers,
    reactiveMap
  )
}
这个函数核心也就是通过 createReactiveObject 把我们传入的 target 变成响应式的:
function createReactiveObject(target, isReadonly, baseHandlers, collectionHandlers, proxyMap) {
  // 如果目标不是对象,则直接返回
  if (!isObject(target)) {
    return target
  }
  // 已经是一个响应式对象了,也直接返回
  if (
    target[ReactiveFlags.RAW] &&
    !(isReadonly && target[ReactiveFlags.IS_REACTIVE])
  ) {
    return target
  }
  // proxyMap 中已经存入过 target,直接返回
  const existingProxy = proxyMap.get(target)
  if (existingProxy) {
    return existingProxy
  }
  // 只有特定类型的值才能被 observe.
  const targetType = getTargetType(target)
  if (targetType === TargetType.INVALID) {
    return target
  }
  // 通过 proxy 来构造一个响应式对象
  const proxy = new Proxy(
    target,
    targetType === TargetType.COLLECTION ? collectionHandlers : baseHandlers
  )
  // 缓存 target proxy
  proxyMap.set(target, proxy)
  return proxy
}
上述整个核心流程就是首先经过一系列判断,判断符合要求的 target 才能被响应式,整理的判断包括了 target 的类型、是否是响应式的、是否已经被定义过了,以及是否是符合要求的类型这些步骤,最后执行的是 new Proxy() 这样的一个响应式代理 API。一起来看看这个 API 的实现:
const proxy = new Proxy(
    target,
    targetType === TargetType.COLLECTION ? collectionHandlers : baseHandlers
)
Proxy 根据 targetType 来确定执行的是 collectionHandlers 还是 baseHandlers。那 targetType 是什么时候确定的呢?可以看一下:
const targetType = getTargetType(target)

function getTargetType(value) {
  return value[ReactiveFlags.SKIP] || !Object.isExtensible(value)
    ? TargetType.INVALID
    : targetTypeMap(toRawType(value))
}

export const toRawType = (value) => {
  // toTypeString 转换成字符串的方式,比如 "[object RawType]"
  return toTypeString(value).slice(8, -1)
}

function targetTypeMap(rawType) {
  switch (rawType) {
    case 'Object':
    case 'Array':
      return TargetType.COMMON
    case 'Map':
    case 'Set':
    case 'WeakMap':
    case 'WeakSet':
      return TargetType.COLLECTION
    default:
      return TargetType.INVALID
  }
}
因为 target 传入进来的是一个 Object,所以 toRawType(value) 得到的值是 Object。所以这里的 targetType 的值等于 TargetType.COMMON 也就是执行了 baseHandlers 。而当我们的 reactive(target) 中的 target 是个 WeakMap 或者 WeakSet 时,那么执行的就是 collectionHandlers 了。
接下来看一下 baseHandlers 的实现:
export const mutableHandlers = {
  get,
  set,
  deleteProperty,
  has,
  ownKeys
}
这里就是 Proxy 中的定义 handler 的一些属性。
- get:属性读取操作的捕捉器。
- set:属性设置操作的捕捉器。
- deleteProperty:delete 操作符的捕捉器。
- has:in 操作符的捕捉器。
- ownKeys:Object.getOwnPropertyNames 方法和 Object.getOwnPropertySymbols 方法的捕捉器。
而关于响应式核心的部分就在 set 和 get 中,我们一起来看一下二者的定义实现。
1. get
其中 get 的实现:
const get = /*#__PURE__*/ createGetter()可以看到核心其实通过 createGetter 来实现的:
function createGetter(isReadonly = false, shallow = false) {
  return function get(target: Target, key: string | symbol, receiver: object) {
    // 对 ReactiveFlags 的处理部分
    if (key === ReactiveFlags.IS_REACTIVE) {
      return !isReadonly
    } else if (key === ReactiveFlags.IS_READONLY) {
      return isReadonly
    } else if (key === ReactiveFlags.IS_SHALLOW) {
      return shallow
    } else if (
      key === ReactiveFlags.RAW &&
      receiver ===
        (isReadonly
          ? shallow
            ? shallowReadonlyMap
            : readonlyMap
          : shallow
          ? shallowReactiveMap
          : reactiveMap
        ).get(target)
    ) {
      return target
    }

    const targetIsArray = isArray(target)
    if (!isReadonly) {
      // 数组的特殊方法处理
      if (targetIsArray && hasOwn(arrayInstrumentations, key)) {
        return Reflect.get(arrayInstrumentations, key, receiver)
      }
      // 对象 hasOwnProperty 方法处理
      if (key === 'hasOwnProperty') {
        return hasOwnProperty
      }
    }
    // 取值
    const res = Reflect.get(target, key, receiver)

    // Symbol Key 不做依赖收集
    if (isSymbol(key) ? builtInSymbols.has(key) : isNonTrackableKeys(key)) {
      return res
    }

    // 进行依赖收集
    if (!isReadonly) {
      track(target, TrackOpTypes.GET, key)
    }

    // 如果是浅层响应,那么直接返回,不需要递归了
    if (shallow) {
      return res
    }


    if (isRef(res)) {
      // 跳过数组、整数 key 的展开
      return targetIsArray && isIntegerKey(key) ? res : res.value
    }

    if (isObject(res)) {
      // 如果 isReadonly 是 true,那么直接返回 readonly(res)
      // 如果 res 是个对象或者数组类型,则递归执行 reactive 函数把 res 变成响应式
      return isReadonly ? readonly(res) : reactive(res)
    }

    return res
  }
}
因为调用 createGetter 时,默认参数 isReadonly = false,所以这里可以先忽略 isReadonly 的部分。整体而言,该函数还是比较通俗易懂的,首先对 key 属于 ReactiveFlags 的部分做了特殊处理,这也是为什么在 createReactiveObject 函数中判断响应式对象是否存在 ReactiveFlags.RAW 属性,如果存在就返回这个响应式对象本身。
然后当我们的 target 是数组,且 key 值存在 arrayInstrumentations 中时,返回 arrayInstrumentations 中对应的 key 值。再来看看 arrayInstrumentations 是个什么:
const arrayInstrumentations = createArrayInstrumentations()

function createArrayInstrumentations() {
  const instrumentations = {};
  (['includes', 'indexOf', 'lastIndexOf']).forEach(key => {
    instrumentations[key] = function (this, ...args) {
      // toRaw 可以把响应式对象转成原始数据
      const arr = toRaw(this)

      for (let i = 0, l = this.length; i < l; i++) {
        // 对数组的每一项进行依赖收集
        track(arr, TrackOpTypes.GET, i + '')
      }
      // 先尝试用参数本身,可能是响应式数据
      const res = arr[key](...args)
      if (res === -1 || res === false) {
        // 如果失败,再尝试把参数转成原始数据
        return arr[key](...args.map(toRaw))
      } else {
        return res
      }
    }
  })
  // instrument length-altering mutation methods to avoid length being tracked
  // which leads to infinite loops in some cases (#2137)
  ;(['push', 'pop', 'shift', 'unshift', 'splice'] as const).forEach(key => {
    instrumentations[key] = function (this: unknown[], ...args: unknown[]) {
      pauseTracking()
      const res = (toRaw(this) as any)[key].apply(this, args)
      resetTracking()
      return res
    }
  })
  return instrumentations
}当reactive函数传入数组时,get捕获器会先在arrayInstrumentations 对象上查找,如果找不到,再在代理对象target上查找。arrayInstrumentations 对象会重写两类函数,一类是查询类函数: includes、 indexOf、 lastIndexOf,代表对数组的读取操作。在这些函数中会执行track函数,对数组上的索引和length属性进行追踪。
一类是修改类函数push、 pop、 shift、 unshift、 splice,代表对数组的修改操作,在这些函数中暂停了全局的追踪功能,防止某些情况下导致死循环。关于这里的一些说明也可以参见 Vue issue。
再回过头看 createGetter 中,接下来的操作就是通过 track(target, TrackOpTypes.GET, key) 进行依赖收集,我们再来一起看一下 track 的实现:
// 是否应该收集依赖
let shouldTrack = true
// 当前激活的 effect
let activeEffect
// 存放所有 reactive 传入的 receiver 容器
const targetMap = new WeakMap()

export function track(target, type, key) {
  if (shouldTrack && activeEffect) {
    let depsMap = targetMap.get(target)
    if (!depsMap) {
      targetMap.set(target, (depsMap = new Map()))
    }
    let dep = depsMap.get(key)
    if (!dep) {
      depsMap.set(key, (dep = createDep()))
    }

    trackEffects(dep)
  }
}

export function trackEffects(
  dep,
  debuggerEventExtraInfo
) {
  // ...
  if (shouldTrack) {
    // 把 activeEffect 添加到 dep 中
    dep.add(activeEffect!)
    activeEffect!.deps.push(dep)
  }
}
上面函数有点绕,其实核心就是在生成一个数据结构,什么样的数据结构呢?我们来画个图看看:
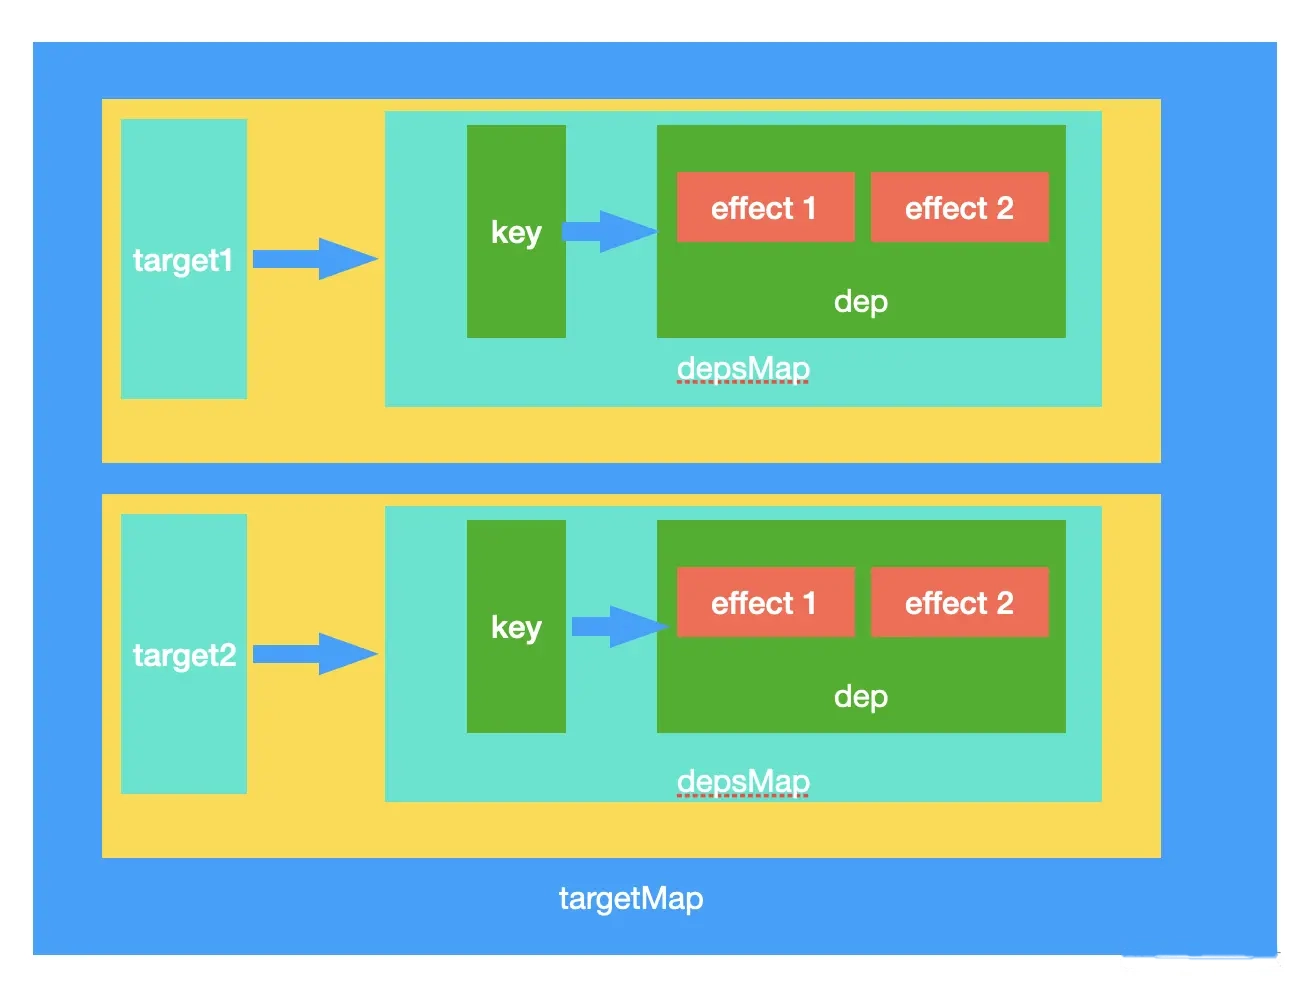
我们创建了全局的 targetMap ,它的键是 target,值是 depsMap;这个 depsMap 的键是 target 的 key,值是 dep 集合,dep 集合中存储的是依赖的副作用函数 effect。
另外,关于 trackEffects 的实现细节,我们后面再详细介绍。
注意到
Proxy在访问对象属性时才递归执行劫持对象属性,相比Object.defineProperty在定义时就遍历把所有层级的对象设置成响应式而言,在性能上有所提升。
2. set
上面说完了 get 的流程,我们了解了依赖收集后的数据结构存储在了 targetMap 中,接下来我们接着看 set 的过程:
const set = /*#__PURE__*/ createSetter()可以看到核心其实通过 createSetter 来实现的:
function createSetter(shallow = false) {
  return function set(target, key, value, receiver) {
    let oldValue = target[key]
    // 不是浅层响应式,这里默认是 false
    if (!shallow) {
      // 不是浅层响应式对象
      if (!isShallow(value) && !isReadonly(value)) {
        oldValue = toRaw(oldValue)
        value = toRaw(value)
      }
      // ...
    } else {
      // 在浅模式中,对象被设置为原始值,而不管是否是响应式
    }

    const hadKey =
      isArray(target) && isIntegerKey(key)
        ? Number(key) < target.length
        : hasOwn(target, key)
    const result = Reflect.set(target, key, value, receiver)
     // 如果目标的原型链也是一个 proxy,通过 Reflect.set 修改原型链上的属性会再次触发 setter,这种情况下就没必要触发两次 trigger 了
    if (target === toRaw(receiver)) {
      if (!hadKey) {
        trigger(target, TriggerOpTypes.ADD, key, value)
      } else if (hasChanged(value, oldValue)) {
        trigger(target, TriggerOpTypes.SET, key, value, oldValue)
      }
    }
    return result
  }
}
可以看到 set 的核心逻辑是先根据是否是浅层响应式来确定原始值和新值,这里默认不是浅层的响应式,所以会先把原始值和新值进行 toRaw 转换,然后通过 Reflect.set 设置值,最后通过 trigger 函数派发通知 ,并依据 key 是否存在于 target 上来确定通知类型是 add(新增) 还是 set(修改)。
接下来核心就是 trigger 的逻辑,是如何实现触发响应的:
export function trigger(target,type,key,newValue,oldValue,oldTarget) {
  const depsMap = targetMap.get(target)
  if (!depsMap) {
    return
  }
  let deps: (Dep | undefined)[] = []
  if (type === TriggerOpTypes.CLEAR) {
    deps = [...depsMap.values()]
  } else if (key === 'length' && isArray(target)) {
    depsMap.forEach((dep, key) => {
      if (key === 'length' || key >= toNumber(newValue)) {
        deps.push(dep)
      }
    })
  } else {
    if (key !== void 0) {
      deps.push(depsMap.get(key))
    }

    switch (type) {
      case TriggerOpTypes.ADD:
        if (!isArray(target)) {
          deps.push(depsMap.get(ITERATE_KEY))
          if (isMap(target)) {
            deps.push(depsMap.get(MAP_KEY_ITERATE_KEY))
          }
        } else if (isIntegerKey(key)) {
          deps.push(depsMap.get('length'))
        }
        break
      case TriggerOpTypes.DELETE:
        if (!isArray(target)) {
          deps.push(depsMap.get(ITERATE_KEY))
          if (isMap(target)) {
            deps.push(depsMap.get(MAP_KEY_ITERATE_KEY))
          }
        }
        break
      case TriggerOpTypes.SET:
        if (isMap(target)) {
          deps.push(depsMap.get(ITERATE_KEY))
        }
        break
    }
  }

  if (deps.length === 1) {
    if (deps[0]) {
      triggerEffects(deps[0])
    }
  } else {
    const effects: ReactiveEffect[] = []
    for (const dep of deps) {
      if (dep) {
        effects.push(...dep)
      }
    }
    triggerEffects(createDep(effects))
  }
}
内容有点多,看起来有点头大,我们来简化一下:
export function trigger(target, type, key) {
  const dep = targetMap.get(target)
  dep.get(key).forEach(effect => effect.run())
}
核心其实就是通过 target 找到 targetMap 中的 dep,再根据 key 来找到所有的副作用函数 effect 遍历执行。副作用函数就是上面 get 收集起来的。
这里有个有意思的地方是对数组的操作监听,我们来看一段代码:
const state = reactive([]);

effect(() => {
  console.log(`state: ${state[1]}`)
});

// 不会触发 effect
state.push(0);

// 触发 effect
state.push(1);
上面的 demo 中,我们第一次访问了 state[1], 所以,对 state[1] 进行了依赖收集,而第一次的 state.push(0) 设置的是 state 的第 0 个元素,所以不会触发响应式更新。而第二次的 push 触发了对 state[1] 的更新。这看起来很合理,没啥问题。那么我们再来看另外一个示例:
// 响应式数据
const state = reactive([])

// 观测变化
effect(() => console.log('state map: ', state.map(item => item))

state.push(1)按照常理来说,state.map 由于 state 是个空数组,所以理论上不会对数组的每一项进行访问,所以 state.push(1) 理论上也不会触发 effect。但实际上是会的,为什么呢?我们再来看一下一个 proxy 的 demo:
const raw = []
const arr = new Proxy(raw, {
  get(target, key) {
    console.log('get', key)
    return Reflect.get(target, key)
  },
  set(target, key, value) {
    console.log('set', key)
    return Reflect.set(target, key, value)
  }
})

arr.map(v => v)
可以看到打印的内容如下:
get map
get length
get constructor
可以看到 map 函数的操作,会触发对数组的 length 访问!这就有意思了,当访问数组 length 的时候,我们进行了对 state 的依赖收集,而数组的 push 操作也会改变 length 的长度,如果我们对 length 做监听,那么此时便会触发 effect!而 Vue 也是这么做的,也就是这段代码:
deps.push(depsMap.get('length'))同理,对于 for in, forEach, map ... 都会触发 length 的依赖收集,从而 pop, push, shift... 等等操作都会触发响应式更新!
另外,除了数组,对象的 Object.keys , for ... of ... 等等对象遍历操作都会触发响应式的依赖收集,这是因为 Vue 在定义 Proxy 的时候,定义了 ownKeys 这个函数:
function ownKeys(target) {
  track(target, TrackOpTypes.ITERATE, isArray(target) ? 'length' : ITERATE_KEY)
  return Reflect.ownKeys(target)
}
ownKeys 函数内部执行了 track 进行了对 Object 的 ITERATE_KEY 的依赖收集。而在 setter 的时候,则对 ITERATE_KEY 进行了响应式触发:
deps.push(depsMap.get(ITERATE_KEY))课外知识
在上面的源码中出现了一个有意思的标识符 /*#__PURE__*/。要说这个东西,那就需要说到和这玩意相关的 Tree-Shaking 副作用了。我们知道 Tree-Shaking 可以删除一些 DC(dead code) 代码。但是对于一些有副作用的函数代码,却是无法进行很好的识别和删除,举个例子:
foo()

function foo(obj) {
  obj?.a
}上述代码中,foo 函数本身是没有任何意义的,仅仅是对对象 obj 进行了属性 a 的读取操作,但是 Tree-Shaking 是无法删除该函数的,因为上述的属性读取操作可能会产生副作用,因为 obj 可能是一个响应式对象,我们可能对 obj 定了一个 getter 在 getter 中触发了很多不可预期的操作。
如果我们确认 foo 函数是一个不会有副作用的纯净的函数,那么这个时候 /*#__PURE__*/ 就派上用场了,其作用就是告诉打包器,对于 foo 函数的调用不会产生副作用,你可以放心地对其进行 Tree-Shaking。
另外,值得一提的是,在 Vue 3 源码中,包含了大量的 /*#__PURE__*/ 标识符,可见 Vue 3 对源码体积的控制是多么的用心!
响应式原理:副作用函数探秘
前面我们说到了 Reactive 会在 proxy getter 的时候收集 effect 依赖,在 proxy setter 的时候触发 effect 的执行。那么 effect 副作用函数到底是个什么?以及是如何被收集起来的呢?
effect
找到源码中关于 effect 部分的定义:
export function effect (fn, options) {
  // 如果 fn 已经是一个 effect 函数了,则指向原始函数
  if (fn.effect) {
    fn = fn.effect.fn
  }
  // 构造 _effect 实例
  const _effect = new ReactiveEffect(fn)

  // options 初始化
  if (options) {
    extend(_effect, options)
    if (options.scope) recordEffectScope(_effect, options.scope)
  }

  // 如有 options 或者 不是懒加载,执行 _effect.run()
  if (!options || !options.lazy) {
    _effect.run()
  }

  // 返回 _effect.run
  const runner = _effect.run.bind(_effect)
  runner.effect = _effect
  return runner
}
这个 effect 函数内部核心是通过 ReactiveEffect 类创建了一个 _effect 实例,从代码来看,_effect 上包含了一个 run 函数。默认 effect 是没有传入 options 参数的,所以这里直接执行了 _effect.run()。我们知道,fn 函数是在 effect 函数中的一个入参,比如:
const state = reactive({a: 1})

effect(() => console.log(state.a))
根据上一小节,我们知道因为这里我们访问了 state.a 所以收集了副作用函数,但是需要知道的是这里的 effect 传入的是一个 fn,所以要想访问 state.a 那这个 fn 必须要执行才可以。那是在哪里执行的呢?接下来看一下 ReactiveEffect 的实现:
// 用于记录位于响应上下文中的effect嵌套层次数
let effectTrackDepth = 0
// 二进制位,每一位用于标识当前effect嵌套层级的依赖收集的启用状态
export left trackOpBit = 1
// 表示最大标记的位数
const maxMarkerBits = 30

// 当前活跃的 effect
let activeEffect;

export class ReactiveEffect {
  // 用于标识副作用函数是否位于响应式上下文中被执行
  active = true
  // 副作用函数持有它所在的所有依赖集合的引用,用于从这些依赖集合删除自身
  deps = []
  // 指针为,用于嵌套 effect 执行后动态切换 activeEffect
  parent = undefined
  // ...
  run() {
    // 若当前 ReactiveEffect 对象脱离响应式上下文
    // 那么其对应的副作用函数被执行时不会再收集依赖
    if (!this.active) {
      return this.fn()
    }

    // 缓存是否需要收集依赖
    let lastShouldTrack = shouldTrack

    try {
      // 保存上一个 activeEffect 到当前的 parent 上
      this.parent = activeEffect
      // activeEffect 指向当前的 effect
      activeEffect = this
      // shouldTrack 置成 true
      shouldTrack = true
      // 左移操作符 << 将第一个操作数向左移动指定位数
      // 左边超出的位数将会被清除,右边将会补零。
      // trackOpBit 是基于 1 左移 effectTrackDepth 位
      trackOpBit = 1 << ++effectTrackDepth

      // 如果未超过最大嵌套层数,则执行 initDepMarkers
      if (effectTrackDepth <= maxMarkerBits) {
        initDepMarkers(this)
      } else {
        cleanupEffect(this)
      }
      // 这里执行了 fn
      return this.fn()
    } finally {
      if (effectTrackDepth <= maxMarkerBits) {
        // 用于对曾经跟踪过,但本次副作用函数执行时没有跟踪的依赖采取删除操作。
        // 新跟踪的 和 本轮跟踪过的都会被保留
        finalizeDepMarkers(this)
      }

      // << --effectTrackDepth 右移动 effectTrackDepth 位
      trackOpBit = 1 << --effectTrackDepth

      // 返回上个 activeEffect
      activeEffect = this.parent
      // 返回上个 shouldTrack
      shouldTrack = lastShouldTrack
      // 情况本次的 parent 指向
      this.parent = undefined
    }
  }
}
大致看一眼,我们可以看到在 ReactiveEffect 中是执行了 this.fn() 的,这也就解释了 effect 中的回调函数 fn 是在这里被调用的。接下来详细研究一下这个 ReactiveEffect。
但这段代码看起来不是很长,但涉及了好几个概念,我们来一个个看。
1. parent 的作用
为什么 ReactiveEffect 要设计一个 parent 这样一个看似没啥用的变量指针来存储上一次的 activeEffect 呢?如果改成下面这样不是更简单吗?
run() {
  if (!this.active) {
    return this.fn();
  }
  // 初始化
  shouldTrack = true;
  activeEffect = this;

  const result = this.fn();

  // 重置
  shouldTrack = false;

  return result;
}
其实对于下面这样的代码:
const state = reactive({a: 1})

effect(() => console.log(state.a))

state.a++
effect 函数内调用 ReactiveEffect 实例的 run 函数。run 函数执行的时候,把 activeEffect 指向 this。然后执行 effect 传入的 fn 函数,函数在执行的时候访问了 state.a 触发了 getter 钩子。回顾一下上一节的内容,getter 的时候有触发添加 activeEffect 的功能:
// 把 activeEffect 添加到 dep 中
dep.add(activeEffect!)
而 activeEffect 正是这里的 this。当执行 state.a++ 时,访问了state.a 的 setter。上一节也说了,setter 的执行会调用 effect.run 函数:
// triggerEffects
effect.run();
所以又会执行 fn。
到这里看似很完美,那么我们再来看另外一个例子🌰:
const state = reactive({
  a: 1,
  b: 2
});

// ef1
effect(() => {
  // ef2
  effect(() => console.log(`b: ${state.b}`))
  console.log(`a: ${state.a}`)
});

state.a ++
按照上面的逻辑,在第一次 effect 执行的时候,activeEffect = ef1 然后再执行内部的 effect, 此时 activeEffect = ef2 然后 ef2 执行完成回到 ef1 函数体内,此时再访问 state.a 触发对 a 的依赖收集,但收集到的却是 ef2。那么最终打印的是:
b: 2
a: 1
b: 2
很明显不符合我们的要求,我们期望的是输出:
b: 2
a: 1
b: 2
a: 2
这时候 parent 就排上用场了,当为 effect 加上 parent 属性后,我们再来捋一下整体的流程。
- 执行
ef1的时候,activeEffect指向ef1,此时parent是undefined。 - 执行
ef1 fn遇到了ef2,调用ef2此时ef2的parent指向ef1,activeEffect指向ef2。然后执行ef2的fn。 ef2的fn执行的时候,访问了state.b依赖收集ef2。执行完成后,activeEffect = this.parent又把activeEffect指向了ef1。- 返回
ef1的fn体继续执行,此时访问state.a依赖收集activeEffect为ef1。 - 触发
state.a的setter,调用a的副作用ef1,依次打印……
到这里相信各位小伙伴已经清楚了 parent 的作用了,那就是通过 parent 这个标记,来回切换 activeEffect 的指向,从而完成对嵌套 effect 的正确的依赖收集。
2. 依赖清理
在说依赖清理之前,再来看一个有意思的例子:
const state = reactive({
  a: 1,
  show: true
});

effect(() => {
  if (state.show) {
    console.log(`a: ${state.a}`)
  }
});

state.a ++

setTimeout(() => {
  state.show = false
  state.a ++
}, 1000)
上面的例子中,我们在 effect 中完成了对 show 和 a 的依赖收集,然后 1s 后,我们改变了 show 的状态为 false。此时 effect 内的函数中的 console.log 将永远不会执行,然后再触发 state.a++ 的动作,访问 a 的 getter,如果没有依赖清理,那么按照之前的做法,测试也会触发 effect.fn 的执行,但这个执行其实没意义的,因为 a 已经没有被使用了,是一个永远不会被访问到的变量,造成了性能浪费。所以我们需要删除 a 的副作用函数,让它不要执行。
接下来一起来看看 Vue 是怎么做的吧!这里涉及到的内容有点多,我们先一个个解释,首先补习一下关于 js 的一些操作符的基础知识。
1. 左移(<<)
左移操作符 (<<) 将第一个操作数转换成 2 进制后向左移动指定位数,左边超出的位数将会被清除,右边将会补零。
const a = 1;         // 00000000000000000000000000000001
const b = 1;

console.log(a << b); // 00000000000000000000000000000010
// expected output: 2
2. 位或操作(|)
位或操作符(|), 如果两位之一为 1,则设置每位为 1。
const a = 5;        // 00000000000000000000000000000101
const b = 3;        // 00000000000000000000000000000011

console.log(a | b); // 00000000000000000000000000000111
// expected output: 7
3. 按位与(&)
按位与运算符 (&) 在两个操作数对应的二进位都为 1 时,该位的结果值才为 1,否则为 0。
const a = 5;        // 00000000000000000000000000000101
const b = 3;        // 00000000000000000000000000000011

console.log(a & b); // 00000000000000000000000000000001
// expected output: 1
4. 按位非(~)
按位非运算符(~),反转操作数的位。
const a = 5;     // 00000000000000000000000000000101
const b = -3;    // 11111111111111111111111111111101

console.log(~a); // 11111111111111111111111111111010
// expected output: -6

console.log(~b); // 00000000000000000000000000000010
// expected output: 2
有了这些基础的知识点后,再来认识几个变量。
1. effectTrackDepth
用于记录位于响应上下文中的 effect 嵌套层次数,默认值为 0。
// effectTrackDepth = 0
effect(() => {
  // effectTrackDepth = 1
  effect(() => {})
})
2. trackOpBit
二进制位,每一位用于标识当前 effect 嵌套层级的依赖收集的启用状态。默认值为 1,即 00000000000000000000000000000001。
3. maxMarkerBits
表示最大的 effect 嵌套的层次数,最大值为 30。
好了,搞懂了这些操作符之后,我们来看看 Vue 的依赖清理是如何实现的,先来看不超过 maxMarkerBits 层级数的嵌套 effect 的依赖收集的过程,还以上面那个 demo 作为示例:
const state = reactive({
  a: 1,
  show: true
});

effect(() => {
  if (state.show) {
    console.log(`a: ${state.a}`)
  }
});

state.a ++

setTimeout(() => {
  state.show = false
  state.a ++
}, 1000)
Step 1:run 函数执行的时候,trackOpBit = 1 << ++effectTrackDepth 这个语句执行完成后,得到 effectTrackDepth = 1;trackOpBit.toString(2) = 00000000000000000000000000000010。
Step 2:因为 effectTrackDepth < maxMarkerBits ,所以执行 initDepMarkers 函数,因为这里的 deps 在初始化的时候还是个空数组,所以此函数未执行。
export const initDepMarkers = ({ deps }) => {
  if (deps.length) {
    for (let i = 0; i < deps.length; i++) {
      deps[i].w |= trackOpBit // set was tracked
    }
  }
}
Step 3:执行 this.fn 函数,先访问 state.show,触发了 trackEffects。
export function trackEffects(dep) {
  let shouldTrack = false
  if (effectTrackDepth <= maxMarkerBits) {
    // 如果本轮副作用函数执行过程中已经访问并收集过,则不用再收集该依赖
    if (!newTracked(dep)) {
      // 设置 dep.n
      dep.n |= trackOpBit
      shouldTrack = !wasTracked(dep)
    }
  } else {
    // Full cleanup mode.
    shouldTrack = !dep.has(activeEffect!)
  }

  if (shouldTrack) {
    dep.add(activeEffect!)
    activeEffect!.deps.push(dep)
  }
}
这里需要额外了解 2 个函数:wasTracked(已经被收集过,缩写是 w) 和 newTracked(新收集的依赖,缩写是 n)。
export const wasTracked = dep => (dep.w & trackOpBit) > 0

export const newTracked = dep => (dep.n & trackOpBit) > 0
进入 trackEffects 时,因为此时还没有为 dep.n 进行或运算赋值,所以 state.show 的 newTracked = false,wasTracked = false。
所以计算得到 shouldTrack = true,最后将 activeEffect 收集进入 dep 中,同时执行了 activeEffect.deps.push(dep) 将 dep 存入了 activeEffect 的 deps 中。然后访问 state.a 重复上述操作。上述步骤执行完成后的 activeEffect.deps 如下:
[
  {"w":0,"n": 00000000000000000000000000000010, [effect]},
  {"w":0,"n": 00000000000000000000000000000010, [effect]}
]
Step 4:最后执行 finalizeDepMarkers 函数,根据第 3 步,此时 effect 中的 deps 包含了 2 个 dep,分别是 state.show 和 state.a。 finalizeDepMarkers 函数内部执行了 wasTracked(已经被收集过,缩写是 w) 和 newTracked(新收集的依赖,缩写是 n) 函数,因为 dep.w = 0 所以 wasTracked = false。
export const finalizeDepMarkers = (effect: ReactiveEffect) => {
  const { deps } = effect
  if (deps.length) {
    let ptr = 0
    for (let i = 0; i < deps.length; i++) {
      const dep = deps[i]
      if (wasTracked(dep) && !newTracked(dep)) {
        dep.delete(effect)
      } else {
        // 缩小依赖集合的大小
        deps[ptr++] = dep
      }
      // clear bits
      dep.w &= ~trackOpBit
      dep.n &= ~trackOpBit
    }
    deps.length = ptr
  }
}
因为 wasTracked = false,因此 finalizeDepMarkers 处理后仍然将副作用函数保留在这两个属性对应的依赖集合中,同时把 dep.w 和 dep.n 重置回 0。
[{"w":0, "n":0, [effect]},{"w":0, "n":0, [effect]}]Step 5:当执行 state.show = false 的时候,触发 effect.run 的执行,此时执行 initDepMarkers 时,因为已经存在了 dep,所以先访问 state.show。
当执行到 trackEffects 时,此时的 newTracked = false,执行逻辑和之前一致。只不过因为 state.show = false,所以没有触发 state.a 的这一部分逻辑的处理,最后得到的结果为:
[
  {
    "w": 00000000000000000000000000000010,
    "n": 00000000000000000000000000000010,
    [effect]
  },
  {
    "w": 00000000000000000000000000000010,
    "n": 0,
    [effect]
  }
]
Step 6:最后执行 finalizeDepMarkers 时,如下。
if (wasTracked(dep) && !newTracked(dep)) {
  dep.delete(effect)
}
因为这里的 state.a 的 wasTracked = true 且 newTracked 为 false,所以执行了 dep.delete(effect) 将 effect 从 dep 中踢掉。
Step 7:1s 后执行 state.a++ 的操作,由于 state.a 中没有 effect 了,所以不会执行副作用函数。
总结: Vue 在组件的 effect 执行之前,会根据 dep 的收集标记位 w 和 n 来进行清理依赖,删除之前 state.a 收集的 effect 依赖。这样当我们修改 state.a 时,由于已经没有依赖了,就不会触发 effect 重新执行。
注意,当
effectTrackDepth大于30时,会调用cleanup来清理依赖,其实cleanup的原理就是依赖收集前全部删除所有的dep,依赖收集时再一个个加进来,这个性能其实是比较差的,所以Vue 3.2改成了通过二进制标记位的方式来选择性删除和添加,提升了性能。关于这部分更多的细节,可以参考这个PR。
总结
到这里,我们基本上讲完了 Vue 3 的响应式原理基础,如果有小伙伴了解 Vue 2 的响应式原理,应该清楚 Vue2 的响应式原理可以理解成如下一幅图:
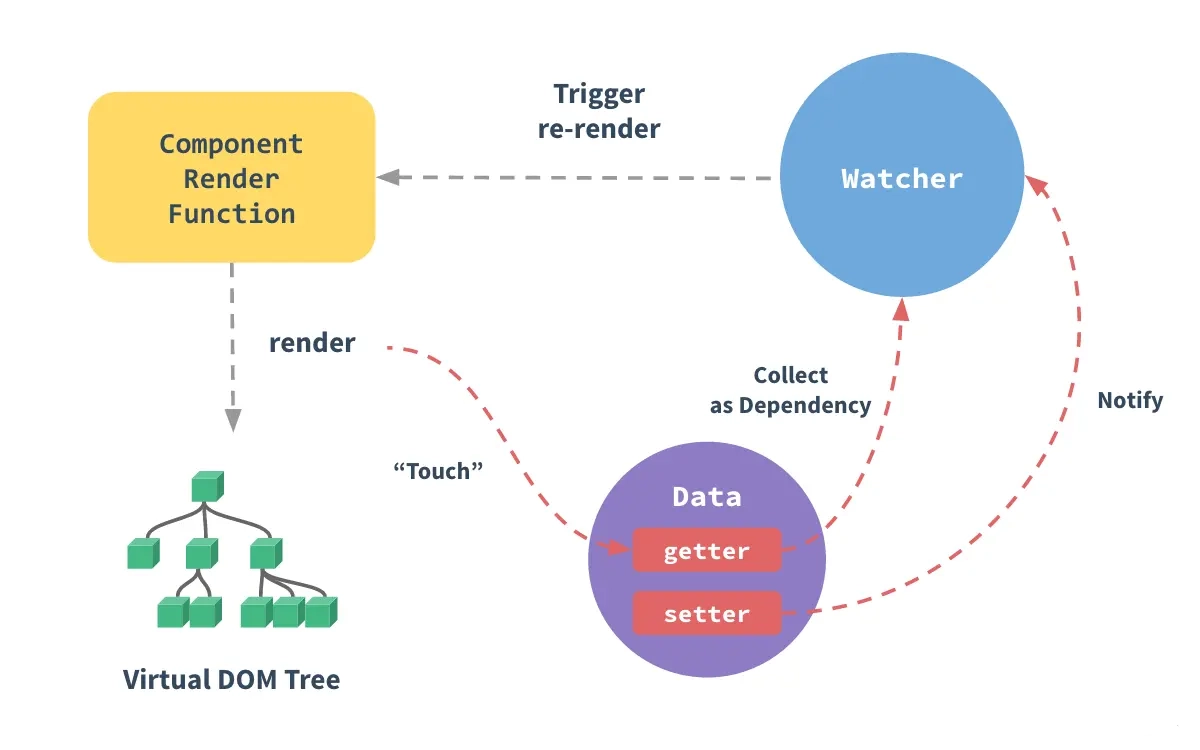
在 Vue 2 中,Watcher 就是依赖,有专门针对组件渲染的 render watcher。
- 依赖收集:组件在
render的时候会访问模板中的数据,触发getter把watcher作为依赖收集。 - 触发渲染:当修改数据时,会触发
setter,通知watcher更新,进而触发了组件的重新渲染。
相应地,在 Vue 3 中的响应式流程如下:
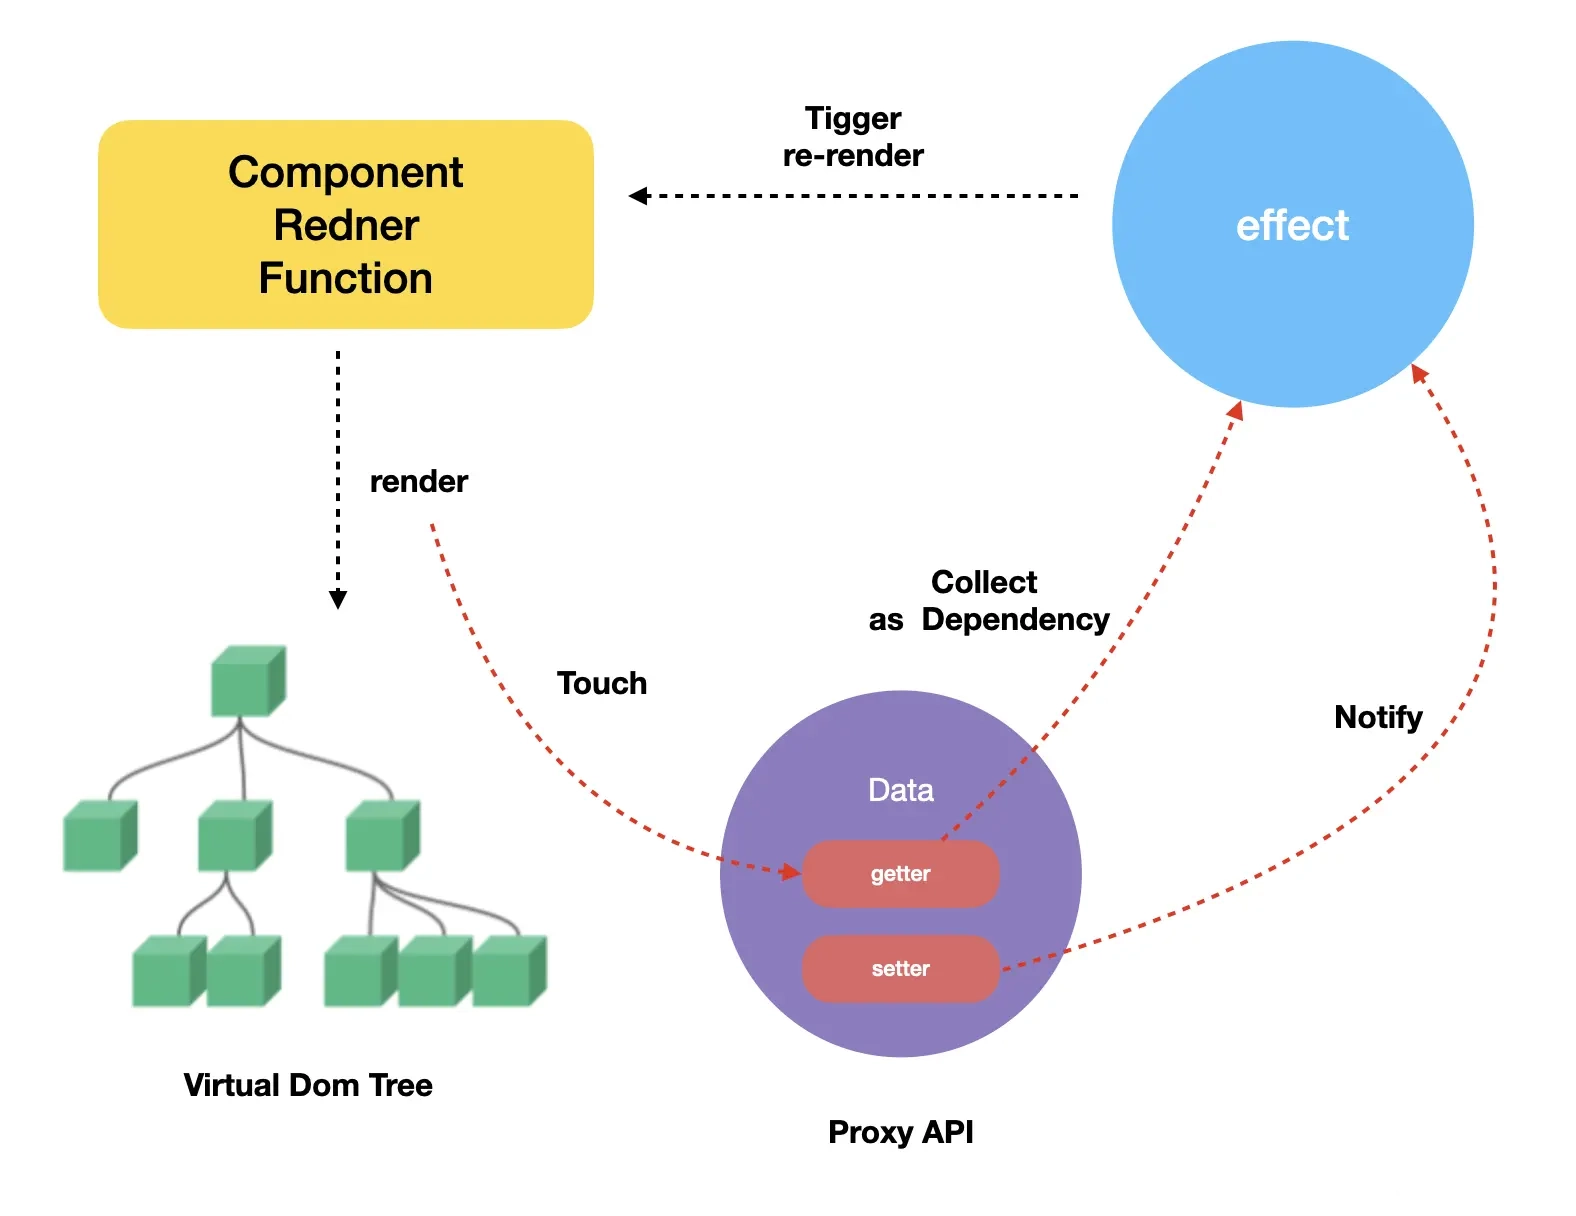
可以看到,Vue 3 相对于 Vue 2 的响应式差别不大,主要就是劫持数据的方式改成用 Proxy 实现,以及收集的依赖由 watcher 实例变成了组件副作用函数 effect。另外,值得一提的是 Vue 3 在响应式设计上又多考虑了层级嵌套的依赖收集问题和不必要的依赖清理问题。
响应式原理:Vue 3 的 nextTick
我们大致了解了对于 Vue 3 中的响应式原理:我们通过对 state 数据的响应式拦截,当触发 proxy setter 的时候,执行对应状态的 effect 函数。接下来看一个经典的例子:
<template>
  <div>{{number}}</div>
  <button @click="handleClick">click</button>
</template>
<script>
import { ref } from 'vue';
export default {
  setup() {
    const number = ref(0)
    function handleClick() {
      for (let i = 0; i < 1000; i++) {
        number.value ++;
      }
    }
    return {
      number,
      handleClick
    }
  }
}
</script>
当我们按下 click 按钮的时候,number 会被循环增加 1000 次。那么 Vue 的视图会在点击按钮的时候,从 1 -> 1000 刷新 1000 次吗?这一小节,我们将一起探探究竟。
queueJob
我们之前介绍关于“组件更新策略”的时候,提到了 setupRenderEffect 函数:
const setupRenderEffect = (instance, initialVNode, container, anchor, parentSuspense, isSVG, optimized) => {
  function componentUpdateFn() {
    if (!instance.isMounted) {
      // 初始化组件
    }
    else {
      // 更新组件
    }
  }
  // 创建响应式的副作用渲染函数
  instance.update = effect(componentUpdateFn, prodEffectOptions)
}
当时这里为了方便介绍组件的更新策略,我们简写了 instance.update 的函数创建过程,现在我们来详细看一下 instance.update 这个函数的创建:
const setupRenderEffect = (instance, initialVNode, container, anchor, parentSuspense, isSVG, optimized) => {
  function componentUpdateFn() {
    // ...
  }
  // 创建响应式的副作用渲染函数
  const effect = (instance.effect = new ReactiveEffect(
    componentUpdateFn,
    () => queueJob(update),
    instance.scope
  ))

  // 生成 instance.update 函数
  const update = (instance.update = () => effect.run())
  update.id = instance.uid

  // 组件允许递归更新
  toggleRecurse(instance, true)

  // 执行更新
  update()
}
可以看到在创建 effect 副作用函数的时候,会给 ReactiveEffect 传入一个 scheduler 调度函数,这样生成的 effect 中就包含了 scheduler 属性。同时为组件实例生成了一个 update 属性,该属性的值就是执行 effect.run 的函数,另外需要注意的一点是 update 中包含了一个 id 信息,该值是一个初始值为 0 的自增数字,下文我们再详细介绍其作用。
当我们触发 proxy setter 的时候,触发执行了 triggerEffect 函数,这次,我们补全 triggerEffect 函数的实现:
function triggerEffect(effect, debuggerEventExtraInfo) {
  if (effect !== activeEffect || effect.allowRecurse) {
    // effect 上存在 scheduler
    if (effect.scheduler) {
      effect.scheduler()
    } else {
      effect.run()
    }
  }
}
可以看到,如果 effect 上有 scheduler 属性时,执行的是 effect.scheduler 函数,否则执行 effect.run 进行视图更新。而这里显然我们需要先执行调度函数 scheduler。通过上面的信息,我们也清楚地知道 scheduler 函数的本质就是执行了 queueJob(update) 函数,一起来看一下 queueJob 的实现:
export function queueJob(job) {
  // 去重判断
  if (
    !queue.length ||
    !queue.includes(
      job,
      isFlushing && job.allowRecurse ? flushIndex + 1 : flushIndex
    )
  ) {
    // 添加到队列尾部
    if (job.id == null) {
      queue.push(job)
    } else {
      // 按照 job id 自增的顺序添加
      queue.splice(findInsertionIndex(job.id), 0, job)
    }
    queueFlush()
  }
}
queueJob 就是维护了一个 queue 队列,目的是向 queue 队列中添加 job 对象,这里的 job 就是我们前面的 update 对象。
这里有几点需要说明一下。
第一个是该函数会有一个 isFlushing && job.allowRecurse 判断,这个作用是啥呢?简单点说就是当队列正处于更新状态中(isFlushing = true) 且允许递归调用( job.allowRecurse = true)时,将搜索起始位置加一,无法搜索到自身,也就是允许递归调用了。什么情况下会出现递归调用?
<!-- 父组件 -->
<template>
  <div>{{msg}}</div>
  <Child />
</template>
<script>
import { ref, provide } from 'vue';
import Child from './components/Child.vue';
export default {
  setup() {
    const msg = ref("initial");
    provide("CONTEXT", { msg });
    return {
      msg
    };
  },
  components: {
    Child
  }
}
</script>

<!-- 子组件 Child -->
<template>
  <div>child</div>
</template>
<script>
import { inject } from 'vue';
export default {
  setup() {
    const ctx = inject("CONTEXT");
    ctx.msg.value = "updated";
  }
}
</script>
对于这种情况,首先是父组件进入 job 然后渲染父组件,接着进入子组件渲染,但是子组件内部修改了父组件的状态 msg。此时父组件需要支持递归渲染,也就是递归更新。
注意,这里的更新已经不属于单选数据流了,如果过多地打破单向数据流,会导致多次递归执行更新,可能会导致性能下降。
第二个是,queueJob 函数向 queue 队列中添加的 job 是按照 id 排序的,id 小的 Job 先被推入 queue 中执行,这保证了,父组件永远比子组件先更新(因为先创建父组件,再创建子组件,子组件可能依赖父组件的数据)。
再回到函数的本身来说,当我们执行 for 循环 1000 次 setter 的时候,因为在第一步进行了去重判断,所以 update 函数只会被添加一次到 queue 中。这里的 update 函数就是组件的渲染函数。所以无论这里执行多少次循环,渲染更新函数只会被执行一次。
queueFlush
上面说到了无论循环多少次 setter,这里相同 id 的 update 只会被添加一次到 queue 中。
细心的小伙伴可能会有这样的疑问:那么为什么视图不是从 0 -> 1 而是直接从 0 -> 1000 了呢?
要回答上面的问题,就得了解一下 queue 的执行更新相关的内容了,也就是 queueJob 的最后一步 queueFlush:
function queueFlush() {
  // 是否正处于刷新状态
  if (!isFlushing && !isFlushPending) {
    isFlushPending = true
    currentFlushPromise = resolvedPromise.then(flushJobs)
  }
}可以看到这里,vue 3 完全抛弃了除了 promise 之外的异步方案,不再支持vue 2 的 Promise > MutationObserver > setImmediate > setTimeout 其他三种异步操作了。
所以这里,vue 3 直接通过 promise 创建了一个微任务 flushJobs 进行异步调度更新,只要在浏览器当前 tick 内的所有更新任务都会被推入 queue 中,然后在下一个 tick 中统一执行更新。
function flushJobs(seen) {
  // 是否正在等待执行
  isFlushPending = false
  // 正在执行
  isFlushing = true

  // 在更新前,重新排序好更新队列 queue 的顺序
  // 这确保了:
  // 1. 组件都是从父组件向子组件进行更新的。(因为父组件都在子组件之前创建的
  // 所以子组件的渲染的 effect 的优先级比较低)
  // 2. 如果父组件在更新前卸载了组件,这次更新将会被跳过。
  queue.sort(comparator)

  try {
    // 遍历主任务队列,批量执行更新任务
    for (flushIndex = 0; flushIndex < queue.length; flushIndex++) {
      const job = queue[flushIndex]
      if (job && job.active !== false) {
        callWithErrorHandling(job, null, ErrorCodes.SCHEDULER)
      }
    }
  } finally {
    // 队列任务执行完,重置队列索引
    flushIndex = 0
    // 清空队列
    queue.length = 0
    // 执行后置队列任务
    flushPostFlushCbs(seen)
    // 重置队列执行状态
    isFlushing = false
    // 重置当前微任务为 Null
    currentFlushPromise = null
    // 如果主任务队列、后置任务队列还有没被清空,就继续递归执行
    if (queue.length || pendingPostFlushCbs.length) {
      flushJobs(seen)
    }
  }
}
在详细介绍 flushJobs 之前,我想先简单介绍一下 Vue 的更新任务执行机制中的一个重要概念:更新时机。 Vue 整个更新过程分成了三个部分:
- 更新前,称之为
pre阶段; - 更新中,也就是
flushing中,执行update更新; - 更新后,称之为
flushPost阶段。
更新前
什么是 pre 阶段呢?拿组件更新举例,就是在 Vue 组件更新之前被调用执行的阶段。默认情况下,Vue 的 watch 和 watchEffect 函数中的 callback 函数都是在这个阶段被执行的,我们简单看一下 watch 中的源码实现:
function watch(surce, cb, {immediate, deep, flush, onTrack, onTrigger} = {}) {
  // ...
  if (flush === 'sync') {
    scheduler = job
  } else if (flush === 'post') {
    scheduler = () => queuePostRenderEffect(job, instance && instance.suspense)
  } else {
    // 默认会给 job 打上 pre 的标记
    job.pre = true
    if (instance) job.id = instance.uid
    scheduler = () => queueJob(job)
  }
}
可以看到 watch 的 job 会被默认打上 pre 的标签。而带 pre 标签的 job 则会在渲染前被执行:
const updateComponent = () => {
  // ... 省略 n 行代码
  updateComponentPreRender(instance, n2, optimized)
}

function updateComponentPreRender() {
  // ... 省略 n 行代码
  flushPreFlushCbs()
}

export function flushPreFlushCbs(seen, i = isFlushing ? flushIndex + 1 : 0) {
  for (; i < queue.length; i++) {
    const cb = queue[i]
    if (cb && cb.pre) {
      queue.splice(i, 1)
      i--
      cb()
    }
  }
}
可以看到,在执行 updateComponent 更新组件之前,会调用 flushPreFlushCbs 函数,执行所有带上 pre 标签的 job。
更新中
更新中的过程就是 flushJobs 函数体前面的部分,首先会通过一个 comparator 函数对 queue 队列进行排序,这里排序的目的主要是保证父组件优先于子组件执行,另外在执行后续循环执行 job 任务的时候,通过判断 job.active !== false 来剔除被 unmount 卸载的组件,卸载的组件会有 active = false 的标记。
最后即通过 callWithErrorHandling 函数执行 queue 队列中的每一个 job:
export function callWithErrorHandling(fn, instance, type, args) {
  let res
  try {
    res = args ? fn(...args) : fn()
  } catch (err) {
    handleError(err, instance, type)
  }
  return res
}
更新后
当页面更新后,需要执行的一些回调函数都存储在 pendingPostFlushCbs 中,通过 flushPostFlushCbs 函数来进行回调执行:
export function flushPostFlushCbs(seen) {
  // 存在 job 才执行
  if (pendingPostFlushCbs.length) {
    // 去重
    const deduped = [...new Set(pendingPostFlushCbs)]
    pendingPostFlushCbs.length = 0

    // #1947 already has active queue, nested flushPostFlushCbs call
    // 已经存在activePostFlushCbs,嵌套flushPostFlushCbs调用,直接return
    if (activePostFlushCbs) {
      activePostFlushCbs.push(...deduped)
      return
    }

    activePostFlushCbs = deduped

    // 按job.id升序
    activePostFlushCbs.sort((a, b) => getId(a) - getId(b))

    // 循环执行job
    for (
      postFlushIndex = 0;
      postFlushIndex < activePostFlushCbs.length;
      postFlushIndex++
    ) {
      activePostFlushCbs[postFlushIndex]()
    }
    activePostFlushCbs = null
    postFlushIndex = 0
  }
}
一些需要渲染完成后再执行的钩子函数都会在这个阶段执行,比如 mounted hook 等等。
总结
通过上面的一些介绍,我们可以了解到本小节开头的示例中,number 的更新函数只会被同步地添加一次到更新队列 queue 中,但更新是异步的,会在 nextTick 也就是 Promise.then 的微任务中执行 update,所以更新会直接从 0 -> 1000。
另外,需要注意的是一个组件内的相同 update 只会有一个被推入 queue 中。比如下面的例子:
<template>
  <div>{{number}}</div>
  <div>{{msg}}</div>
  <button @click="handleClick">click</button>
</template>
<script>
import { ref } from 'vue'
export default {
  setup() {
    const number = ref(0)
    const msg = ref('init')
    function handleClick() {
      for (let i = 0; i < 1000; i++) {
        number.value ++;
      }
      msg.value = 'hello world'
    }
    return {
      number,
      msg,
      handleClick
    }
  }
}
</script>
当点击按钮时,因为 update 内部执行的是当前组件的同一个 componentUpdateFn 函数,状态 msg 和 number 的 update 的 id 是一致的,所以 queue 中,只有一个 update 函数,只会进行一次统一的更新。
响应式原理:watch 函数的实现原理
在组合式 API 中,我们可以使用 watch 函数在每次响应式状态发生变化时触发回调函数,watch 的第一个参数可以是不同形式的数据类型:它可以是一个 ref(包括计算属性)、一个响应式对象、一个 getter 函数、或多个数据源组成的数组。
const x = ref(0)
const y = ref(0)
const state = reactive({ num: 0 })

// 单个 ref
watch(x, (newX) => {
  console.log(`x is ${newX}`)
})

// getter 函数
watch(
  () => x.value + y.value,
  (sum) => {
    console.log(`sum of x + y is: ${sum}`)
  }
)

// 响应式对象
watch(
  state,
  (newState) => {
    console.log(`new state num is: ${newState.num}`)
  }
)

// 多个来源组成的数组
watch([x, () => y.value], ([newX, newY]) => {
  console.log(`x is ${newX} and y is ${newY}`)
})
了解了一些基础的 watch 使用示例后,我们开始分析一下 watch 函数是如何实现的呢。
标准化 source
先来看一下 watch 函数实现的代码:
function watch(source, cb, options) {
  // ...
  return doWatch(source, cb, options)
}

function doWatch(source, cb, { immediate, deep, flush, onTrack, onTrigger } = EMPTY_OBJ) {
  // ...
}
watch 函数内部是通过 doWatch 来执行的,在分析 doWatch 函数实现前,我们先看看前面的示例中,watch 监听的 source 可以是多种类型,一个函数可以支持多种类型的参数入参,那么实现该函数最好的设计模式就是 adapter 代理模式。就是将底层模型设计成一致的,抹平调用差异,这也是 doWatch 函数实现的第一步:标准化 source 参数。
一起来看看其中的实现:
function doWatch(source, cb, { immediate, deep, flush, onTrack, onTrigger } = EMPTY_OBJ) {
  // ...
  // source 不合法的时候警告函数
  const warnInvalidSource = (s: unknown) => {
    warn(
      `Invalid watch source: `,
      s,
      `A watch source can only be a getter/effect function, a ref, ` +
      `a reactive object, or an array of these types.`
    )
  }

  const instance = currentInstance
  let getter
  let forceTrigger = false
  let isMultiSource = false

  // 判断是不是 ref 类型
  if (isRef(source)) {
    getter = () => source.value
    forceTrigger = isShallow(source)
  }
  // 判断是不是响应式对象
  else if (isReactive(source)) {
    getter = () => source
    deep = true
  }
  // 判断是不是数组类型
  else if (isArray(source)) {
    isMultiSource = true
    forceTrigger = source.some(s => isReactive(s) || isShallow(s))
    getter = () =>
      source.map(s => {
        if (isRef(s)) {
          return s.value
        } else if (isReactive(s)) {
          return traverse(s)
        } else if (isFunction(s)) {
          return callWithErrorHandling(s, instance, ErrorCodes.WATCH_GETTER)
        } else {
          __DEV__ && warnInvalidSource(s)
        }
      })
  }
  // 判断是不是函数类型
  else if (isFunction(source)) {
    if (cb) {
      // getter with cb
      getter = () =>
        callWithErrorHandling(source, instance, ErrorCodes.WATCH_GETTER)
    } else {
      // 如果只有一个函数作为source 入参,则执行 watchEffect 的逻辑
      // ...
    }
  }
  // 都不符合,则告警
  else {
    getter = NOOP
    __DEV__ && warnInvalidSource(source)
  }

  // 深度监听
  if (cb && deep) {
    const baseGetter = getter
    getter = () => traverse(baseGetter())
  }

  // ...
}
由于 doWatch 函数代码量比较多,我们先一部分一部分地来解读,这里我们只关注于标准化 source 的逻辑。可以看到 doWatch 函数会对入参的 source 做不同类型的判断逻辑,然后生成一个统一的 getter 函数:
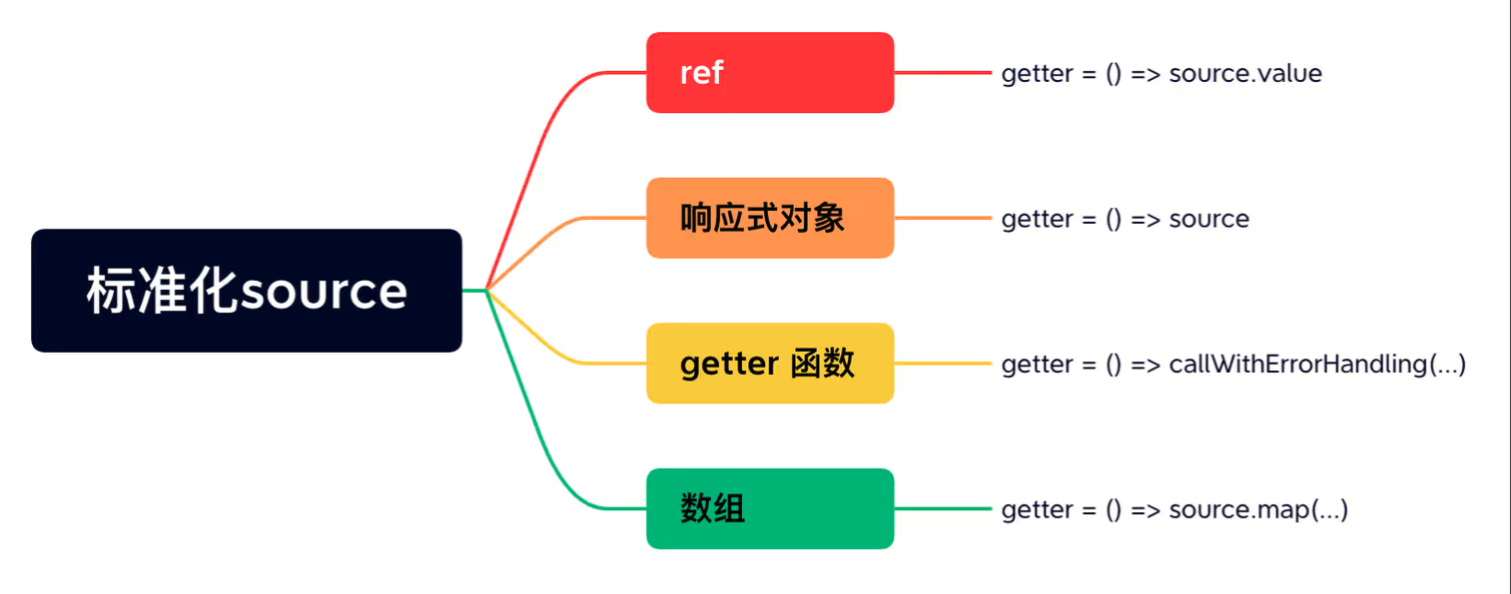
getter 函数就是简单地对不同数据类型设置一个访问 source 的操作,比如对于 ref 就是一个创建了一个访问 source.value 的函数。
那么为什么需要访问呢?由之前的响应式原理我们知道,只有在触发 proxy getter 的时候,才会进行依赖收集,所以,这里标准化的 source 函数中,不管是什么类型的 source 都会设计一个访问器函数。
另外,需要注意的是当 source 是个响应式对象时,源码中会同时设置 deep = true。这是因为对于响应式对象,需要进行深度监听,因为响应式对象中的属性变化时,都需要进行反馈。那是怎么做到深度监听的呢?在回答这个问题之前,我们前面说了监听一个对象的属性就是需要先访问对象的属性,触发 proxy getter,把副作用 cb 收集起来。源码中则是通过 traverse 函数来实现对响应式对象属性的遍历访问:
export function traverse(value, seen) {
  // ...
  if (isRef(value)) {
    // 如果是 ref 类型,继续递归执行 .value值
    traverse(value.value, seen)
  } else if (Array.isArray(value)) {
    // 如果是数组类型
    for (let i = 0; i < value.length; i++) {
      // 递归调用 traverse 进行处理
      traverse(value[i], seen)
    }
  } else if (isPlainObject(value)) {
    // 如果是对象,使用 for in 读取对象的每一个值,并递归调用 traverse 进行处理
    for (const key in value) {
      traverse((value as any)[key], seen)
    }
  }
  return value
}
构造副作用 effect
前面说到,我们通过一系列操作,标准化了用户传入的 source 成了一个 getter 函数,此时的 getter 函数一方面还没有真正执行,也就没有触发对属性的访问操作。
watch 的本质是对数据源进行依赖收集,当依赖变化时,回调执行 cb 函数并传入新旧值。所以我们需要构造一个副作用函数,完成对数据源的变化追踪:
function doWatch(source, cb, { immediate, deep, flush, onTrack, onTrigger } = EMPTY_OBJ) {
  // ...
  const effect = new ReactiveEffect(getter, scheduler)
}
这里的 getter 就是前面构造的属性访问函数,我们在介绍响应式原理的章节中,介绍过 ReactiveEffect 函数,这里再来回顾一下 ReactiveEffect 的实现:
class ReactiveEffect {
  constructor(
    public fn: () => T,
    public scheduler: EffectScheduler | null = null,
    scope?: EffectScope
  ) {
    recordEffectScope(this, scope)
  }

  run() {
    // ...
    this.fn()
  }
}
这里细节部分可以详细阅读响应式原理的部分,我们只需要知道这里的 ReactiveEffect run 函数内部执行了 this.fn() 也就是上面传入的 getter 函数,所以,本质上是在此时完成了对 watch source 的访问。
然后再看一下 ReactiveEffect 的第二个参数 scheduler,是如何构造的呢?
构造 scheduler 调度
function doWatch(source, cb, { immediate, deep, flush, onTrack, onTrigger } = EMPTY_OBJ) {
  // ...
  let oldValue = isMultiSource
    ? new Array(source.length).fill(INITIAL_WATCHER_VALUE)
    : INITIAL_WATCHER_VALUE
  const job = () => {
    // 被卸载
    if (!effect.active) {
      return
    }
    if (cb) {
      // 获取新值
      const newValue = effect.run()
      // ...
      // 执行 cb 函数
      callWithAsyncErrorHandling(cb, instance, ErrorCodes.WATCH_CALLBACK, [
        newValue,
        // 第一次更改时传递旧值为 undefined
        oldValue === INITIAL_WATCHER_VALUE
          ? undefined
          : (isMultiSource && oldValue[0] === INITIAL_WATCHER_VALUE)
            ? []
            : oldValue,
        onCleanup
        ])
      oldValue = newValue
    } else {
      // watchEffect
      effect.run()
    }
  }

  let scheduler
  // 直接赋值为 job 函数
  if (flush === 'sync') {
    scheduler = job
  } else if (flush === 'post') {
    // 渲染后执行,放入 postRenderEffect 队列
    scheduler = () => queuePostRenderEffect(job, instance && instance.suspense)
  } else {
    // 默认是渲染更新之前执行,设置 job.pre = true
    job.pre = true
    if (instance) job.id = instance.uid
    scheduler = () => queueJob(job)
  }
}
scheduler我们在批量调度更新章节有简单介绍过,本质这里是根据不同的watch options中的flush参数来设置不同的调度节点,这里默认是渲染更新前执行,也就是在异步更新队列queue执行前执行。
scheduler 核心就是将 job 放入异步执行队列中,但有个特殊,也就是 flush = 'sync' 时,是放入同步执行的。那么 job 是个什么啥玩意呢?
上述代码的注释已经很详尽了,job 其实就是一个用来执行回调函数 cb 的函数而已,在执行 cb 的同时,传入了 source 的新旧值。
effect run 函数执行
前面我们说到了,ReactiveEffect 内部的 run 函数,执行了依赖访问的 getter 函数,所以 run 函数是如何被执行的呢?
function doWatch(source, cb, { immediate, deep, flush, onTrack, onTrigger } = EMPTY_OBJ) {
  //...
  // 如果存在 cb
  if (cb) {
    // 立即执行
    if (immediate) {
      // 首次直接执行 job
      job()
    } else {
      // 执行run 函数,获取旧值
      oldValue = effect.run()
    }
  }
}
可以看到在执行 effect.run 的前面判断了是否是立即执行的模式,如果是立即执行,则直接执行上面的 job 函数,而此时的 job 函数是没有旧值的,所以此时执行的 oldValue = undefined。
返回销毁函数
最后,会返回侦听器销毁函数,也就是 watch API 执行后返回的函数。我们可以通过调用它来停止 watcher 对数据的侦听。
function doWatch(source, cb, { immediate, deep, flush, onTrack, onTrigger } = EMPTY_OBJ) {
  //...
  return () => {
    effect.stop()
    if (instance && instance.scope) {
      remove(instance.scope.effects!, effect)
    }
  }
}
销毁函数内部会执行 effect.stop 方法,用来停止对数据的 effect 响应。并且,如果是在组件中注册的 watcher,也会移除组件 effects 对这个 runner 的引用。
总结
所谓 watch,就是观测一个响应式数据或者监测一个副作用函数里面的响应式数据,当数据发生变化的时候通知并执行相应的回调函数。而内部实现,就是通过构造一个 effect 副作用对象,通过对 watch 监听属性的访问触发副作用收集,当修改监听属性时,根据 flush 的状态触发 job 的不同阶段更新。
响应式原理:computed 函数的实现原理
计算属性接受一个 getter 函数,返回一个只读的响应式 ref 对象。该 ref 通过 .value 暴露 getter 函数的返回值。
const count = ref(1)
const plusOne = computed(() => count.value + 1)

console.log(plusOne.value) // 2

plusOne.value++ // 错误
它也可以接受一个带有 get 和 set 函数的对象来创建一个可写的 ref 对象。
const count = ref(1)
const plusOne = computed({
  get: () => count.value + 1,
  set: (val) => {
    count.value = val - 1
  }
})

plusOne.value = 1
console.log(count.value) // 0
接下来看看源码里是如何实现 computed 的 API。
构造 setter 和 getter
function computed(getterOrOptions, debugOptions, isSSR = false) {
  let getter
  let setter
  // 判断第一个参数是不是一个函数
  const onlyGetter = isFunction(getterOrOptions)

  // 构造 setter 和 getter 函数
  if (onlyGetter) {
    getter = getterOrOptions
    // 如果第一个参数是一个函数,那么就是只读的
    setter = __DEV__
      ? () => {
          console.warn('Write operation failed: computed value is readonly')
        }
      : NOOP
  } else {
    getter = getterOrOptions.get
    setter = getterOrOptions.set
  }
  // 构造 ref 响应式对象
  const cRef = new ComputedRefImpl(getter, setter, onlyGetter || !setter, isSSR)
  // 返回响应式 ref
  return cRef
}
可以看到,这段 computed 函数体最初就是需要格式化传入的参数,根据第一个参数入参的类型来构造统一的 setter 和 getter 函数,并传入 ComputedRefImpl 类中,进行实例化 ref 响应式对象。
接下来一起看看 ComputedRefImpl 是如何构造 cRef 响应式对象的。
构造 cRef 响应式对象
class ComputedRefImpl {
  public dep = undefined

  private _value
  public readonly effect
  //表示 ref 类型
  public readonly __v_isRef = true
  //是否只读
  public readonly [ReactiveFlags.IS_READONLY] = false
  //用于控制是否进行值更新(代表是否脏值)
  public _dirty = true
  // 缓存
  public _cacheable

  constructor(
    getter,
    _setter,
    isReadonly,
    isSSR
  ) {
    // 把 getter 作为响应式依赖函数 fn 参数
    this.effect = new ReactiveEffect(getter, () => {
      if (!this._dirty) {
        this._dirty = true
        // 触发更新
        triggerRefValue(this)
      }
    })
    // 标记 effect 的 computed 属性
    this.effect.computed = this
    this.effect.active = this._cacheable = !isSSR
    this[ReactiveFlags.IS_READONLY] = isReadonly
  }

  get value() {
    const self = toRaw(this)
    // 依赖收集
    trackRefValue(self)
    // 脏值则进行更新
    if (self._dirty || !self._cacheable) {
      self._dirty = false
      // 更新值
      self._value = self.effect.run()!
    }
    return self._value
  }
  // 执行 setter
  set value(newValue) {
    this._setter(newValue)
  }
}
简单看一下该类的实现:在构造函数的时候,创建了一个副作用对象 effect。并为 effect 额外定义了一个 computed 属性执行当前响应式对象 cRef。
另外,定义了一个 get 方法,当我们通过 ref.value 取值的时候可以进行依赖收集,将定义的 effect 收集起来。
其次,定义了一个 set 方法,该方法就是执行传入进来的 setter 函数。
最后,熟悉 Vue 的开发者都知道 computed 的特性就在于能够缓存计算的值(提升性能),只有当 computed 的依赖发生变化时才会重新计算,否则读取 computed 的值则一直是之前的值。在源码这里,实现上述功能相关的变量分别是 _dirty 和 _cacheable 这 2 个,用来控制缓存的实现。
有了上面的介绍,我们来看一个具体的例子,看看 computed 是如何执行的:
<template>
  <div>
    {{ plusOne }}
  </div>
  <button @click="plus">plus</button>
</template>
<script>
  import { ref, computed } from 'vue'
  export default {
    setup() {
      const num = ref(0)
      const plusOne = computed(() => {
        return num.value + 1
      })

      function plus() {
        num.value++
      }
      return {
        plusOne,
        plus
      }
    }
  }
</script>
Step 1:setup 函数体内,computed 函数执行,初始的过程中,生成了一个 computed effect。
Step 2:初始化渲染的时候,render 函数访问了 plusOne.value,触发了收集,此时收集的副作用为 render effect,因为是首次访问,所以此时的 self._dirty = true 执行 effect.run() 也就是执行了 getter 函数,得到 _value = 1。
Step 3:getter 函数体内访问了 num.value 触发了对 num 的依赖收集,此时收集到的依赖为 computed effect。
Step 4:点击按钮,此时 num = 1 触发了 computed effect 的 schduler 调度,因为 _dirty = false,所以触发了 triggerRefValue 的执行,同时,设置 _dirty = true。
Step 5:triggerRefValue 执行过程中,会执行 computed effect.run() 触发 getter 函数的执行。因为此时的 _dirty = true,所以 get value 会重新计算 _value 的值为 plusOne.value = 2。
Step 6:plusOne.value 值变化后,触发了 render effect.run 重新渲染。
可以看到 computed 函数通过 _dirty 把 computed 的缓存特性表现得淋漓尽致,只有当 _dirty = true 的时候,才会进行重新计算求值,而 _dirty = true 只有在首次取值或者取值内部依赖发生变化时才会执行。
计算属性的执行顺序
这里,我们介绍完了 computed 的核心流程,但是细心的同学可能发现,这里我们还漏了一个小的知识点没有介绍,就是在类 ComputedRefImpl 的构造函数中,执行了这样一行代码:
this.effect.computed = this那么这行代码的作用是什么呢?在说这个作用之前,我们先来看一个 demo:
const { ref, effect, computed } = Vue

const n = ref(0)
const plusOne = computed(() => n.value + 1)
effect(() => {
  n.value
  console.log(plusOne.value)
})
n.value++
小伙伴们可以猜测一下上述代码的打印结果。
可能有些小伙伴猜测应该是:
1
1
2
首先是 effect 函数先执行,触发 n 的依赖收集,然后访问了 plusOne.value,再收集 computed effect。然后执行 n.value++ 按照顺序触发 effect 执行,所以理论上先触发 effect 函数内部的回调,再去执行 computed 的重新求值。所以输出是上述结果。
但事实却是:
1
2
2这就是因为上面那一行代码的作用。effect.computed 的标记保障了 computed effect 会优先于其他普通副作用函数先执行,关于具体的实现,可以看一下 triggerEffects 函数体内对 computed 的特殊处理:
function triggerEffects(dep, debuggerEventExtraInfo) {
  const effects = isArray(dep) ? dep : [...dep]
  // 确保执行完所有的 computed
  for (const effect of effects) {
    if (effect.computed) {
      triggerEffect(effect, debuggerEventExtraInfo)
    }
  }
  // 再执行其他的副作用函数
  for (const effect of effects) {
    if (!effect.computed) {
      triggerEffect(effect, debuggerEventExtraInfo)
    }
  }
}
总结
总而言之,计算属性可以从状态数据中计算出新数据,computed 和 methods 的最大差异是它具备缓存性,如果依赖项不变时不会重新计算,而是直接返回缓存的值。
搞懂了本小节关于 computed 函数的介绍后,相信你已经知道计算属性相对于普通函数的不同之处的原理,在以后的开发中,可以更合理地使用计算属性!
响应式原理:依赖注入实现跨级组件数据共享
通常情况下,当我们需要从父组件向子组件传递数据时,会使用 props。对于层级不深的父子组件可以通过 props 透传数据,但是当父子层级过深时,数据透传将会变得非常麻烦和难以维护,引用 Vue.js 官网的一张图:
而依赖注入则是为了解决 prop 逐级透传 的问题而诞生的,父组件 provide 需要共享给子组件的数据,子组件 inject 使用需要的父组件状态数据,而且可以保持响应式。
再来看一个依赖注入的使用示例:
// 父组件
import { provide, ref } from 'vue'
const msg = ref('hello')
provide(/* 注入名 */ 'message', /* 值 */ msg)

//子组件使用
import { inject } from 'vue'
const message = inject('message')
Provide
Provide 顾名思义,就是一个数据提供方,看看源码里面是如何提供的:
export function provide(key, value) {
  if (!currentInstance) {
    // ...
  } else {
    // 获取当前组件实例上的 provides 对象
    let provides = currentInstance.provides
    // 获取父组件实例上的 provides 对象
    const parentProvides =
      currentInstance.parent && currentInstance.parent.provides
    // 当前组件的 providers 指向父组件的情况
    if (parentProvides === provides) {
      // 继承父组件再创建一个 provides
      provides = currentInstance.provides = Object.create(parentProvides)
    }
    // 生成 provides 对象
    provides[key] = value
  }
}
这里稍微回忆一下 Object.create 这个函数:这个方法用于创建一个新对象,使用现有的对象来作为新创建对象的原型(prototype)。
所以 provide 就是通过获取当前组件实例对象上的 provides,然后通过 Object.create 把父组件的 provides 属性设置到当前的组件实例对象的 provides 属性的原型对象上。最后再将需要 provid 的数据存储在当前的组件实例对象上的 provides上。
这里你可能会有个疑问,当前组件上实例的 provides 为什么会等于父组件上的 provides 呢?这是因为在组件实例 currentInstance 创建的时候进行了初始化的:
appContext = {
  // ...
  provides: Object.create(null),
}

const instance = {
  // 依赖注入相关
  provides: parent ? parent.provides : Object.create(appContext.provides),
  // 其它属性
  // ...
}
可以看到,如果父组件定义了 provide 那么子组件初始的过程中都会将自己的 provide 指向父组件的 provide。而根组件因为没有父组件,则被赋值为一个空对象。大致可以表示为:

Inject
Inject 顾名思义,就是一个数据注入方,看看源码里面是如何实现注入的:
export function inject(key, defaultValue, treatDefaultAsFactory = false) {
    // 获取当前组件实例
    const instance = currentInstance || currentRenderingInstance
    if (instance) {
        // 获取父组件上的 provides 对象
        const provides =
            instance.parent == null
                ? instance.vnode.appContext && instance.vnode.appContext.provides
                : instance.parent.provides
        // 如果能取到,则返回值
        if (provides && key in provides) {
            return provides[key]
        } else if (arguments.length > 1) {
            // 返回默认值
            return treatDefaultAsFactory && isFunction(defaultValue)
                // 如果默认内容是个函数的,就执行并且通过call方法把组件实例的代理对象绑定到该函数的this上
                ? defaultValue.call(instance.proxy)
                : defaultValue
        }
    }
}
这里的实现就显得通俗易懂了,核心也就是从当前组件实例的父组件上取 provides 对象,然后再查找父组件 provides 上有没有对应的属性。因为父组件的 provides 是通过原型链的方式和父组件的父组件进行了关联,如果父组件上没有,那么会通过原型链的方式再向上取,这也实现了不管组件层级多深,总是可以找到对应的 provide 的提供方数据。
总结
通过上面的分析,我们知道了依赖注入的实现原理相对还是比较简单的,比较有意思的事他巧妙地利用了原型和原型链的方式进行数据的继承和获取。
在执行 provide 的时候,会将父组件的的 provides 关联成当前组件实例 provides 对象原型上的属性,当在 inject 获取数据的时候,则会根据原型链的规则进行查找,找不到的话则会返回用户自定义的默认值。
最后,我们知道 Vue 通过了依赖注入的方式实现了跨层级组件的状态共享问题。跨层级的状态共享问题是不是听起来有点耳熟?没错,那就是 vuex / pinia 所做的事情。
编译器:模板是如何被编译成 AST 的
通过前面的小节,我们知道组件渲染成 vnode 的过程,其实就是组件的 render 函数调用执行的结果。但是我们写 Vue 项目时,经常会使用 <template> 的模版式写法,很少使用 render 函数的写法,那么 Vue 是如何实现从 模版 转成 render 函数的呢?
另外,关于模版编译成 render 函数的结果,也可以通过官方提供的 模版导出工具 现在调试编译结果。
Vue3 的核心编译源码文件在 packages/compiler-dom/src/index.ts 中:
function compile(template, options = {}) {
  return baseCompile(template, extend({}, parserOptions, options, {
    nodeTransforms: [...DOMNodeTransforms, ...(options.nodeTransforms || [])],
    directiveTransforms: extend({}, DOMDirectiveTransforms, options.directiveTransforms || {}),
    transformHoist:  null
  }))
}
其核心调用的就是 baseCompile 函数,接下来一起看一下 baseCompile 的实现:
export function baseCompile(template, options = {}) {
  // 如果是字符串模版,则直接进行解析,转成 AST
  const ast = isString(template) ? baseParse(template, options) : template
  const [nodeTransforms, directiveTransforms] =
    getBaseTransformPreset(prefixIdentifiers)

  // AST 转换成 JS AST
  transform(
    ast,
    extend({}, options, {
      prefixIdentifiers,
      nodeTransforms: [
        ...nodeTransforms,
        ...(options.nodeTransforms || []) // user transforms
      ],
      directiveTransforms: extend(
        {},
        directiveTransforms,
        options.directiveTransforms || {} // user transforms
      )
    })
  )

  // JS AST 生成代码
  return generate(
    ast,
    extend({}, options, {
      prefixIdentifiers
    })
  )
}
可以看到 baseCompile 函数核心就只有 3 步:
- 对
template模版进行词法和语法分析,生成AST AST转换成附有JS语义的JavaScript AST- 解析
JavaScript AST生成代码
解析 template 生成 AST
一个简单的模版如下:
<template>
  <!-- 这是一段注释 -->
  <p>{{ msg }}</p>
</template>
这个模版经过 baseParse 后转成的 AST 结果如下:
{
  "type": 0,
  "children": [
    {
      "type": 3,
      "content": " 这是一段注释 ",
      "loc": {
        "start": {
          "column": 3,
          "line": 2,
          "offset": 3
        },
        "end": {
          "column": 18,
          "line": 2,
          "offset": 18
        },
        "source": "<!-- 这是一段注释 -->"
      }
    },
    {
      "type": 1,
      "ns": 0,
      "tag": "p",
      "tagType": 0,
      "props": [],
      "isSelfClosing": false,
      "children": [
        {
          "type": 5,
          "content": {
            "type": 4,
            "isStatic": false,
            "constType": 0,
            "content": "msg",
            "loc": {
              "start": {
                "column": 9,
                "line": 3,
                "offset": 27
              },
              "end": {
                "column": 12,
                "line": 3,
                "offset": 30
              },
              "source": "msg"
            }
          },
          "loc": {
            "start": {
              "column": 6,
              "line": 3,
              "offset": 24
            },
            "end": {
              "column": 15,
              "line": 3,
              "offset": 33
            },
            "source": "{{ msg }}"
          }
        }
      ],
      "loc": {
        "start": {
          "column": 3,
          "line": 3,
          "offset": 21
        },
        "end": {
          "column": 19,
          "line": 3,
          "offset": 37
        },
        "source": "<p>{{ msg }}</p>"
      }
    }
  ],
  "helpers": [],
  "components": [],
  "directives": [],
  "hoists": [],
  "imports": [],
  "cached": 0,
  "temps": 0,
  "loc": {
    "start": {
      "column": 1,
      "line": 1,
      "offset": 0
    },
    "end": {
      "column": 1,
      "line": 4,
      "offset": 38
    },
    "source": "\n  <!-- 这是一段注释 -->\n  <p>{{ msg }}</p>\n"
  }
}
其中有一个 type 字段,用来标记 AST 节点的类型,这里涉及到的枚举如下:
export const enum NodeTypes {
  ROOT, // 0 根节点
  ELEMENT, // 1 元素节点
  TEXT, // 2 文本节点
  COMMENT, // 3 注释节点
  SIMPLE_EXPRESSION, // 4 表达式
  INTERPOLATION, // 5 插值节点
  // ...
}另外,props 描述的是节点的属性,loc 代表的是节点对应的代码相关信息,包括代码的起始位置等等。
有了上面的一些基础知识,我们来看看生成 AST 的核心算法:
export function baseParse(content, options) {
  // 创建解析上下文
  const context = createParserContext(content, options)
  // 获取起点位置
  const start = getCursor(context)
  // 创建 AST
  return createRoot(
    parseChildren(context, TextModes.DATA, []),
    getSelection(context, start)
  )
}
其中创建解析上下文得到的 context 的过程:
function createParserContext(content, options) {
  return {
    options: extend({}, defaultParserOptions, options),
    column: 1,
    line: 1,
    offset: 0,
    // 存储原始模版内容
    originalSource: content,
    source: content,
    inPre: false,
    inVPre: false
  }
}
createParserContext 本质就是返回了一个 context 对象,用来标记解析过程中的上下文内容。
接下来我们核心需要分析的是 parseChildren 函数,该函数是生成 AST 的核心函数。通过函数调用我们大致清楚该函数传入了初始化生成的 context 对象,context 对象中包含我们初始的模版内容,存储在 originalSource 和 source 中。
先来看看 parseChildren 对节点内容解析的过程:
function parseChildren(context, mode, ancestors) {
  // 获取父节点
  const parent = last(ancestors)
  const ns = parent ? parent.ns : Namespaces.HTML
  const nodes: TemplateChildNode[] = []
  // 判断是否到达结束位置,遍历结束
  while (!isEnd(context, mode, ancestors)) {
    // template 中的字符串
    const s = context.source
    let node = undefined
    // 如果 mode 是 DATA 和 RCDATA 模式
    if (mode === TextModes.DATA || mode === TextModes.RCDATA) {
      // 处理 {{ 开头的情况
      if (!context.inVPre && startsWith(s, context.options.delimiters[0])) {
        // '{{'
        node = parseInterpolation(context, mode)
      } else if (mode === TextModes.DATA && s[0] === '<') {
        // 以 < 开头且就一个 < 字符
        if (s.length === 1) {
          emitError(context, ErrorCodes.EOF_BEFORE_TAG_NAME, 1)
        } else if (s[1] === '!') {
          // 以 <! 开头的情况
          if (startsWith(s, '<!--')) {
            // 如果是 <!-- 这种情况,则按照注释节点处理
            node = parseComment(context)
          } else if (startsWith(s, '<!DOCTYPE')) {
            // 如果是 <!DOCTYPE 这种情况
            node = parseBogusComment(context)
          } else if (startsWith(s, '<![CDATA[')) {
            // 如果是 <![CDATA[ 这种情况
            if (ns !== Namespaces.HTML) {
              node = parseCDATA(context, ancestors)
            } else {
              emitError(context, ErrorCodes.CDATA_IN_HTML_CONTENT)
              node = parseBogusComment(context)
            }
          } else {
            // 都不是的话,则报错
            emitError(context, ErrorCodes.INCORRECTLY_OPENED_COMMENT)
            node = parseBogusComment(context)
          }
        } else if (s[1] === '/') {
          // 以 </ 开头,并且只有 </ 的情况
          if (s.length === 2) {
            emitError(context, ErrorCodes.EOF_BEFORE_TAG_NAME, 2)
          } else if (s[2] === '>') {
            // </> 缺少结束标签,报错
            emitError(context, ErrorCodes.MISSING_END_TAG_NAME, 2)
            advanceBy(context, 3)
            continue
          } else if (/[a-z]/i.test(s[2])) {
            // 文本中存在多余的结束标签的情况 </p>
            emitError(context, ErrorCodes.X_INVALID_END_TAG)
            parseTag(context, TagType.End, parent)
            continue
          } else {
            emitError(
              context,
              ErrorCodes.INVALID_FIRST_CHARACTER_OF_TAG_NAME,
              2
            )
            node = parseBogusComment(context)
          }
        } else if (/[a-z]/i.test(s[1])) {
          // 解析标签元素节点
          node = parseElement(context, ancestors)
        } else if (s[1] === '?') {
          emitError(
            context,
            ErrorCodes.UNEXPECTED_QUESTION_MARK_INSTEAD_OF_TAG_NAME,
            1
          )
          node = parseBogusComment(context)
        } else {
          emitError(context, ErrorCodes.INVALID_FIRST_CHARACTER_OF_TAG_NAME, 1)
        }
      }
    }
    if (!node) {
      // 解析普通文本节点
      node = parseText(context, mode)
    }

    if (isArray(node)) {
      for (let i = 0; i < node.length; i++) {
        pushNode(nodes, node[i])
      }
    } else {
      pushNode(nodes, node)
    }
  }
}
上述代码量虽然挺多,但整体要做的事情还是比较明确和清晰的。从上述代码中可以看到,Vue 在解析模板字符串时,可分为两种情况:以 < 开头的字符串和不以 < 开头的字符串。
其中,不以 < 开头的字符串有两种情况:它是文本节点或 插值表达式。
而以 < 开头的字符串又分为以下几种情况:
- 元素开始标签,比如
<div> - 注释节点
<!-- 123 --> - 文档声明
<!DOCTYPE html> - 纯文本标签
<![CDATA[<]]>
接下来我们介绍几个比较重要的解析器。
1. 解析插值
根据前面的描述,我们知道当遇到字符串 的时候,会把当前代码当做是插值节点来解析,进入 parseInterpolation 函数体内:
function parseInterpolation(context, mode) {
  // 从配置中获取插值开始和结束分隔符,默认是 {{ 和 }}
  const [open, close] = context.options.delimiters
  // 获取结束分隔符的位置
  const closeIndex = context.source.indexOf(close, open.length)
  // 如果不存在结束分隔符,则报错
  if (closeIndex === -1) {
    emitError(context, ErrorCodes.X_MISSING_INTERPOLATION_END)
    return undefined
  }

  // 获取开始解析的起点
  const start = getCursor(context)
  // 解析位置移动到插值开始分隔符后
  advanceBy(context, open.length)
  // 获取插值起点位置
  const innerStart = getCursor(context)
  // 获取插值结束位置
  const innerEnd = getCursor(context)
  // 插值原始内容的长度
  const rawContentLength = closeIndex - open.length
  // 插值原始内容
  const rawContent = context.source.slice(0, rawContentLength)
  // 获取插值的内容,并移动位置到插值的内容后
  const preTrimContent = parseTextData(context, rawContentLength, mode)
  const content = preTrimContent.trim()
  // 如果存在空格的情况,需要计算偏移值
  const startOffset = preTrimContent.indexOf(content)
  if (startOffset > 0) {
    // 更新插值起点位置
    advancePositionWithMutation(innerStart, rawContent, startOffset)
  }
  // 如果尾部存在空格的情况
  const endOffset =
    rawContentLength - (preTrimContent.length - content.length - startOffset)
  // 也需要更新尾部的位置
  advancePositionWithMutation(innerEnd, rawContent, endOffset)
  // 移动位置到插值结束分隔符后
  advanceBy(context, close.length)

  return {
    type: NodeTypes.INTERPOLATION,
    content: {
      type: NodeTypes.SIMPLE_EXPRESSION,
      isStatic: false,
      // Set `isConstant` to false by default and will decide in transformExpression
      constType: ConstantTypes.NOT_CONSTANT,
      content,
      loc: getSelection(context, innerStart, innerEnd)
    },
    loc: getSelection(context, start)
  }
}
这里大量使用了一个重要函数 advanceBy(context, numberOfCharacters)。其功能是更新解析上下文 context 中的 source 来移动代码解析的位置,同时更新 offset、line、column 等和代码位置相关的属性,这样来达到一步步 蚕食 模版字符串的目的,从而达到对整个模版字符 chuancontext 是字符串的上下文对象,numberOfCharacters 是要前进的字符数。
针对这样一段代码:
<div>{{ msg }}</div>调用 advance(s, 14) 函数,得到结果:
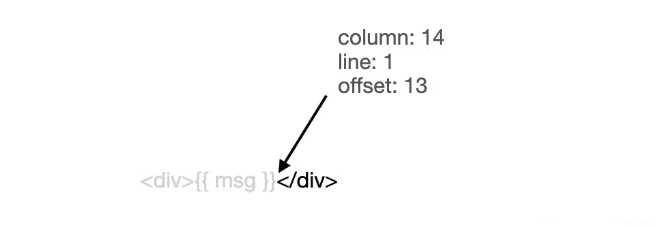
可以看到,parseInterpolation 函数本质就是通过插值的开始标签 {{ 和结束标签 }} 找到插值的内容 content。然后再计算插值的起始位置,接着就是前进代码到插值结束分隔符后,表示插值部分代码处理完毕,可以继续解析后续代码了。
最后返回一个描述插值节点的 AST 对象,其中,loc 记录了插值的代码开头和结束的位置信息,type 表示当前节点的类型,content 表示当前节点的内容信息。
2. 解析文本
针对源代码起点位置的字符不是 < 或者 {{ 时,则当做是文本节点处理,调用 parseText 函数:
function parseText(context, mode) {
  // 文本结束符
  const endTokens = mode === TextModes.CDATA ? [']]>'] : ['<', context.options.delimiters[0]]

  let endIndex = context.source.length
  // 遍历文本结束符,匹配找到结束的位置
  for (let i = 0; i < endTokens.length; i++) {
    const index = context.source.indexOf(endTokens[i], 1)
    if (index !== -1 && endIndex > index) {
      endIndex = index
    }
  }

  const start = getCursor(context)
  // 获取文本的内容,并前进代码到文本的内容后
  const content = parseTextData(context, endIndex, mode)

  return {
    type: NodeTypes.TEXT,
    content,
    loc: getSelection(context, start)
  }
}
parseText 函数整体功能还是比较简单的,如果一段文本,在 CDATA 模式下,当遇到 ]]> 即为结束位置,否则,都是在遇到 < 或者插值分隔符 {{ 结束。所以通过遍历这些结束符,匹配并找到文本结束的位置。
找到文本结束位置后,就可以通过 parseTextData 函数来获取到文本的内容并前进到文本内容后。
最后返回一个文本节点的 AST 对象。
3. 解析节点
当起点字符是 < 开头,且后续字符串匹配 /[a-z]/i 正则表达式,则会进入 parseElement 的节点解析函数:
function parseElement(context, ancestors) {
  // ...
  // 开始标签
  // 获取当前元素的父标签节点
  const parent = last(ancestors)
  // 解析开始标签,生成一个标签节点,并前进代码到开始标签后
  const element = parseTag(context, TagType.Start, parent)
  // 如果是自闭和标签,直接返回标签节点
  if (element.isSelfClosing || context.options.isVoidTag(element.tag)) {
    return element
  }

  // 下面是处理子节点的逻辑
  // 先把标签节点添加到 ancestors,入栈
  ancestors.push(element)
  const mode = context.options.getTextMode(element, parent)
  // 递归解析子节点,传入 ancestors
  const children = parseChildren(context, mode, ancestors)
  // 子节点解析完成 ancestors 出栈
  ancestors.pop()

  // ...
  element.children = children

  // 结束标签
  if (startsWithEndTagOpen(context.source, element.tag)) {
    // 解析结束标签,并前进代码到结束标签后
    parseTag(context, TagType.End, parent)
  } else {
    // ...
  }
  // 更新标签节点的代码位置,结束位置到结束标签后
  element.loc = getSelection(context, element.loc.start)

  return element
}可以看到,parseElement 主要做了三件事情:解析开始标签,解析子节点,解析闭合标签。
在解析子节点过程中, Vue 会用一个栈 ancestors 来保存解析到的元素标签。当它遇到开始标签时,会将这个标签推入栈,遇到结束标签时,将刚才的标签弹出栈。它的作用是保存当前已经解析了,但还没解析完的元素标签。这个栈还有另一个作用,在解析到某个字节点时,通过 ancestors[ancestors.length - 1] 可以获取它的父元素。
<div class="app">
  <p>{{ msg }}</p>
  一个文本节点
</div>
从我们的示例来看,它的出入栈顺序是这样的:
[] // 刚开始时空栈
[div] // div 入栈
[div, p] // p 入栈
[div] // p 节点解析完成,出栈
[] // div 节点解析完成,出栈
另外,在解析开始标签和解析闭合标签时,都用到了一个 parseTag 函数,这也是节点标签解析的核心函数:
function parseTag(context, type, parent) {
  const start = getCursor(context)
  // 匹配标签文本结束的位置
  const match = /^<\/?([a-z][^\t\r\n\f />]*)/i.exec(context.source)!
  const tag = match[1]
  const ns = context.options.getNamespace(tag, parent)
  // 前进代码到标签文本结束位置
  advanceBy(context, match[0].length)
  // 前进代码到标签文本后面的空白字符后
  advanceSpaces(context)

  // 解析标签中的属性,并前进代码到属性后
  let props = parseAttributes(context, type)
  // ...
  // 标签闭合.
  let isSelfClosing = false
  if (context.source.length === 0) {
    emitError(context, ErrorCodes.EOF_IN_TAG)
  } else {
    // 判断是否自闭合标签
    isSelfClosing = startsWith(context.source, '/>')
    // 结束标签不应该是自闭和标签
    if (type === TagType.End && isSelfClosing) {
      emitError(context, ErrorCodes.END_TAG_WITH_TRAILING_SOLIDUS)
    }
    // 前进代码到闭合标签后
    advanceBy(context, isSelfClosing ? 2 : 1)
  }

  // 闭合标签,则退出
  if (type === TagType.End) {
    return
  }

  let tagType = ElementTypes.ELEMENT
  if (!context.inVPre) {
    // 接下来判断标签类型,是组件、插槽还是模板
    if (tag === 'slot') {
      tagType = ElementTypes.SLOT
    } else if (tag === 'template') {
      if (
        props.some(
          p =>
            p.type === NodeTypes.DIRECTIVE && isSpecialTemplateDirective(p.name)
        )
      ) {
        tagType = ElementTypes.TEMPLATE
      }
    } else if (isComponent(tag, props, context)) {
      tagType = ElementTypes.COMPONENT
    }
  }

  return {
    type: NodeTypes.ELEMENT,
    ns,
    tag,
    tagType,
    props,
    isSelfClosing,
    children: [],
    loc: getSelection(context, start),
    codegenNode: undefined // to be created during transform phase
  }
}
parseTag 函数首先会匹配标签的文本的节点信息,比如 <div class="test"></div> 得到的 match 信息如下:
[
  '<div',
  'div',
  index: 0,
  input: '<div class="test">{{ msg }}</div>\n',
  groups: undefined
]
然后将代码前进到节点信息后,再通过 parseAttributes 函数来解析标签中的 props 属性,比如 class、style 等等。
接下来再去判断是不是一个自闭和标签,并前进代码到闭合标签后;
最后根据 tag 判断标签类型,是组件、插槽还是模板。
parseTag 完成后,最终就是返回一个节点描述的 AST 对象,如果有子节点,会继续进入 parseChildren 的递归流程,不断更新节点的 children 对象。
总结
有了上面的介绍,我们来看一个简单的 demo 来理解 AST 创建的过程。针对以下模版:
<div class="test">
  {{ msg }}
  <p>这是一段文本</p>
</div>
我们来演示一下创建过程:
div 标签解析
首先进入 parseChildren 遇到 <div 标签,进入 parseElement 函数,parseElement 函数通过 parseTag 函数得到 element 的数据结构为:
{
  "type": 1, // 标签节点
  "ns": 0,
  "tag": "div",
  "tagType": 0,
  "props": [
    {
      "type": 6,
      "name": "class",
      "value": {
       // ...
      },
      "loc": {
        // ...
      }
    }
  ],
  "isSelfClosing": false,
  "children": [],
  "loc": {
    "start": {
      "column": 3,
      "line": 2,
      "offset": 3
    },
    "end": {
      "column": 21,
      "line": 2,
      "offset": 21
    },
    "source": "<div class='test'>"
  }
}
此时的 context 经过 advanceBy 操作后,内容为:
{
  "options": {
    // ...
  },
  "column": 18,
  "line": 1,
  "offset": 18,
  "originalSource": "<div class='test''>\n    {{ msg }}\n    <p>这是一段文本</p>\n  </div>\n",
  "source": "\n    {{ msg }}\n    <p>这是一段文本</p>\n  </div>\n",
  "inPre": false,
  "inVPre": false
}
插值标签解析
然后再进入 parseChildren 流程,此时的 source 内容如下:
{{ msg }}
  <p>这是一段文本</p>
</div>
此时的开始标签是 {{ 所以进入插值解析的函数 parseInterpolation,该函数执行完成后得到的 source 结果如下:
<p>这是一段文本</p>
</div>
这里关于
AST内容就会包含插值节点的信息描述。context内容则会在parseInterpolation后继续更新,执行后续source的内容坐标,这里不再赘述
p 标签解析
在完成,插值节点解析后,在 parseChildren 内存在一个 while 判断:while (!isEnd(context, mode, ancestors)),因为还未到达闭合标签的位置,所以接着进入 p 标签的解析 parseElement。解析完成后得到 source 内容如下:
这是一段文本</p>
</div>
此时继续进入 parseChildren 递归。
解析文本节点
然后遇到的了文本开头的内容,会进入 parseText 文本解析的流程,完成 parseText 后,得到的 source 内容如下:
</p>
</div>
解析闭合标签
此时 while 退出循环,进入 parseTag 继续解析闭合标签,首先是 </p> 标签,因为不是自闭和标签,则继续更新 content 后,然后更新标签节点的代码位置,最后得到的 source 如下:
</div>最后再继续解析闭合标签 </div> 更新 content 和标签节点div的代码位置,直到结束。
编译器:AST 是如何被转换成 JS AST 的
接下来进入模版编译的第二步 transform,transform 的目标是为了生成 JavaScript AST。因为渲染函数是一堆 js 代码构成的,编译器最终产物就是渲染函数,所以理想中的 AST 应该是用来描述渲染函数的 JS 代码。
Transform
function baseCompile(template, options) {
  const isModuleMode = options.mode === 'module'
  // 用来标记代码生成模式
  const prefixIdentifiers =
    !__BROWSER__ && (options.prefixIdentifiers === true || isModuleMode)
  // 获取节点和指令转换的方法
  const [nodeTransforms, directiveTransforms] = getBaseTransformPreset()
  // AST 转换成 Javascript AST
  transform(
    ast,
    extend({}, options, {
      prefixIdentifiers,
      nodeTransforms: [
        ...nodeTransforms,
        ...(options.nodeTransforms || [])
      ],
      directiveTransforms: extend(
        {},
        directiveTransforms,
        options.directiveTransforms || {}
      )
    })
  )
}
其中第一个参数 prefixIdentifiers 是用于标记前缀代码生成模式的。举个例子,以下代码:
<div>
  {{msg}}
</div>
在 module 模式下,生成的渲染函数是一个通过 with(_ctx) { ... } 包裹后的,大致为:
return function render(_ctx) {
  with (_ctx) {
    const { toDisplayString, openBlock, createElementBlock } = Vue
    return (openBlock(), createElementBlock("div", null, toDisplayString(msg), 1 /* TEXT */))
  }
}
而在 function 模式下,生成的渲染函数中的动态内容,则会被转成 _ctx.msg 的模式:
import { toDisplayString, openBlock, createElementBlock } from "vue"
export function render(_ctx) {
  return (openBlock(), createElementBlock("div", null, toDisplayString(ctx.msg), 1 /* TEXT */))
}
而参数 nodeTransforms 和 directiveTransforms 对象则是由 getBaseTransformPreset 生成的一系列预设函数:
function getBaseTransformPreset(prefixIdentifiers) {
    return [
        [
            transformOnce,
            transformIf,
            transformFor,
            transformExpression,
            transformSlotOutlet,
            transformElement,
            trackSlotScopes,
            transformText
        ],
        {
            on: transformOn,
            bind: transformBind,
            model: transformModel
        }
    ]
}
nodeTransforms 涵盖了特殊节点的转换函数,比如文本节点、v-if 节点等等,directiveTransforms 则包含了一些指令的转换函数。
这些转换函数的细节,不是这里的核心,我们将在下文进行几个重点函数的介绍,其余的有兴趣的小伙伴可以自行翻阅 vue3 源码查看实现的细节。接下来我们将核心介绍 transform 函数的实现:
export function transform(root, options) {
    // 生成 transform 上下文
    const context = createTransformContext(root, options)
    // 遍历处理 ast 节点
    traverseNode(root, context)
    // 静态提升
    if (options.hoistStatic) {
        hoistStatic(root, context)
    }
    // 创建根代码生成节点
    if (!options.ssr) {
        createRootCodegen(root, context)
    }
    // 最终确定元信息
    root.helpers = [...context.helpers.keys()]
    root.components = [...context.components]
    root.directives = [...context.directives]
    root.imports = context.imports
    root.hoists = context.hoists
    root.temps = context.temps
    root.cached = context.cached
}
1. 生成 transform 上下文
在正式开始 transform 前,需要创建生成一个 transformContext,即 transform 上下文。
export function createTransformContext(root, TransformOptions) {
  const context = {
    // 选项配置
    hoistStatic,
    cacheHandlers,
    nodeTransforms,
    directiveTransforms,
    transformHoist,
    // ...
    // 状态数据
    root,
    helpers: new Map(),
    components: new Set(),
    directives: new Set(),
    hoists: [],
    // ....
    // 一些函数
    helper(name) {},
    removeHelper(name) {},
    helperString(name) {},
    replaceNode(node) {},
    removeNode(node) {},
    onNodeRemoved: () => {},
    addIdentifiers(exp) {},
    removeIdentifiers(exp) {},
    hoist(exp) {},
    cache(exp, isVNode = false) {}
  }

  return context
}
可以看到这个上下文对象 context 内主要包含三部分:transform 过程中的一些配置属性,一些状态数据,以及在 transform 过程中可能会调用的一些辅助函数。
2. 遍历AST节点
export function traverseNode(node, context) {
  context.currentNode = node
  // 节点转换函数
  const { nodeTransforms } = context
  const exitFns = []
  for (let i = 0; i < nodeTransforms.length; i++) {
    // 执行节点转换函数,返回得到一个退出函数
    const onExit = nodeTransforms[i](node, context)
    // 收集所有退出函数
    if (onExit) {
      if (isArray(onExit)) {
        exitFns.push(...onExit)
      } else {
        exitFns.push(onExit)
      }
    }
    if (!context.currentNode) {
      // 节点被移除
      return
    } else {
      node = context.currentNode
    }
  }

  switch (node.type) {
    case NodeTypes.COMMENT:
      if (!context.ssr) {
        // context 中 helpers 添加 CREATE_COMMENT 辅助函数
        context.helper(CREATE_COMMENT)
      }
      break
    case NodeTypes.INTERPOLATION:
      // context 中 helpers 添加 TO_DISPLAY_STRING 辅助函数
      if (!context.ssr) {
        context.helper(TO_DISPLAY_STRING)
      }
      break
    case NodeTypes.IF:
      // 递归遍历每个分支节点
      for (let i = 0; i < node.branches.length; i++) {
        traverseNode(node.branches[i], context)
      }
      break
    case NodeTypes.IF_BRANCH:
    case NodeTypes.FOR:
    case NodeTypes.ELEMENT:
    case NodeTypes.ROOT:
      // 遍历子节点
      traverseChildren(node, context)
      break
  }

  context.currentNode = node
  // 执行上面收集到的所有退出函数
  let i = exitFns.length
  while (i--) {
    exitFns[i]()
  }
}
traverseNode 递归的遍历 ast 中的每个节点,然后执行一些转换函数 nodeTransforms,这些转换函数就是我们上面介绍的通过 getBaseTransformPreset 生成的对象,值得注意的是:nodeTransforms 返回的是一个数组,说明这些转换函数是有序的,顺序代表着优先级关系,比如对于if的处理优先级就比 for 要高,因为如果条件不满足很可能有大部分内容都没必要进行转换。
另外,如果转换函数执行完成后,有返回退出函数 onExit 的话,那么会被统一存贮到 exitFns 当中,在所有字节点处理完成统一执行调用。
transformElement
根据上文我们知道了对节点进行处理,就是通过一系列函数对节点的的各个部分的内容分别进行处理。鉴于这些函数很多内容也很庞杂,我们拿其中一个函数transformElement进行分析,理解对AST的转化过程:
export const transformElement = (node, context) => {
  // 这里就是返回了一个退出函数
  return function postTransformElement() {
    // ...
    node.codegenNode = createVNodeCall(
      context,
      vnodeTag,
      vnodeProps,
      vnodeChildren,
      vnodePatchFlag,
      vnodeDynamicProps,
      vnodeDirectives,
      !!shouldUseBlock,
      false /* disableTracking */,
      isComponent,
      node.loc
    )
  }
}可以看到,transformElement 的核心目的就是通过调用createVNodeCall函数获取 VNodeCall 对象,并赋值给 node.codegenNode。
到这里,我们就大致明白了,我们前面一直提到需要把 AST 转成 JavaScript AST,实际上就是给 AST 的 codegenNode 属性赋值。接下来,我们接着看 createVNodeCall 函数的实现:
function createVNodeCall(context, tag, props, children, patchFlag, dynamicProps, directives, isBlock = false, disableTracking = false, loc = locStub) {
  if (context) {
    if (isBlock) {
      context.helper(OPEN_BLOCK)
      context.helper(getVNodeBlockHelper(context.inSSR, isComponent))
    } else {
      context.helper(getVNodeHelper(context.inSSR, isComponent))
    }
    if (directives) {
      context.helper(WITH_DIRECTIVES)
    }
  }

  return {
    type: NodeTypes.VNODE_CALL,
    tag,
    props,
    children,
    patchFlag,
    dynamicProps,
    directives,
    isBlock,
    disableTracking,
    loc
  }
}
该函数也非常容易理解,本质就是为了返回一个 VNodeCall 对象,该对象是用来描述 js 代码的。
这里的函数 context.helper 是会把一些 Symbol 对象添加到 context.helpers Set 的数据结构当中,在接下来的代码生成阶段,会判断当前 JS AST 中是否存在 helpers 内容,如果存在,则会根据 helpers 中标记的 Symbol 对象,来生成辅助函数。
接下来看一下之前的这样一个 demo
<template>
    <!-- 这是一段注释 -->
    <p>{{ msg }}</p>
</template>经过遍历AST节点 traverseNode 函数调用之后之后的结果大致如下:
{
  "type": 0,
  "children": [
    {
      "type": 1,
      "ns": 0,
      "tag": "p",
      "tagType": 0,
      "props": [],
      "isSelfClosing": false,
      "children": [],
      "loc": {},
      "codegenNode": {
        "type": 13,
        "tag": "\"p\"",
        "children": {
          "type": 5,
          "content": {
            "type": 4,
            "isStatic": false,
            "constType": 0,
            "content": "msg",
            "loc": {
              "start": {},
              "end": {},
              "source": "msg"
            }
          },
          "loc": {
            "start": {},
            "end": {},
            "source": "{{ msg }}"
          }
        },
        "patchFlag": "1 /* TEXT */",
        "isBlock": false,
        "disableTracking": false,
        "isComponent": false,
        "loc": {
          "start": {},
          "end": {},
          "source": "<p>{{ msg }}</p>"
        }
      }
    }
  ],
  "helpers": [],
  "components": [],
  "directives": [],
  "hoists": [],
  "imports": [],
  "cached": 0,
  "temps": 0,
  "loc": {
    "start": {},
    "end": {},
    "source": "\n  <p>{{ msg }}</p>\n"
  }
}
可以看到,相比原节点,转换后的节点无论是在语义化还是在信息上,都更加丰富,我们可以依据它在代码生成阶段生成所需的代码。
3. 静态提升
经过上一步的遍历 AST 节点后,我们接着来看一下静态提升做了哪些工作。
export function hoistStatic(root, context) {
  walk(
    root,
    context,
    // 根节点是不可提升的
    isSingleElementRoot(root, root.children[0])
  )
}
hoistStatic 核心调用的就是 walk 函数:
function walk(node, context, doNotHoistNode = false) {
  const { children } = node
  // 记录那些被静态提升的节点数量
  let hoistedCount = 0

  for (let i = 0; i < children.length; i++) {
    const child = children[i]
    // 普通元素节点可以被提升
    if (
      child.type === NodeTypes.ELEMENT &&
      child.tagType === ElementTypes.ELEMENT
    ) {
      // 根据 doNotHoistNode 判断是否可以提升
      // 设置 constantType 的值
      const constantType = doNotHoistNode
        ? ConstantTypes.NOT_CONSTANT
        : getConstantType(child, context)
      // constantType = CAN_SKIP_PATCH || CAN_HOIST || CAN_STRINGIFY
      if (constantType > ConstantTypes.NOT_CONSTANT) {
        // constantType = CAN_HOIST || CAN_STRINGIFY
        if (constantType >= ConstantTypes.CAN_HOIST) {
          // 可提升状态中,codegenNode = PatchFlags.HOISTED
          child.codegenNode.patchFlag =
            PatchFlags.HOISTED + (__DEV__ ? ` /* HOISTED */` : ``)

          // 提升节点,将节点存储到 转换上下文context 的 hoist 数组中
          child.codegenNode = context.hoist(child.codegenNode!)
          // 提升节点数量自增 1
          hoistedCount++
          continue
        }
      } else {
        // 动态子节点可能存在一些静态可提升的属性
        const codegenNode = child.codegenNode!
        if (codegenNode.type === NodeTypes.VNODE_CALL) {
          // 判断 props 是否可提升
          const flag = getPatchFlag(codegenNode)
          if (
            (!flag ||
              flag === PatchFlags.NEED_PATCH ||
              flag === PatchFlags.TEXT) &&
            getGeneratedPropsConstantType(child, context) >=
              ConstantTypes.CAN_HOIST
          ) {
            // 提升 props
            const props = getNodeProps(child)
            if (props) {
              codegenNode.props = context.hoist(props)
            }
          }
          // 将节点的动态 props 添加到转换上下文对象中
          if (codegenNode.dynamicProps) {
            codegenNode.dynamicProps = context.hoist(codegenNode.dynamicProps)
          }
        }
      }
    }

    if (child.type === NodeTypes.ELEMENT) {
      // 组件是 slot 的情况
      const isComponent = child.tagType === ElementTypes.COMPONENT
      if (isComponent) {
        context.scopes.vSlot++
      }
      // 如果节点类型是组件,则进行递归判断操作
      walk(child, context)
      if (isComponent) {
        context.scopes.vSlot--
      }
    } else if (child.type === NodeTypes.FOR) {
      // 再循环节点中,只有一个子节点的情况下,不需要提升
      walk(child, context, child.children.length === 1)
    } else if (child.type === NodeTypes.IF) {
      for (let i = 0; i < child.branches.length; i++) {
        // 在 v-if 这样的条件节点上,如果也只有一个分支逻辑的情况
        walk(
          child.branches[i],
          context,
          child.branches[i].children.length === 1
        )
      }
    }
  }
  // 预字符串化
  if (hoistedCount && context.transformHoist) {
    context.transformHoist(children, context, node)
  }
  // ...
}
该函数看起来比较复杂,其实就是通过 walk 这个递归函数,不断的判断节点是否符合可以静态提升的条件:只有普通的元素节点是可以提升的。
如果满足条件,则会给节点的 codegenNode 属性中的 patchFlag 的值设置成 PatchFlags.HOISTED。
接着执行转换器上下文中的 context.hoist 方法:
function hoist(exp) {
  // 存储到 hoists 数组中
  context.hoists.push(exp);
  const identifier = createSimpleExpression(`_hoisted_${context.hoists.length}`, false, exp.loc, true)
  identifier.hoisted = exp
  return identifier
}
该函数的作用就是将这个可以被提升的节点存储到转换上下文 context 的 hoist 数组中。这个数据就是用来存储那些可被提升节点的列表。
接下来,我们再来说一下,为什么要做静态提升呢? 如下模板所示:
<div>
  <p>text</p>
</div>
在没有被提升的情况下其渲染函数相当于:
import { createElementVNode as _createElementVNode, openBlock as _openBlock, createElementBlock as _createElementBlock } from "vue"

export function render(_ctx, _cache, $props, $setup, $data, $options) {
  return (_openBlock(), _createElementBlock("div", null, [
    _createElementVNode("p", null, "text")
  ]))
}很明显,p 标签是静态的,它不会改变。但是如上渲染函数的问题也很明显,如果组件内存在动态的内容,当渲染函数重新执行时,即使 p 标签是静态的,那么它对应的 VNode 也会重新创建。
**所谓的 “静态提升”,就是将一些静态的节点或属性提升到渲染函数之外。**如下面的代码所示:
import { createElementVNode as _createElementVNode, openBlock as _openBlock, createElementBlock as _createElementBlock } from "vue"

const _hoisted_1 = /*#__PURE__*/_createElementVNode("p", null, "text", -1 /* HOISTED */)
const _hoisted_2 = [
  _hoisted_1
]

export function render(_ctx, _cache, $props, $setup, $data, $options) {
  return (_openBlock(), _createElementBlock("div", null, _hoisted_2))
}
这就实现了减少 VNode 创建的性能消耗。
而这里的静态提升步骤生成的 hoists,会在 codegenNode 会在生成代码阶段帮助我们生成静态提升的相关代码。
预字符串化
注意到在 walk 函数结束时,进行了静态提升节点的 预字符串化。什么是预字符串化呢?一起来看个示例:
<template>
  <p></p>
  ... 共 20+ 节点
  <p></p>
</template>
对于这样有大量静态提升的模版场景,如果不考虑 预字符串化 那么生成的渲染函数将会包含大量的 createElementVNode 函数:假设如上模板中有大量连续的静态的 p 标签,此时渲染函数生成的结果如下:
const _hoisted_1 = /*#__PURE__*/_createElementVNode("p", null, null, -1 /* HOISTED */)
// ...
const _hoisted_20 = /*#__PURE__*/_createElementVNode("p", null, null, -1 /* HOISTED */)
const _hoisted_21 = [
  _hoisted_1,
  // ...
  _hoisted_20,
]

export function render(_ctx, _cache, $props, $setup, $data, $options) {
  return (_openBlock(), _createElementBlock("div", null, _hoisted_21))
}
createElementVNode 大量连续性创建 vnode 也是挺影响性能的,所以可以通过 预字符串化 来一次性创建这些静态节点,采用 与字符串化 后,生成的渲染函数如下:
const _hoisted_1 = /*#__PURE__*/_createStaticVNode("<p></p>...<p></p>", 20)
const _hoisted_21 = [
  _hoisted_1
]

export function render(_ctx, _cache, $props, $setup, $data, $options) {
  return (_openBlock(), _createElementBlock("div", null, _hoisted_21))
}
这样一方面降低了 createElementVNode 连续创建带来的性能损耗,也降侧面减少了代码体积。关于 预字符串化 实现的细节函数 transformHoist 有兴趣的小伙伴可以再去深入了解。
4. 创建根代码生成节点
介绍完了静态提升后,我们还剩最后一个 createRootCodegen 创建根代码生成节点,接下来一起看一下 createRootCodegen 函数的实现:
function createRootCodegen(root, context) {
  const { helper } = context
  const { children } = root
  if (children.length === 1) {
    const child = children[0]
    // 如果子节点是单个元素节点,则将其转换成一个 block
    if (isSingleElementRoot(root, child) && child.codegenNode) {
      const codegenNode = child.codegenNode
      if (codegenNode.type === NodeTypes.VNODE_CALL) {
        makeBlock(codegenNode, context)
      }
      root.codegenNode = codegenNode
    } else {
      root.codegenNode = child
    }
  } else if (children.length > 1) {
    // 如果子节点是多个节点,则返回一个 fragement 的代码生成节点
    let patchFlag = PatchFlags.STABLE_FRAGMENT
    let patchFlagText = PatchFlagNames[PatchFlags.STABLE_FRAGMENT]

    root.codegenNode = createVNodeCall(
      context,
      helper(FRAGMENT),
      undefined,
      root.children,
      patchFlag + (__DEV__ ? ` /* ${patchFlagText} */` : ``),
      undefined,
      undefined,
      true,
      undefined,
      false /* isComponent */
    )
  } else {
    // no children = noop. codegen will return null.
  }
}我们知道,Vue3 中是可以在 template 中写多个字节点的:
<template>
  <p>1</p>
  <p>2</p>
</template>createRootCodegen,核心就是创建根节点的 codegenNode 对象。所以当有多个子节点时,也就是 children.length > 1 时,调用 createVNodeCall 来创建一个新的 fragment 根节点 codegenNode。
否则,就代表着只有一个根节点,直接让根节点的 codegenNode 等于第一个子节点的根节点的 codegenNode 即可。
createRootCodegen 完成之后,接着把 transform 上下文在转换 AST 节点过程中创建的一些变量赋值给 root 节点对应的属性,这样方便在后续代码生成的过程中访问到这些变量。
root.helpers = [...context.helpers.keys()]
root.components = [...context.components]
root.directives = [...context.directives]
root.imports = context.imports
root.hoists = context.hoists
root.temps = context.temps
root.cached = context.cached
transform 节点的核心功能就是语法分析阶段,把 AST 节点做进一层转换,构造出语义化更强,信息更加丰富的 codegenCode。便于在下一小节 generate 中使用。
编译器:JS AST 是如何生成渲染函数的
接下来我们将进入模版编译的最后一步:代码生成器 generate。
generate(
ast,
extend({}, options, {
prefixIdentifiers
})
)一起来看一下 generate 的核心实现:
export function generate(ast, options = {}) {
// 创建代码生成上下文
const context = createCodegenContext(ast, options)
const {
mode,
push,
prefixIdentifiers,
indent,
deindent,
newline,
scopeId,
ssr
} = context
const hasHelpers = ast.helpers.length > 0
const useWithBlock = !prefixIdentifiers && mode !== 'module'
const genScopeId = !__BROWSER__ && scopeId != null && mode === 'module'
const isSetupInlined = !__BROWSER__ && !!options.inline
// 生成预设代码
const preambleContext = isSetupInlined
? createCodegenContext(ast, options)
: context
// 不在浏览器的环境且 mode 是 module
if (!__BROWSER__ && mode === 'module') {
genModulePreamble(ast, preambleContext, genScopeId, isSetupInlined)
} else {
genFunctionPreamble(ast, preambleContext)
}
// 进入 render 函数构造
const functionName = `render`
const args = ['_ctx', '_cache']
const signature = args.join(', ')
push(`function ${functionName}(${signature}) {`)
indent()
if (useWithBlock) {
// 处理带 with 的情况,Web 端运行时编译
push(`with (_ctx) {`)
indent()
if (hasHelpers) {
push(`const { ${ast.helpers.map(aliasHelper).join(', ')} } = _Vue`)
push(`\n`)
newline()
}
}
// 生成自定义组件声明代码
if (ast.components.length) {
genAssets(ast.components, 'component', context)
if (ast.directives.length || ast.temps > 0) {
newline()
}
}
// 生成自定义指令声明代码
if (ast.directives.length) {
genAssets(ast.directives, 'directive', context)
if (ast.temps > 0) {
newline()
}
}
// 生成临时变量代码
if (ast.temps > 0) {
push(`let `)
for (let i = 0; i < ast.temps; i++) {
push(`${i > 0 ? `, ` : ``}_temp${i}`)
}
}
if (ast.components.length || ast.directives.length || ast.temps) {
push(`\n`)
newline()
}
if (!ssr) {
push(`return `)
}
// 生成创建 VNode 树的表达式
if (ast.codegenNode) {
genNode(ast.codegenNode, context)
} else {
push(`null`)
}
if (useWithBlock) {
deindent()
push(`}`)
}
deindent()
push(`}`)
return {
ast,
code: context.code,
preamble: isSetupInlined ? preambleContext.code : ``,
map: context.map ? (context.map as any).toJSON() : undefined
}
}这个函数看起来有点复杂,我们先来简单了解一下:generate 函数,接收两个参数,分别是经过转换器处理的 ast 抽象语法树,以及 options 代码生成选项。最终返回一个 CodegenResult 类型的对象:
return {
ast, // 抽象语法树
code, // render 函数代码字符串
preamble, // 代码字符串的前置部分
map, //可选的 sourceMap
}接下来开始深入了解一下该函数的核心功能。
1. 创建代码生成上下文
generate 函数的第一步是通过 createCodegenContext 来创建 CodegenContext 上下文对象。一起来看一下其核心实现:
function createCodegenContext(ast, { mode = 'function', prefixIdentifiers = mode === 'module', sourceMap = false, filename = `template.vue.html`, scopeId = null, optimizeBindings = false, runtimeGlobalName = `Vue`, runtimeModuleName = `vue`, ssr = false }) {
const context = {
mode,
prefixIdentifiers,
sourceMap,
filename,
scopeId,
optimizeBindings,
runtimeGlobalName,
runtimeModuleName,
ssr,
source: ast.loc.source,
code: ``,
column: 1,
line: 1,
offset: 0,
indentLevel: 0,
pure: false,
map: undefined,
helper(key) {
return `_${helperNameMap[key]}`
},
push(code) {
context.code += code
// ... 省略 非浏览器环境下的 addMapping
},
indent() {
newline(++context.indentLevel)
},
deindent(withoutNewLine = false) {
if (withoutNewLine) {
--context.indentLevel
}
else {
newline(--context.indentLevel)
}
},
newline() {
newline(context.indentLevel)
}
}
function newline(n) {
context.push('\n' + ` `.repeat(n))
}
return context
}可以看出 createCodegenContext 创建的 context 中,核心维护了一些基础配置变量和一些工具函数,我们来看几个比较常用的函数:
push:该函数的功能是将传入的字符串拼接入上下文中的code属性中。并且会生成对应的sourceMap。indent: 作用是缩进deindent: 回退缩进newline: 插入新的一行
其中,index、deindent、newline 是用来辅助生成的代码字符串,用来格式化结构,让生成的代码字符串非常直观,就像在 ide 中敲入的制表符、换行、格式化代码块一样。
在创建上下文变量完成后,接着进入生成预设代码的流程:
2. 生成预设代码
// 不在浏览器的环境且 mode 是 module
if (!__BROWSER__ && mode === 'module') {
// 使用 ES module 标准的 import 来导入 helper 的辅助函数,处理生成代码的前置部分
genModulePreamble(ast, preambleContext, genScopeId, isSetupInlined)
} else {
// 否则生成的代码前置部分是一个单一的 const { helpers... } = Vue 处理代码前置部分
genFunctionPreamble(ast, preambleContext)
}mode 有两个选项:
module: 会通过ES module的import来导入ast中的helpers辅助函数,并用export默认导出render函数。function时,就会生成一个单一的const { helpers... } = Vue声明,并且return返回render函数。
先看一下 genModulePreamble 的实现:
function genModulePreamble(ast, context, genScopeId, inline) {
const {
push,
newline,
optimizeImports,
runtimeModuleName,
ssrRuntimeModuleName
} = context
// ...
if (ast.helpers.length) {
if (optimizeImports) {
// 生成 import 声明代码
push(
`import { ${ast.helpers
.map(s => helperNameMap[s])
.join(', ')} } from ${JSON.stringify(runtimeModuleName)}\n`
)
push(
`\n// Binding optimization for webpack code-split\nconst ${ast.helpers
.map(s => `_${helperNameMap[s]} = ${helperNameMap[s]}`)
.join(', ')}\n`
)
} else {
push(
`import { ${ast.helpers
.map(s => `${helperNameMap[s]} as _${helperNameMap[s]}`)
.join(', ')} } from ${JSON.stringify(runtimeModuleName)}\n`
)
}
}
// 提升静态节点
genHoists(ast.hoists, context)
newline()
if (!inline) {
push(`export `)
}
}其中 ast.helpers 是在 transform 阶段通过 context.helper 方法添加的,它的值如下:
[
Symbol(resolveComponent),
Symbol(createVNode),
Symbol(createCommentVNode),
Symbol(toDisplayString),
Symbol(openBlock),
Symbol(createBlock)
]所以这一步结束后,得到的代码为
import { createElementVNode as _createElementVNode, toDisplayString as _toDisplayString, Fragment as _Fragment, openBlock as _openBlock, createElementBlock as _createElementBlock } from "vue"然后执行 genHoists:
function genHoists(hoists, context) {
if (!hoists.length) {
return
}
context.pure = true
const { push, newline } = context
newline()
hoists.forEach((exp, i) => {
if (exp) {
push(`const _hoisted_${i + 1} = `)
genNode(exp, context)
newline()
}
})
context.pure = false
}核心功能就是遍历 ast.hoists 数组,该数组是我们在 transform 的时候构造的,然生成静态提升变量定义的方法。在进行 hoists 数组遍历的时候,这里有个 geNode 函数,是用来生成节点的创建字符串的,一起来看一下其实现:
function genNode(node, context) {
if (isString(node)) {
context.push(node)
return
}
if (isSymbol(node)) {
context.push(context.helper(node))
return
}
// 根据 node 节点类型不同,调用不同的生成函数
switch (node.type) {
case NodeTypes.ELEMENT:
case NodeTypes.IF:
case NodeTypes.FOR:
genNode(node.codegenNode!, context)
break
case NodeTypes.TEXT:
genText(node, context)
break
case NodeTypes.SIMPLE_EXPRESSION:
genExpression(node, context)
break
case NodeTypes.INTERPOLATION:
genInterpolation(node, context)
break
case NodeTypes.TEXT_CALL:
genNode(node.codegenNode, context)
break
case NodeTypes.COMPOUND_EXPRESSION:
genCompoundExpression(node, context)
break
case NodeTypes.COMMENT:
genComment(node, context)
break
case NodeTypes.VNODE_CALL:
genVNodeCall(node, context)
break
case NodeTypes.JS_CALL_EXPRESSION:
genCallExpression(node, context)
break
case NodeTypes.JS_OBJECT_EXPRESSION:
genObjectExpression(node, context)
break
case NodeTypes.JS_ARRAY_EXPRESSION:
genArrayExpression(node, context)
break
case NodeTypes.JS_FUNCTION_EXPRESSION:
genFunctionExpression(node, context)
break
case NodeTypes.JS_CONDITIONAL_EXPRESSION:
genConditionalExpression(node, context)
break
case NodeTypes.JS_CACHE_EXPRESSION:
genCacheExpression(node, context)
break
case NodeTypes.JS_BLOCK_STATEMENT:
genNodeList(node.body, context, true, false)
break
/* istanbul ignore next */
case NodeTypes.IF_BRANCH:
// noop
break
default:
}
}根据上一小节的 demo
<template>
<p>hello world</p>
<p>{{ msg }}</p>
</template>我们经过 transform 后得到的 AST 内容大致如下:
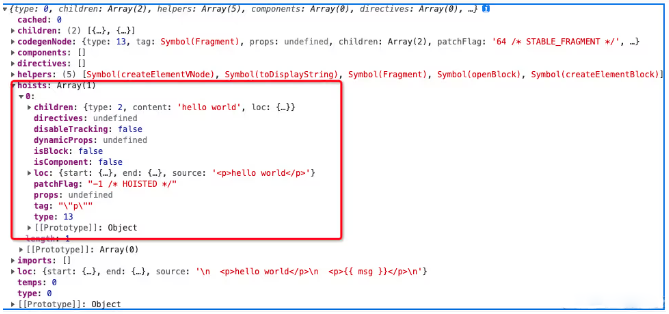
其中 hoists 内容中存储的是 <p>hello world</p> 节点的信息,其中 type = 13 表示的是 VNODE_CALL 类型,进入 genVNodeCall 函数中:
function genVNodeCall(node, context) {
const { push, helper, pure } = context
const {
tag,
props,
children,
patchFlag,
dynamicProps,
directives,
isBlock,
disableTracking,
isComponent
} = node
if (directives) {
push(helper(WITH_DIRECTIVES) + `(`)
}
if (isBlock) {
push(`(${helper(OPEN_BLOCK)}(${disableTracking ? `true` : ``}), `)
}
if (pure) {
push(PURE_ANNOTATION)
}
const callHelper = isBlock
? getVNodeBlockHelper(context.inSSR, isComponent)
: getVNodeHelper(context.inSSR, isComponent)
push(helper(callHelper) + `(`, node)
genNodeList(
genNullableArgs([tag, props, children, patchFlag, dynamicProps]),
context
)
push(`)`)
if (isBlock) {
push(`)`)
}
if (directives) {
push(`, `)
genNode(directives, context)
push(`)`)
}
}在执行 genVNodeCall 函数时,因为 directives 不存在,isBlock = false 此时我们生成的代码内容如下
import { createElementVNode as _createElementVNode, toDisplayString as _toDisplayString, Fragment as _Fragment, openBlock as _openBlock, createElementBlock as _createElementBlock } from "vue"
const _hoisted_1 = /*#__PURE__*/_createElementVNode("p", null, "hello world", -1 /* HOISTED */)genModulePreamble 函数的最后,执行 push('export') 完成 genModulePreamble 的所有逻辑,得到以下内容:
import { createElementVNode as _createElementVNode, toDisplayString as _toDisplayString, Fragment as _Fragment, openBlock as _openBlock, createElementBlock as _createElementBlock } from "vue"
const _hoisted_1 = /*#__PURE__*/_createElementVNode("p", null, "hello world", -1 /* HOISTED */)
export然后再看一下 genFunctionPreamble 函数,该函数的功能和 genModulePreamble 类似,就不再赘述,直接来看一下生成的结果:
const _Vue = Vue
const { createElementVNode: _createElementVNode } = _Vue
const _hoisted_1 = /*#__PURE__*/_createElementVNode("p", null, "hello world", -1 /* HOISTED */)
return要注意以上代码仅仅是代码前置部分,还没有开始解析其他资源和节点,所以仅仅是到了 export 或者 return 就结束了。
3. 生成渲染函数
// 进入 render 函数构造
const functionName = `render`
const args = ['_ctx', '_cache']
const signature = args.join(', ')
push(`function ${functionName}(${signature}) {`)
indent()这些代码还是比较好理解的,核心也是在通过 push 函数,继续生成 code 字符串,看一下经过这个步骤后,我们的代码字符串变成的内容:
import { createElementVNode as _createElementVNode, toDisplayString as _toDisplayString, Fragment as _Fragment, openBlock as _openBlock, createElementBlock as _createElementBlock } from "vue"
const _hoisted_1 = /*#__PURE__*/_createElementVNode("p", null, "hello world", -1 /* HOISTED */)
export function render(_ctx, _cache) {到这里,后面的内容也就不言而喻了,就是生成 render 函数的主题内容代码,我们先忽略对 components、directives、temps 代码块的生成,有兴趣的可以在源码里面调试打印。
我们知道之前的 transform 在处理节点内容时,会生成 codegenNode 对象,这个对象就是在这里被使用转换成代码字符串的:
if (ast.codegenNode) {
genNode(ast.codegenNode, context)
} else {
push(`null`)
}上面的例子中,我们生产的模版节点的 codegenNode 内容如下:
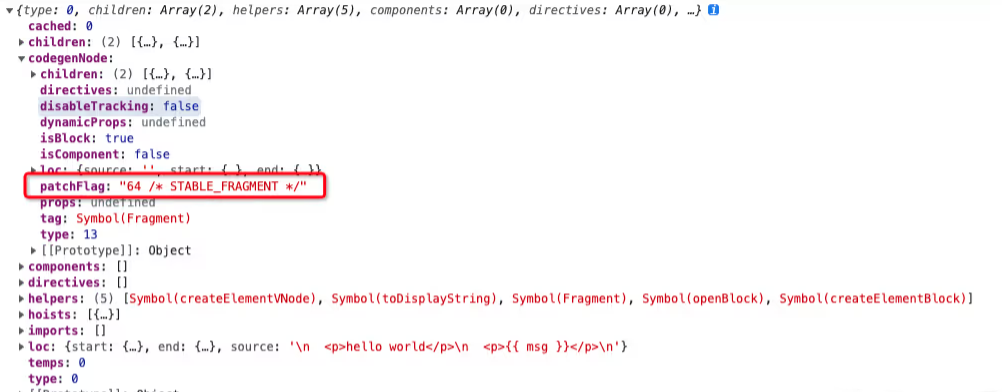
其中 type = 13 表示的是 VNODE_CALL 类型,也进入 genVNodeCall 函数中,这里需要注意的是,因为我们 template 下包含了 2 个同级的标签,所以在 transform 阶段会创建一个 patchFlag = STABLE_FRAGMENT 这样一个根 fragment 的 ast 节点来包含 2 个 p 标签节点。
针对我们上面的示例,directives 没有,isBlock 是 true。那么经过 genVNodeCall 后生成的代码如下:
import { createElementVNode as _createElementVNode, toDisplayString as _toDisplayString, Fragment as _Fragment, openBlock as _openBlock, createElementBlock as _createElementBlock } from "vue"
const _hoisted_1 = /*#__PURE__*/_createElementVNode("p", null, "hello world", -1 /* HOISTED */)
export function render(_ctx, _cache) {
return (_openBlock(), _createElementBlock(_Fragment, null, [
_hoisted_1,
_createElementVNode("p", null, _toDisplayString(msg), 1 /* TEXT */)
], 64 /* STABLE_FRAGMENT */))那么至此,根节点 vnode 树的表达式就创建好了。我们再回到 generate 函数,generate 函数的最后就是添加右括号 } 来闭合渲染函数,最终生成如下代码:
import { createElementVNode as _createElementVNode, toDisplayString as _toDisplayString, Fragment as _Fragment, openBlock as _openBlock, createElementBlock as _createElementBlock } from "vue"
const _hoisted_1 = /*#__PURE__*/_createElementVNode("p", null, "hello world", -1 /* HOISTED */)
export function render(_ctx, _cache) {
return (_openBlock(), _createElementBlock(_Fragment, null, [
_hoisted_1,
_createElementVNode("p", null, _toDisplayString(msg), 1 /* TEXT */)
], 64 /* STABLE_FRAGMENT */))
}通过上述流程我们大致清楚了 generate 是 compile 阶段的最后一步,它的作用是将 transform 转换后的 AST 生成对应的可执行代码,从而在之后 Runtime 的 Render 阶段时,就可以通过可执行代码生成对应的 VNode Tree,然后最终映射为真实的 DOM Tree 在页面上。其中我们也省略了一些细节的介绍,但整体流程还是很容易理解的。
编译器:编译过程中的优化细节
在开启本章之前,我们先来思考一个问题,假设有以下模板:
<template>
<p>hello world</p>
<p>{{ msg }}</p>
</template>>其中一个 p 标签的节点是一个静态的节点,第二个 p 标签的节点是一个动态的节点,如果当 msg 的值发生了变化,那么理论上肉眼可见最优的更新方案应该是只做第二个动态节点的 diff,而无需进行第一个 p 标签节点的 diff。
如果熟悉 Vue 2.x 的小伙伴可能会知道,在 Vue 2.x 版本中在编译过程中有一个叫做 optimize 的阶段,会进行标记静态根节点的操作,被标记为静态根节点的节点,一方面会生成一个 staticRenderFns,首次渲染会以这个静态根节点 vnode 进行缓存,后续渲染会直接取缓存中的,从而避免重复渲染;另一方面生成的 vnode 会带有 isStatic = true 的属性,将会在 diff 过程中被跳过。但 Vue 2.x 对静态节点进行缓存就是一种空间换时间的优化策略,为了避免过度优化,在 Vue 2.x 中,识别静态根节点是需要满足:
- 子节点是静态节点;
- 子节点不是只有一个静态文本节点的节点。
所以,上面的示例第一个 p 标签在 Vue 2.x 中不会被判定位静态根节点,也就无法进行优化。
关于
Vue 2.x如何做的编译时优化,这里只是简单进行了介绍,想了解更多的小伙伴可以参考这里:入口开始,解读 Vue2 源码(七)——$mount内部实现 ---compile optimize标记节点。
那么 Vue 3 呢?还是和 Vue 2 一样吗?答案显然是否定的,首先我们前面介绍了对于静态的节点,Vue 3 首先会进行静态提升,也就是相当于缓存了静态节点的 vnode,那 diff 过程呢?会跳过吗?本小节我们来一探究竟。
PatchFlags
首先,我们需要认识一个 PatchFlags 这个属性,它是一个枚举类型,里面是一些二进制操作的值,用来标记在节点的 patch 类型。具体的枚举内容如下:
export const enum PatchFlags {
// 动态文本的元素
TEXT = 1,
// 动态 class 的元素
CLASS = 1 << 1,
// 动态 style 的元素
STYLE = 1 << 2,
// 动态 props 的元素
PROPS = 1 << 3,
// 动态 props 和有 key 值绑定的元素
FULL_PROPS = 1 << 4,
// 有事件绑定的元素
HYDRATE_EVENTS = 1 << 5,
// children 顺序确定的 fragment
STABLE_FRAGMENT = 1 << 6,
// children 中有带有 key 的节点的 fragment
KEYED_FRAGMENT = 1 << 7,
// 没有 key 的 children 的 fragment
UNKEYED_FRAGMENT = 1 << 8,
// 带有 ref、指令的元素
NEED_PATCH = 1 << 9,
// 动态的插槽
DYNAMIC_SLOTS = 1 << 10,
// 静态节点
HOISTED = -1,
// 不是 render 函数生成的元素,如 renderSlot
BAIL = -2,
}这些二进制的值是通过左移操作符 << 生成的:
TEXT = 0000000001;
CLASS = 0000000010;
STYLE = 0000000100;这里通过二进制来表示 PatchFlags 可以方便我们做很多属性的判断,比如 TEXT | STYLE 来得到 0000000101,表示 patchFlag 既有 TEXT 属性也有 STYLE 属性,当需要进行判断有没有 STYLE 属性时,只需要 FLAG & STYLE > 0就行。
什么时候生成的?
在搞清楚 patchFlags 的一些定义和使用基础后,那它是什么时候被赋值到 vnode 节点上的呢?前言中的模板字符串在 compiler 阶段会被转成一个 render 函数的字符串代码:
import { createElementVNode as _createElementVNode, toDisplayString as _toDisplayString, Fragment as _Fragment, openBlock as _openBlock, createElementBlock as _createElementBlock } from "vue"
const _hoisted_1 = /*#__PURE__*/_createElementVNode("p", null, "hello world", -1 /* HOISTED */)
export function render(_ctx, _cache) {
return (_openBlock(), _createElementBlock(_Fragment, null, [
_hoisted_1,
_createElementVNode("p", null, _toDisplayString(msg), 1 /* TEXT */)
], 64 /* STABLE_FRAGMENT */))
}这里可以看出,render 函数内是通过 createElementVNode 方法来创建 vnode 的,该函数的第四个参数就代表着 patchFlag。对于我们上面的示例,其中 <p>hello world</p> 是 hoisted,对应的 patchFlag = -1,<p></p> 是动态文字节点,对应的 patchFlag = 1。
有什么用?
接下来看看其实际使用案例,还是拿之前的 patchElement 函数来说:
const patchElement = (n1, n2, parentComponent, parentSuspense, isSVG, slotScopeIds, optimized) => {
let { patchFlag, dynamicChildren, dirs } = n2
// 如果 patchFlag 不存在,那么就设置成 FULL_PROPS,意味着要全量 props 比对
patchFlag |= n1.patchFlag & PatchFlags.FULL_PROPS
const oldProps = n1.props || EMPTY_OBJ
const newProps = n2.props || EMPTY_OBJ
const areChildrenSVG = isSVG && n2.type !== 'foreignObject'
if (dynamicChildren) {
patchBlockChildren(
n1.dynamicChildren!,
dynamicChildren,
el,
parentComponent,
parentSuspense,
areChildrenSVG,
slotScopeIds
)
} else if (!optimized) {
// full diff
patchChildren(
n1,
n2,
el,
null,
parentComponent,
parentSuspense,
areChildrenSVG,
slotScopeIds,
false
)
}
if (patchFlag > 0) {
if (patchFlag & PatchFlags.FULL_PROPS) {
// 如果元素的 props 中含有动态的 key,则需要全量比较
patchProps(
el,
n2,
oldProps,
newProps,
parentComponent,
parentSuspense,
isSVG
)
} else {
// class
if (patchFlag & PatchFlags.CLASS) {
if (oldProps.class !== newProps.class) {
hostPatchProp(el, 'class', null, newProps.class, isSVG)
}
}
// style
if (patchFlag & PatchFlags.STYLE) {
hostPatchProp(el, 'style', oldProps.style, newProps.style, isSVG)
}
// props
if (patchFlag & PatchFlags.PROPS) {
const propsToUpdate = n2.dynamicProps!
for (let i = 0; i < propsToUpdate.length; i++) {
const key = propsToUpdate[i]
const prev = oldProps[key]
const next = newProps[key]
// #1471 force patch value
if (next !== prev || key === 'value') {
hostPatchProp(
el,
key,
prev,
next,
isSVG,
n1.children as VNode[],
parentComponent,
parentSuspense,
unmountChildren
)
}
}
}
}
// text
if (patchFlag & PatchFlags.TEXT) {
if (n1.children !== n2.children) {
hostSetElementText(el, n2.children as string)
}
}
} else if (!optimized && dynamicChildren == null) {
patchProps(
el,
n2,
oldProps,
newProps,
parentComponent,
parentSuspense,
isSVG
)
}
}这里涉及到两个比较重点的事儿,一个是和 dynamicChildren 相关,另一个是和动态 props 相关。我们先看和动态 props 相关的内容。
之前的章节我们跳过了对 PatchFlags 内容的理解,到了这里,我们通过代码可以知道 Vue 在更新子节点时,首先也是利用 patchFlag 的能力,对子节点进行分类做出不同的处理,比如针对以下例子:
<template>
<div :class="classNames" id='test'>
hello world
</div>
</template>得到的编译结果:
import { normalizeClass as _normalizeClass, openBlock as _openBlock, createElementBlock as _createElementBlock } from "vue"
export function render(_ctx, _cache) {
return (_openBlock(), _createElementBlock("div", {
class: _normalizeClass(classNames),
id: "test"
}, " hello world ", 2 /* CLASS */))
}此时 patchFlag & PatchFlags.CLASS > 0 则在 diff 过程中,需要进行 class 属性的 diff, 从而减少了对 id 属性的不必要 diff,提升了 props diff 过程中的性能。
dynamicChildren
另外,我们注意到,在编译后的 render 函数中会有一个 _openBlock() 函数的执行,我们来一起看一下其实现:
export const blockStack = []
export let currentBlock = null
export function openBlock(disableTracking = false) {
blockStack.push((currentBlock = disableTracking ? null : []))
}openBlock 实现比较通俗易懂,就是向 blockStack 中 push currentBlock。其中 currentBlock 是一个数组,用于存储动态节点。blockStack 则是存储 currentBlock 的一个 Block tree。
然后我们接着看 createElementBlock 的实现:
export function createElementBlock(type, props, children, patchFlag, dynamicProps, shapeFlag) {
return setupBlock(
createBaseVNode(
type,
props,
children,
patchFlag,
dynamicProps,
shapeFlag,
true /* isBlock */
)
)
}
function createBaseVNode(type, props = null, children = null, patchFlag = 0, dynamicProps = null, shapeFlag = type === Fragment ? 0 : ShapeFlags.ELEMENT, isBlockNode = false, needFullChildrenNormalization = false) {
// ...
// 添加动态 vnode 节点到 currentBlock 中
if (
isBlockTreeEnabled > 0 &&
!isBlockNode &&
currentBlock &&
(vnode.patchFlag > 0 || shapeFlag & ShapeFlags.COMPONENT) &&
vnode.patchFlag !== PatchFlags.HYDRATE_EVENTS
) {
currentBlock.push(vnode)
}
return vnode
}
function setupBlock(vnode) {
// 在 vnode 上保留当前 Block 收集的动态子节点
vnode.dynamicChildren =
isBlockTreeEnabled > 0 ? currentBlock || (EMPTY_ARR) : null
// 当前 Block 恢复到父 Block
closeBlock()
// 节点本身作为父 Block 收集的子节点
if (isBlockTreeEnabled > 0 && currentBlock) {
currentBlock.push(vnode)
}
return vnode
}createElementBlock 内部首先通过 createBaseVNode 创建 vnode 节点,在创建的过程中,会根据 patchFlag 的值进行判断是否是动态节点,如果发现 vnode 是一个动态节点,那么会被添加到 currentBlock 当中,然后在执行 setupBlock 函数的时候,将 currentBlock 赋值给 vnode.dynamicChildren 属性。
我们前面看 patchElement 的时候,有注意到函数体内部会进行是否有 dynamicChildren 属性进行不同的逻辑执行,前面的章节,我们只介绍了 patchChildren 完整的子节点 diff 算法,当 dynamicChildren 存在时,这里只会进行 patchBlockChildren 的动态节点 diff:
const patchBlockChildren = (oldChildren, newChildren, fallbackContainer, parentComponent, parentSuspense, isSVG) => {
for (let i = 0; i < newChildren.length; i++) {
const oldVNode = oldChildren[i]
const newVNode = newChildren[i]
// 确定待更新节点的容器
const container =
// 对于 Fragment,我们需要提供正确的父容器
oldVNode.type === Fragment ||
// 在不同节点的情况下,将有一个替换节点,我们也需要正确的父容器
!isSameVNodeType(oldVNode, newVNode) ||
// 组件的情况,我们也需要提供一个父容器
oldVNode.shapeFlag & 6 /* COMPONENT */
? hostParentNode(oldVNode.el)
:
// 在其他情况下,父容器实际上并没有被使用,所以这里只传递 Block 元素即可
fallbackContainer
patch(oldVNode, newVNode, container, null, parentComponent, parentSuspense, isSVG, true)
}
}patchBlockChildren 的实现很简单,遍历新的动态子节点数组,拿到对应的新旧动态子节点,并执行 patch 更新子节点即可。
这样一来,更新的复杂度就变成和动态节点的数量正相关,而不与模板大小正相关。这也是 Vue 3 做的一个重要的编译时优化的一部分。
总结
有了上面的一些介绍,我们还是回到开头的例子中:
<template>
<p>hello world</p>
<p>{{ msg }}</p>
</template>转成 vnode 后的结果大致为:
const vnode = {
type: Symbol(Fragment),
children: [
{ type: 'p', children: 'hello world' },
{ type: 'p', children: ctx.msg, patchFlag: 1 /* 动态的 text */ },
],
dynamicChildren: [
{ type: 'p', children: ctx.msg, patchFlag: 1 /* 动态的 text */ },
]
}此时组件内存在了一个静态的节点 <p>hello world</p>,在传统的 diff 算法里,还是需要对该静态节点进行不必要的 diff。所以 Vue3 先通过 patchFlag 来标记动态节点 <p></p>, 然后配合 dynamicChildren 将动态节点进行收集,从而完成在 diff 阶段只做靶向更新的目的。
内置组件:Transition 的实现
Vue 内置了 Trasition 组件可以帮助我们快速简单的实现基于状态变换的动画效果。该组件支持了 CSS 过渡动画、CSS 动画、Javascript 钩子 几种模式,接下来我们将逐步介绍这几种模式的实现原理。
基于 CSS 的过渡效果
我们先来看官网上一个简单的关于 CSS Transiton 过渡动画的示例: 以下是最基本用法的示例:
<template>
<button @click="show = !show">Toggle</button>
<Transition>
<p v-if="show">hello</p>
</Transition>
</template>
<style>
.v-enter-active,
.v-leave-active {
transition: opacity 0.5s ease;
}
.v-enter-from,
.v-leave-to {
opacity: 0;
}
</style>然后再来看看官网上对于这些类名的实现定义:
v-enter-from:进入动画的起始状态。在元素插入之前添加,在元素插入完成后的下一帧移除。v-enter-active:进入动画的生效状态。应用于整个进入动画阶段。在元素被插入之前添加,在过渡或动画完成之后移除。这个class可以被用来定义进入动画的持续时间、延迟与速度曲线类型。v-enter-to:进入动画的结束状态。在元素插入完成后的下一帧被添加 (也就是v-enter-from被移除的同时),在过渡或动画完成之后移除。v-leave-from:离开动画的起始状态。在离开过渡效果被触发时立即添加,在一帧后被移除。v-leave-active:离开动画的生效状态。应用于整个离开动画阶段。在离开过渡效果被触发时立即添加,在过渡或动画完成之后移除。这个class可以被用来定义离开动画的持续时间、延迟与速度曲线类型。v-leave-to:离开动画的结束状态。在一个离开动画被触发后的下一帧被添加 (也就是v-leave-from被移除的同时),在过渡或动画完成之后移除。
接下来我们一起来看看 Vue 源码是如何实现的,首先找到关于 Transition 组件的定义:
export const Transition = (props, { slots }) => h(BaseTransition, resolveTransitionProps(props), slots)
Transition.displayName = 'Transition'代码很简单,Transition 组件是一个函数式组件,本身就是一个渲染函数。还记得我们之前说过吗,Vue 组件分为了有状态组件和函数组件,有状态组件内部会存储组件的状态,而函数组件不会。
我们知道 Vue 对 Transtion 内置组件的功能定义就是只是一个容器,一个搬运工,需要渲染 DOM,那就不需要 template,本身不需要维护任何状态。所以这里直接通过一个函数式组件定义了 Transition 组件。
接着,我们看到了该组件核心功能就是一个渲染 BaseTransition 组件,并为期传入处理好的 props 和内部挂载的 slot。先来看看 BaseTransition 组件,这里我们只关心与 CSS 动画相关的逻辑。
const BaseTransitionImpl = {
name: `BaseTransition`,
props: {
// ...
},
setup(props, { slots }) {
// 当前渲染的组价实例
const instance = getCurrentInstance()!
const state = useTransitionState()
return () => {
/**
* 这里都是进入状态需要定义的内容
*/
// 获取子节点
const children =
slots.default && getTransitionRawChildren(slots.default(), true)
if (!children || !children.length) {
return
}
let child = children[0]
// 这里 props 不需要响应式追踪,为了更好的性能,去除响应式
const rawProps = toRaw(props)
const { mode } = rawProps
// 获取当前的容器节点
const innerChild = getKeepAliveChild(child)
if (!innerChild) {
return emptyPlaceholder(child)
}
// 获取进入状态的调用函数
const enterHooks = resolveTransitionHooks(
innerChild,
rawProps,
state,
instance
)
// 为子节点添加进入 hooks 属性
setTransitionHooks(innerChild, enterHooks)
/**
* 下面都是离开状态需要定义的内容
*/
// 离开状态中,之前的节点就是旧节点了
const oldChild = instance.subTree
const oldInnerChild = oldChild && getKeepAliveChild(oldChild)
let transitionKeyChanged = false
if (
oldInnerChild &&
oldInnerChild.type !== Comment &&
(!isSameVNodeType(innerChild, oldInnerChild) || transitionKeyChanged)
) {
// 获取离开状态的调用函数
const leavingHooks = resolveTransitionHooks(
oldInnerChild,
rawProps,
state,
instance
)
// 为子节点添加离开 hooks 属性
setTransitionHooks(oldInnerChild, leavingHooks)
// out-in 模式状态切换
if (mode === 'out-in') {
state.isLeaving = true
// 返回空的占位符节点,当离开过渡结束后,重新渲染组件
leavingHooks.afterLeave = () => {
state.isLeaving = false
// 当 active = false 时,被卸载状态不需要更新
if (instance.update.active !== false) {
instance.update()
}
instance.update()
}
return emptyPlaceholder(child)
} else if (mode === 'in-out' && innerChild.type !== Comment) {
// in-out 模式状态切换,延迟移除
leavingHooks.delayLeave = (el, earlyRemove, delayedLeave) => {
// 先缓存需要移除的节点
const leavingVNodesCache = getLeavingNodesForType(
state,
oldInnerChild
)
leavingVNodesCache[String(oldInnerChild.key)] = oldInnerChild
el._leaveCb = () => {
earlyRemove()
el._leaveCb = undefined
delete enterHooks.delayedLeave
}
enterHooks.delayedLeave = delayedLeave
}
}
}
// 返回子节点
return child
}
}
}可以看到 BaseTransitionImpl 的 setup 函数,核心就干了三件事儿:
Step 1: 为 Transition 下的子节点添加 enterHooks。
Step 2: 为 Transition 下的子节点添加 leavingHooks。
Step 3: 处理完成后直接返回子节点作为渲染内容。
那么,这些 hooks 到底做了些什么?以及这些 hooks 是在什么时候被执行的呢?我们一个个来看。
1. hooks 到底做了些什么? 要回答这些 hooks 到底做了什么?首先需要了解这些 hooks 是从哪里来的。再回到上述源码,我们知道 hooks 是通过:
const leavingHooks = resolveTransitionHooks(
oldInnerChild,
rawProps,
state,
instance
)这样的函数调用产生的,现在我们先不讨论这个函数的具体实现,先看看该函数的入参,有一个 rawProps 的参数,这个就是上文所说的 Transition 组件 render 函数中传入的 props 参数。
接下来就需要分析 props 中有些什么东西:
function resolveTransitionProps(rawProps) {
const baseProps = {}
// ...
for (const key in rawProps) {
if (!(key in DOMTransitionPropsValidators)) {
baseProps[key] = rawProps[key]
}
}
const {
name = 'v',
type,
duration,
enterFromClass = `${name}-enter-from`,
enterActiveClass = `${name}-enter-active`,
enterToClass = `${name}-enter-to`,
appearFromClass = enterFromClass,
appearActiveClass = enterActiveClass,
appearToClass = enterToClass,
leaveFromClass = `${name}-leave-from`,
leaveActiveClass = `${name}-leave-active`,
leaveToClass = `${name}-leave-to`
} = rawProps
// ...
return extend(baseProps, {
onEnter: makeEnterHook(false),
onLeave: () => {},
// ....
})
}根据我们前面了解到的,Vue 会在特定阶段为节点增加或删除特定 class。而这个 props 正式为了所谓的 特定的阶段 量身打造的 钩子 函数。举个例子,我们需要实现进入节点的 v-enter-from、v-enter-active、v-enter-to 类名的添加,我们只需要在 onEnter 进入钩子内实现逻辑:
const makeEnterHook = (isAppear) => {
return (el, done) => {
// 移除 v-enter-to、v-enter-active 类名
const resolve = () => finishEnter(el, isAppear, done)
// 下一帧渲染时
nextFrame(() => {
// 删除 v-enter-from 类名
removeTransitionClass(el, isAppear ? appearFromClass : enterFromClass)
// 添加 v-enter-to 类名
addTransitionClass(el, isAppear ? appearToClass : enterToClass)
// 动画结束时,执行 resolve 函数,即删除 v-enter-to、v-enter-active 类名
if (!hasExplicitCallback(hook)) {
whenTransitionEnds(el, type, enterDuration, resolve)
}
})
}
}2. hooks 何时执行? 前面我们提到 hooks 将会在特定时间执行,用来对 class 进行增加或删除。比如 enter-from 至 enter-to 阶段的过渡或者动画效果的 class 被添加到 DOM 元素上。考虑到 Vue 在 patch 阶段已经有生成对应的 DOM (只不过还没有被真实的挂载到页面上而已)。所以我们只需要在 patch 阶段做对应的 class 增删即可。
比如进入阶段的钩子函数,将会在 mountElement 中被调用:
// 挂载元素节点
const mountElement = (vnode,...args) => {
let el;
let vnodeHook;
const { type, props, shapeFlag, transition, patchFlag, dirs } = vnode;
// ...
if (needCallTransitionHooks*) {
// 执行 beforeEnter 钩子
transition.beforeEnter(el);
}
// ...
if ((vnodeHook = props && props.onVnodeMounted) || needCallTransitionHooks || dirs) {
// post 各种钩子 至后置执行任务池
queuePostRenderEffect(() => {
// 执行 enter 钩子
needCallTransitionHooks && transition.enter(el);
}, parentSuspense);
}
};离开阶段的钩子函数,在 remove 节点的时候被调用:
// 移除 Vnode
const remove = vnode => {
const { type, el, anchor, transition } = vnode;
// ...
const performRemove = () => {
hostRemove(el);
if (transition && !transition.persisted && transition.afterLeave) {
// 执行 afterLeave 钩子
transition.afterLeave();
}
};
if (vnode.shapeFlag & 1 ShapeFlags.ELEMENT && transition && !transition.persisted) {
const { leave, delayLeave } = transition;
// 执行 leave 钩子
const performLeave = () => leave(el, performRemove);
if (delayLeave) {
// 执行 delayLeave 钩子
delayLeave(vnode.el, performRemove, performLeave);
}
else {
performLeave();
}
}
};状态流转图:
JavaScript 钩子
<Transition> 组件在动画过渡的各个阶段定义了很多钩子函数,我们可以通过在钩子函数内部自定义实现各种动画效果。
<Transition
@before-enter="onBeforeEnter"
@enter="onEnter"
@after-enter="onAfterEnter"
@enter-cancelled="onEnterCancelled"
@before-leave="onBeforeLeave"
@leave="onLeave"
@after-leave="onAfterLeave"
@leave-cancelled="onLeaveCancelled"
>
<!-- ... -->
</Transition>前面其实已经稍微提及到了部分钩子函数,比如 onEnter ,这些钩子函数在源码中会被合并到 Transiton 下子节点的 transition 属性上。这块的实现主要是通过 setTransitionHooks 函数来实现的:
const BaseTransitionImpl = {
name: `BaseTransition`,
props: {
// ...
},
setup(props, { slots }) {
return () => {
// 获取进入状态的调用函数
const enterHooks = resolveTransitionHooks(
innerChild,
rawProps,
state,
instance
)
// 为子节点添加进入 hooks 属性
setTransitionHooks(innerChild, enterHooks)
// ...
// 返回子节点
return child
}
}
}
// 为 vnode 添加 transition 属性
function setTransitionHooks(vnode, hooks) {
// ...
vnode.transition = hooks
}其中 hooks 包含了哪些内容呢? hooks 其实是通过 resolveTransitionHooks 函数调用生成的:
export function resolveTransitionHooks(vnode, props, state, instance) {
// 传入的各个钩子函数
const {
appear,
mode,
persisted = false,
onBeforeEnter,
onEnter,
onAfterEnter,
onEnterCancelled,
onBeforeLeave,
onLeave,
onAfterLeave,
onLeaveCancelled,
onBeforeAppear,
onAppear,
onAfterAppear,
onAppearCancelled
} = props
// 定义调用钩子函数的方法
const callHook = (hook, args) => {
hook &&
callWithAsyncErrorHandling(
hook,
instance,
ErrorCodes.TRANSITION_HOOK,
args
)
}
// 钩子函数定义
const hooks = {
mode,
persisted,
beforeEnter(el) {
let hook = onBeforeEnter
// ...
// 执行 onBeforeEnter
callHook(hook, [el])
},
enter(el) {
let hook = onEnter
// ...
// 执行 onEnter
callAsyncHook(hook, [el, done])
},
leave(el, remove) {
// ...
// 执行 onBeforeLeave
callHook(onBeforeLeave, [el])
const done = (el._leaveCb = (cancelled?) => {
// ...
// 执行 onLeave
callAsyncHook(onLeave, [el, done])
})
},
clone(vnode) {
return resolveTransitionHooks(vnode, props, state, instance)
}
}
return hooks
}一个最基础的 hooks 主要包含 beforeEnter、enter、leave 这几个阶段,将会在 patch 的环节中被执行,执行的逻辑就是 Vue 官网上描述的逻辑。
另外,值得注意的是,除了这几个关键阶段之外,Transiton 还支持一个 mode 来指定动画的过渡时机,举个例子,如果 mode === 'out-in',先执行离开动画,然后在其完成之后再执行元素的进入动画。那么这个时候就需要延迟渲染进入动画,则会为 leavingHooks 额外添加一个新的钩子:afterLeave,该钩子将会在离开后执行,表示着离开后再更新 DOM。
const BaseTransitionImpl = {
setup() {
// ...
if (mode === 'out-in') {
state.isLeaving = true
// 返回空的占位符节点,当离开过渡结束后,重新渲染组件
leavingHooks.afterLeave = () => {
state.isLeaving = false
instance.update()
}
return emptyPlaceholder(child)
}
}
}总结 Transition 内置组件的实现原理:
Transition组件本身是一个无状态组件,内部本身不渲染任何额外的 DOM 元素,Transition渲染的是组件嵌套的第一个子元素节点。- 如果子元素是应用了
CSS过渡或动画,Transition组件会在子元素节点渲染适当时机,动态为子元素节点增加或删除对应的class。 - 如果有为
Transition定义一些钩子函数,那么这些钩子函数会被合入到子节点的关键生命周期beforeEnter、enter、leave中调用执行,通过setTransitionHooks被设置到子节点的transition属性中。
内置组件:KeepAlive 保活的原理
Vue 内置了 KeepAlive 组件,帮助我们实现缓存多个组件实例切换时,完成对卸载组件实例的缓存,从而使得组件实例在来会切换时不会被重复创建,又是一个空间换时间的典型例子。在介绍源码之前,我们先来了解一下 KeppAlive 使用的基础示例:
<template>
<KeepAlive>
<component :is="activeComponent" />
</KeepAlive>
</template>当动态组件在随着 activeComponent 变化时,如果没有 KeepAlive 做缓存,那么组件在来回切换时就会进行重复的实例化,这里就是通过 KeepAlive 实现了对不活跃组件的缓存。
这里需要思考几个问题:
- 组件是如何被缓存的,以及是如何被重新激活的?
- 既然缓存可以提高组件渲染的性能,那么是不是缓存的越多越好呢?
- 如果不是越多越好,那么如何合理的丢弃多余的缓存呢?
接下来我们通过对源码的分析,一步步找到答案。先找到定义 KeppAlive 组件的地方,然后看一下其大致内容:
const KeepAliveImpl = {
// 组件名称
name: `KeepAlive`,
// 区别于其他组件的标记
__isKeepAlive: true,
// 组件的 props 定义
props: {
include: [String, RegExp, Array],
exclude: [String, RegExp, Array],
max: [String, Number]
},
setup(props, {slots}) {
// ...
// setup 返回一个函数
return () => {
// ...
}
}
}可以看到,KeepAlive 组件中,通过 __isKeepAlive 属性来完成对这个内置组件的特殊标记,这样外部可以通过 isKeepAlive 函数来做区分:
const isKeepAlive = vnode => vnode.type.__isKeepAlive紧接着定义了 KeepAlive 的一些 props:
include表示包含哪些组件可被缓存exclude表示排除那些组件max则表示最大的缓存数
后面我们将可以详细的看到这些 props 是如何被发挥作用的。
最后实现了一个 setup 函数,该函数返回了一个函数,我们前面提到 setup 返回函数的话,那么这个函数将会被当做节点 render 函数。了解了 KeepAlive 的整体骨架后,我们先来看看这个 render 函数具体做了哪些事情。
KeepAlive 的 render 函数
先来看看 render 函数的源码实现:
const KeepAliveImpl = {
// ...
setup(props, { slot }) {
// ...
return () => {
// 记录需要被缓存的 key
pendingCacheKey = null
// ...
// 获取子节点
const children = slots.default()
const rawVNode = children[0]
if (children.length > 1) {
// 子节点数量大于 1 个,不会进行缓存,直接返回
current = null
return children
} else if (
!isVNode(rawVNode) ||
(!(rawVNode.shapeFlag & ShapeFlags.STATEFUL_COMPONENT) &&
!(rawVNode.shapeFlag & ShapeFlags.SUSPENSE))
) {
current = null
return rawVNode
}
// suspense 特殊处理,正常节点就是返回节点 vnode
let vnode = getInnerChild(rawVNode)
const comp = vnode.type
// 获取 Component.name 值
const name = getComponentName(isAsyncWrapper(vnode) ? vnode.type.__asyncResolved || {} : comp)
// 获取 props 中的属性
const { include, exclude, max } = props
// 如果组件 name 不在 include 中或者存在于 exclude 中,则直接返回
if (
(include && (!name || !matches(include, name))) ||
(exclude && name && matches(exclude, name))
) {
current = vnode
return rawVNode
}
// 缓存相关,定义缓存 key
const key = vnode.key == null ? comp : vnode.key
// 从缓存中取值
const cachedVNode = cache.get(key)
// clone vnode,因为需要重用
if (vnode.el) {
vnode = cloneVNode(vnode)
if (rawVNode.shapeFlag & ShapeFlags.SUSPENSE) {
rawVNode.ssContent = vnode
}
}
// 给 pendingCacheKey 赋值,将在 beforeMount/beforeUpdate 中被使用
pendingCacheKey = key
// 如果存在缓存的 vnode 元素
if (cachedVNode) {
// 复制挂载状态
// 复制 DOM
vnode.el = cachedVNode.el
// 复制 component
vnode.component = cachedVNode.component
// 增加 shapeFlag 类型 COMPONENT_KEPT_ALIVE
vnode.shapeFlag |= ShapeFlags.COMPONENT_KEPT_ALIVE
// 把缓存的 key 移动到到队首
keys.delete(key)
keys.add(key)
} else {
// 如果缓存不存在,则添加缓存
keys.add(key)
// 如果超出了最大的限制,则移除最早被缓存的值
if (max && keys.size > parseInt(max as string, 10)) {
pruneCacheEntry(keys.values().next().value)
}
}
// 增加 shapeFlag 类型 COMPONENT_SHOULD_KEEP_ALIVE,避免被卸载
vnode.shapeFlag |= ShapeFlags.COMPONENT_SHOULD_KEEP_ALIVE
current = vnode
// 返回 vnode 节点
return isSuspense(rawVNode.type) ? rawVNode : vnode
}
}
}可以看到返回的这个 render 函数执行的结果就是返回被 KeepAlive 包裹的子节点的 vnode 只不过在返回子节点的过程中做了很多处理而已,如果子节点数量大于一个,那么将不会被 keepAlive,直接返回子节点的 vnode,如果组件 name 不在用户定义的 include 中或者存在于 exclude 中,也会直接返回子节点的 vnode。
缓存设计
接着来看后续的缓存步骤,首先定义了一个 pendingCacheKey 变量,用来作为 cache 的缓存 key。对于初始化的 KeepAlive 组件的时候,此时还没有缓存,那么只会讲 key 添加到 keys 这样一个 Set 的数据结构中,在组件 onMounted 和 onUpdated 钩子中进行缓存组件的 vnode 收集,因为这个时候收集到的 vnode 节点是稳定不会变的缓存。
const cacheSubtree = () => {
if (pendingCacheKey != null) {
// 以 pendingCacheKey 作为key 进行缓存收集
cache.set(pendingCacheKey, getInnerChild(instance.subTree))
}
}
onMounted(cacheSubtree)
onUpdated(cacheSubtree)另外,注意到 props 中还有一个 max 变量用来标记最大的缓存数量,这个缓存策略就是类似于 LRU 缓存 的方式实现的。在缓存重新被激活时,之前缓存的 key 会被重新添加到队首,标记为最近的一次缓存,如果缓存的实例数量即将超过指定的那个最大数量,则最久没有被访问的缓存实例将被销毁,以便为新的实例腾出空间。
最后,当缓存的节点被重新激活时,则会将缓存中的节点的 el 属性赋值给新的 vnode 节点,从而减少了再进行 patch 生成 DOM 的过程,这里也说明了 KeepAlive 核心目的就是缓存 DOM 元素。
激活态设计
上述源码中,当组件被添加到 KeepAlive 缓存池中时,也会为 vnode 节点的 shapeFlag 添加两额外的两个属性,分别是 COMPONENT_KEPT_ALIVE 和 COMPONENT_SHOULD_KEEP_ALIVE。我们先说 COMPONENT_KEPT_ALIVE 这个属性,当一个节点被标记为 COMPONENT_KEPT_ALIVE 时,会在 processComponent 时进行特殊处理:
const processComponent = (...) => {
if (n1 == null) {
// 处理 KeepAlive 组件
if (n2.shapeFlag & ShapeFlags.COMPONENT_KEPT_ALIVE) {
// 执行 activate 钩子
;(parentComponent!.ctx as KeepAliveContext).activate(
n2,
container,
anchor,
isSVG,
optimized
)
} else {
mountComponent(
n2,
container,
anchor,
parentComponent,
parentSuspense,
isSVG,
optimized
)
}
}
else {
// 更新组件
}
}可以看到,在 processComponent 阶段如果是 keepAlive 的组件,在挂载过程中,不会执行执行 mountComponent 的逻辑,因为已经缓存好了,所以只需要再次调用 activate 激活就好了。接下来看看这个激活函数做了哪些事儿:
const KeepAliveImpl = {
// ...
setup(props, { slot }) {
sharedContext.activate = (vnode, container, anchor, isSVG, optimized) => {
// 获取组件实例
const instance = vnode.component!
// 将缓存的组件挂载到容器中
move(vnode, container, anchor, MoveType.ENTER, parentSuspense)
// 如果 props 有变动,还是需要对 props 进行 patch
patch(
instance.vnode,
vnode,
container,
anchor,
instance,
parentSuspense,
isSVG,
vnode.slotScopeIds,
optimized
)
// 执行组件的钩子函数
queuePostRenderEffect(() => {
instance.isDeactivated = false
// 执行 onActivated 钩子
if (instance.a) {
invokeArrayFns(instance.a)
}
// 执行 onVnodeMounted 钩子
const vnodeHook = vnode.props && vnode.props.onVnodeMounted
if (vnodeHook) {
invokeVNodeHook(vnodeHook, instance.parent, vnode)
}
}, parentSuspense)
}
// ...
}
}可以直观的看到 activate 激活函数,核心就是通过 move 方法,将缓存中的 vnode 节点直接挂载到容器中,同时为了防止 props 变化导致组件变化,也会执行 patch 方法来更新组件,注意此时的 patch 函数的调用是会传入新老子节点的,所以只会进行 diff 而不会进行重新创建。
当这一切都执行完成后,最后再通过 queuePostRenderEffect 函数,将用户定义的 onActivated 钩子放到状态更新流程后执行。
卸载态设计
接下来我们再看另一个标记态:COMPONENT_SHOULD_KEEP_ALIVE,我们看一下组件的卸载函数 unmount 的设计:
const unmount = (vnode, parentComponent, parentSuspense, doRemove = false) => {
// ...
const { shapeFlag } = vnode
if (shapeFlag & ShapeFlags.COMPONENT_SHOULD_KEEP_ALIVE) {
;(parentComponent!.ctx as KeepAliveContext).deactivate(vnode)
return
}
// ...
}可以看到,如果 shapeFlag 上存在 COMPONENT_SHOULD_KEEP_ALIVE 属性的话,那么将会执行 ctx.deactivate 方法,我们再来看一下 deactivate 函数的定义:
const KeepAliveImpl = {
// ...
setup(props, { slot }) {
// 创建一个隐藏容器
const storageContainer = createElement('div')
sharedContext.deactivate = (vnode: VNode) => {
// 获取组件实例
const instance = vnode.component!
// 将组件移动到隐藏容器中
move(vnode, storageContainer, null, MoveType.LEAVE, parentSuspense)
// 执行组件的钩子函数
queuePostRenderEffect(() => {
// 执行组件的 onDeactivated 钩子
if (instance.da) {
invokeArrayFns(instance.da)
}
// 执行 onVnodeUnmounted
const vnodeHook = vnode.props && vnode.props.onVnodeUnmounted
if (vnodeHook) {
invokeVNodeHook(vnodeHook, instance.parent, vnode)
}
instance.isDeactivated = true
}, parentSuspense)
}
// ...
}
}卸载态函数 deactivate 核心工作就是将页面中的 DOM 移动到一个隐藏不可见的容器 storageContainer 当中,这样页面中的元素就被移除了。当这一切都执行完成后,最后再通过 queuePostRenderEffect 函数,将用户定义的 onDeactivated 钩子放到状态更新流程后执行。
TIP
解答开头的三个问题:
- 组件是通过类似于
LRU的缓存机制来缓存的,并为缓存的组件vnode的shapeFlag属性打上COMPONENT_KEPT_ALIVE属性,当组件在processComponent挂载时,如果存在COMPONENT_KEPT_ALIVE属性,则会执行激活函数,激活函数内执行具体的缓存节点挂载逻辑。 - 缓存不是越多越好,因为所有的缓存节点都会被存在
cache中,如果过多,则会增加内存负担。 - 丢弃的方式就是在缓存重新被激活时,之前缓存的
key会被重新添加到队首,标记为最近的一次缓存,如果缓存的实例数量即将超过指定的那个最大数量,则最久没有被访问的缓存实例将被丢弃。
内置组件:Teleport 是如何实现选择性挂载的
Teleport 内置组件的功能是可以将一个组件内部的一部分 vnode 元素 “传送” 到该组件的 DOM 结构外层的位置去挂载。那什么情况下可能会用到该组件呢?如果开发过组件库的小伙伴可能深有体会,当我们开发全局 Dialog 组件来说,我们希望 Dialog 的组件可以渲染到全局 <body> 标签上,这个时候我们写的 Dialog 组件的源代码可能是这样的:
<template>
<div>
<!-- 这里是 dialog 组件的容器逻辑 -->
</div>
</template>
<script>
export default {
mounted() {
// 在 dom 被挂载完成后,再转移到 body 上
document.body.appendChild(this.$el);
},
destroyed() {
// 在组件被销毁之前,移除 DOM
this.$el.parentNode.removeChild(this.$el);
}
}
</script>这么做确实可是实现挂载到特定容器中,但这样一方面让 Dialog 组件内部需要维护复杂的 DOM 节点转换的逻辑,另一方面导致了浏览器需要进行 2 次刷新操作,一次初始化挂载,一次迁移。
所以 Vue 3 很贴心的为我们了提供了 Teleport 组件,帮助我们以简便的方式高性能的完成节点的转移工作:
<Teleport to="body">
<div class="modal">
<p>Hello from the modal!</p>
</div>
</Teleport>接下来我们将一起探秘 Teleport 组件是如何实现 “传送” 挂载的。
Teleport 的挂载
先来看看 Teleport 组件的源码定义:
export const TeleportImpl = {
// 组件标记
__isTeleport: true,
process(...) {
// ...
// 初始化的逻辑
if (n1 === null) {
// ...
} else {
// ...
// 更新逻辑
}
},
// 卸载的逻辑
remove(...) {
// ...
},
// 移动的逻辑
move: moveTeleport,
// ...
}接下来,我们看一下这个内部组件是如何实现组件挂载的,这块的逻辑集中在组件的 process 函数中,process 函数是在渲染器 renderer 的 patch 函数中被调用的,在前面渲染器章节中,我们提到过 patch 函数内部会根据 vnode 的 type 和 shapeFlag 的类型调用不同的处理函数,而 <Teleport> 组件的 process 正是在这里被判断调用的:
const patch = (n1, n2, container, anchor, ...) => {
// ...
const { type, ref, shapeFlag } = n2
switch (type) {
// 根据 type 类型处理
case Text:
// 对文本节点的处理
processText(n1, n2, container, anchor)
break
// 这里省略了一些其他节点处理,比如注释、Fragment 节点等等
// ...
default:
// 根据 shapeFlag 来处理
// ...
else if (shapeFlag & ShapeFlags.TELEPORT) {
// 对 Teleport 节点进行处理
type.process(
n1,
n2,
container,
anchor,
parentComponent,
parentSuspense,
isSVG,
slotScopeIds,
optimized,
internals
);
}
}
}然后一起来看看 process 中是如何完成对 Teleport 中的节点进行挂载的,这里我们先只关注挂载逻辑,对于更新逻辑后面再介绍:
export const TeleportImpl = {
// 组件标记
__isTeleport: true,
process(n1, n2, container, anchor, parentComponent, parentSuspense, isSVG, slotScopeIds, optimized, internals) {
// 从内在对象上结构关键功能函数
const {
mc: mountChildren,
pc: patchChildren,
pbc: patchBlockChildren,
o: {insert, querySelector, createText, createComment}
} = internals
// 是否禁用
const disabled = isTeleportDisabled(n2.props)
let {shapeFlag, children, dynamicChildren} = n2
// 初始化的逻辑
if (n1 == null) {
// 向主视图中插入锚点
const placeholder = (n2.el = __DEV__
? createComment('teleport start')
: createText(''))
const mainAnchor = (n2.anchor = __DEV__
? createComment('teleport end')
: createText(''))
insert(placeholder, container, anchor)
insert(mainAnchor, container, anchor)
// 获取需要挂载的位置元素,如果目标元素不存在于DOM中,则返回 null
const target = (n2.target = resolveTarget(n2.props, querySelector))
// 目标挂载节点的锚点
const targetAnchor = (n2.targetAnchor = createText(''))
// 如果存在目标元素
if (target) {
// 将锚点插入到目标元素当中
insert(targetAnchor, target)
isSVG = isSVG || isTargetSVG(target)
}
const mount = (container: RendererElement, anchor: RendererNode) => {
// teleport 子节点需要是个数组
// 挂载子节点
if (shapeFlag & ShapeFlags.ARRAY_CHILDREN) {
mountChildren(
children,
container,
anchor,
parentComponent,
parentSuspense,
isSVG,
slotScopeIds,
optimized
)
}
}
// 如果禁用 teleport 则直接挂载到当前渲染节点中
if (disabled) {
mount(container, mainAnchor)
} else if (target) {
// 否则,以 targetAnchor 为参照物进行挂载
mount(target, targetAnchor)
}
} else {
// 进入更新逻辑
}
},
}这里,我们先不着急着看源码,我们先看看一个 teleport 节点在开发环境会被渲染成什么样子:
<template>
<Teleport to="body">
<div class="modal">
<p>Hello from the modal!</p>
</div>
</Teleport>
</template>上面模版的渲染结果如下:

可以看到,已经被渲染到 body 元素当中,除了这个变化外,之前的容器中,还多了两个额外的注释符:
<!--teleport start-->
<!--teleport end-->这下我们再来看看源码,或许就能更好的理解这些变化了。首先,在初始化中,会先创建两个占位符,分别是 placeholder 和 mainAnchor 然后再讲这两个占位符挂载到组件容器中,这两个占位符也就是上文中的注释节点。
接着又创建了一个目标节点的占位符 targetAnchor 这个则会被挂载到目标容器中,只不过这里是个文本节点,所以在 DOM 上没有体现出来,我们把这里稍微改一下:
const targetAnchor = (n2.targetAnchor = createComment('teleport target'))这样再看一下 DOM 的渲染结果:
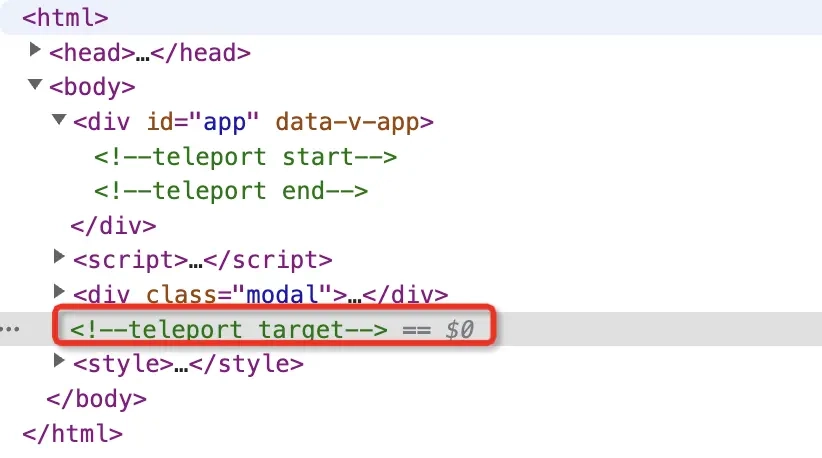
最后再根据 disabled 这个 props 属性来判断当前的节点需要采用哪种方式渲染,如果 disabled = true 则会以 mainAnchor 为参考节点进行挂载,也就是挂载到主容器中,否则会以 targetAnchor 为参考节点进行挂载,挂载到目标元素容器中。至此,完成节点的初始化挂载逻辑。
Teleport 的更新
如果 Teleport 组件需要进行更新,则会进入更新的逻辑:
export const TeleportImpl = {
// 组件标记
__isTeleport: true,
process(n1, n2, container, anchor, parentComponent, parentSuspense, isSVG, slotScopeIds, optimized, internals) {
// 从内在对象上结构关键功能函数
const {
mc: mountChildren,
pc: patchChildren,
pbc: patchBlockChildren,
o: {insert, querySelector, createText, createComment}
} = internals
// 是否禁用
const disabled = isTeleportDisabled(n2.props)
let {shapeFlag, children, dynamicChildren} = n2
// 初始化的逻辑
if (n1 == null) {
// ...
} else {
// 从老节点上获取相关参照系等属性
n2.el = n1.el
const mainAnchor = (n2.anchor = n1.anchor)!
const target = (n2.target = n1.target)!
const targetAnchor = (n2.targetAnchor = n1.targetAnchor)!
// 之前是不是禁用态
const wasDisabled = isTeleportDisabled(n1.props)
// 当前的渲染容器
const currentContainer = wasDisabled ? container : target
// 参照节点
const currentAnchor = wasDisabled ? mainAnchor : targetAnchor
isSVG = isSVG || isTargetSVG(target)
// 通过 dynamicChildren 更新节点
if (dynamicChildren) {
// fast path when the teleport happens to be a block root
patchBlockChildren(
n1.dynamicChildren!,
dynamicChildren,
currentContainer,
parentComponent,
parentSuspense,
isSVG,
slotScopeIds
)
traverseStaticChildren(n1, n2, true)
} else if (!optimized) {
// 全量更新
patchChildren(
n1,
n2,
currentContainer,
currentAnchor,
parentComponent,
parentSuspense,
isSVG,
slotScopeIds,
false
)
}
if (disabled) {
if (!wasDisabled) {
// enabled -> disabled
// 移动回主容器
moveTeleport(
n2,
container,
mainAnchor,
internals,
TeleportMoveTypes.TOGGLE
)
}
} else {
// 目标元素被改变
if ((n2.props && n2.props.to) !== (n1.props && n1.props.to)) {
// 获取新的目标元素
const nextTarget = (n2.target = resolveTarget(
n2.props,
querySelector
))
// 移动到新的元素当中
if (nextTarget) {
moveTeleport(
n2,
nextTarget,
null,
internals,
TeleportMoveTypes.TARGET_CHANGE
)
}
} else if (wasDisabled) {
// disabled -> enabled
// 移动到目标元素中
moveTeleport(
n2,
target,
targetAnchor,
internals,
TeleportMoveTypes.TOGGLE
)
}
}
}
},
}代码量虽然挺多的,但所做的事情是特别明确的,首先 Teleprot 组件的更新需要和普通节点更新一样进行子节点的 diff。然后会判断 Teleport 组件的 props 是否有变更,主要就是 disabled 和 to 这两个参数。
如果 disabled 变化,无非就是从 可用 -> 不可用 或者从 不可用 -> 可用。从 可用 ->不可用 就是将原来挂在在 target 容器中的节点重新移动到主容器中,而从 不可用 -> 可用 就是将主容器中的节点再挂载到 target 中。
如果 to 这个参数变化了,那么就需要重新寻找目标节点,再进行挂载。
Teleport 的移除
当组件卸载时,我们需要移除 Teleport 组件,一起再看看卸载重对于 Teleport 组件的处理:
const unmount = (vnode, parentComponent, parentSuspense, doRemove, optiomized) => {
// ...
if (shapeFlag & ShapeFlags.TELEPORT) {
vnode.type.remove(
vnode,
parentComponent,
parentSuspense,
optimized,
internals,
doRemove
)
}
// ...
}unmount 卸载函数对于 Teleport 组件的处理就是直接调用 remove 方法:
export const TeleportImpl = {
// 组件标记
__isTeleport: true,
remove(vnode, parentComponent, parentSuspense, optimized, { um: unmount, o: { remove: hostRemove } }, doRemove) {
const { shapeFlag, children, anchor, targetAnchor, target, props } = vnode
// 如果存在 target,移除 targetAnchor
if (target) {
hostRemove(targetAnchor!)
}
// 在未禁用状态下,需要卸载 teleport 的子元素
if (doRemove || !isTeleportDisabled(props)) {
hostRemove(anchor!)
if (shapeFlag & ShapeFlags.ARRAY_CHILDREN) {
for (let i = 0; i < children.length; i++) {
const child = children[i]
unmount(
child,
parentComponent,
parentSuspense,
true,
!!child.dynamicChildren
)
}
}
}
}
}remove 方法的操作,看起来也比较好理解,首先先移除掉 targetAnchor 锚点内容,然后再调用 unmount 函数挨个卸载子组件,从而完成卸载功能。
TIP
Teleport 相比于之前的那种挂载方式他的性能优势就在于 Teleport 节点的挂载是在 patch 阶段进行的,也就是在 patch 阶段就确定了需要挂载到哪里,而不会出现先挂在到主容器再迁移到目标容器的情况。
内置组件:Suspense 原理与异步
<Suspense> 是一个内置组件,用来在组件树中协调对异步依赖的处理。可以帮助我们更好的完成组件树父组件对子组件的多个嵌套异步依赖关系的管理,当父组件处于等待中时,允许我们自定挂载一个加载中状态。
上图中,红色字体代表的是组件有异步的 setup() 。 通过 <Suspense> 组件我们可以很容易实现在组件异步加载时统一展示加载中状态,在所有组件完成加载时,再统一展示:
<Suspense>
<!-- 具有深层异步依赖的组件 -->
<Dashboard />
<!-- 在 #fallback 插槽中显示 “正在加载中” -->
<template #fallback>
Loading...
</template>
</Suspense>接下来我们将深度解读 <Suspense> 组件实现的原理。
Suspense 挂载
<Suspense> 组件和所有内置组件一样,也是有初始化挂载的过程,先来看看 Vue 对 <Suspense> 组件的源码定义:
export const SuspenseImpl = {
name: 'Suspense',
// Suspense 组件标识符
__isSuspense: true,
process(...) {
if (n1 == null) {
// 初始化挂载的逻辑
} else {
// diff 的逻辑
}
},
create: createSuspenseBoundary,
normalize: normalizeSuspenseChildren
}process 的执行时机和前面提到的 <Teleport> 组件是一致的,会在 patch 的时候根据组件的 shapeFlag 标志来判断是否需要执行 process 函数的调用。
const patch = (n1, n2, container, anchor, ...) => {
// ...
const { type, ref, shapeFlag } = n2
switch (type) {
// 根据 type 类型处理
case Text:
// 对文本节点的处理
processText(n1, n2, container, anchor)
break
// 这里省略了一些其他节点处理,比如注释、Fragment 节点等等
// ...
default:
// 根据 shapeFlag 来处理
// ...
else if (__FEATURE_SUSPENSE__ && shapeFlag & ShapeFlags.SUSPENSE) {
// 对 Suspense 节点进行处理
type.process(
n1,
n2,
container,
anchor,
parentComponent,
parentSuspense,
isSVG,
slotScopeIds,
optimized,
internals
);
}
}
}接下来,我们着重先来看看 Suspense 的初始化挂载逻辑,这块的代码集中在 mountSuspense 中:
function mountSuspense(vnode, container, anchor, parentComponent, parentSuspense, isSVG, slotScopeIds, optimized, rendererInternals) {
const {
p: patch,
o: { createElement }
} = rendererInternals
// 创建隐藏容器,用来实例化挂载 default 插槽内的内容
const hiddenContainer = createElement('div')
// 构造一个 suspense 对象,并赋值给 vnode.suspense
const suspense = (vnode.suspense = createSuspenseBoundary(
vnode,
parentSuspense,
parentComponent,
container,
hiddenContainer,
anchor,
isSVG,
slotScopeIds,
optimized,
rendererInternals
))
// 离线挂载 default 插槽内的内容
patch(
null,
(suspense.pendingBranch = vnode.ssContent),
hiddenContainer,
null,
parentComponent,
suspense,
isSVG,
slotScopeIds
)
// 如果有异步依赖
if (suspense.deps > 0) {
// 触发 onPending,onFallback 钩子函数
triggerEvent(vnode, 'onPending')
triggerEvent(vnode, 'onFallback')
// 初始化挂载 fallback 插槽内容
patch(
null,
vnode.ssFallback,
container,
anchor,
parentComponent,
// fallback tree 不会有 suspense context
null,
isSVG,
slotScopeIds
)
// 将 fallback vnode 设置为 activeBranch
setActiveBranch(suspense, vnode.ssFallback)
} else {
// 如果 suspense 没有异步依赖,直接调用 resolve
suspense.resolve()
}
}在开始解读源码之前,我们需要提前认识几个关键变量的含义:
ssContent代表的是default插槽内的内容的vnode。ssFallback代表的是fallback插槽内的内容的vnode。activeBranch代表的是当前激活的分支,就是挂载到页面中的 vnode。pendingBranch代表的是正处于pending状态的分支,一般指还未被激活的default插槽内的内容中的vnode
然后我们再来看一下整个 mountSuspense 的过程,首先会创建一个隐藏的 DOM 元素,该元素将作为 default 插槽内容的初始化挂载容器。然后创建了一个 suspense 变量,该变量内部包含了一些的对 <Suspense> 组件的处理函数:
function createSuspenseBoundary(vnode, parent, parentComponent, container, hiddenContainer, anchor, isSVG, slotScopeIds, optimized, rendererInternals, isHydrating = false) {
// ...
const suspense = {
vnode,
parent,
parentComponent,
isSVG,
container,
hiddenContainer,
anchor,
deps: 0,
pendingId: 0,
timeout: typeof timeout === 'number' ? timeout : -1,
activeBranch: null,
pendingBranch: null,
isInFallback: true,
isHydrating,
isUnmounted: false,
effects: [],
resolve(resume = false) {
// ...
},
fallback(fallbackVNode) {
// ...
},
move(container, anchor, type) {
// ...
},
next() {
// ...
},
registerDep(instance, setupRenderEffect) {
// ...
},
unmount(parentSuspense, doRemove) {
// ...
}
}
return suspense
}可以看到,这个 createSuspenseBoundary 函数本身其实并没有做太多的事情,本质上就是为了构造一个 suspense 对象。
接下来会进入到对 default 容器中的内容进行 patch 的过程。在本课程的第二小节中,我们提到了 patch 函数在进行组件实例化的过程中,会执行 setupStatefulComponent 这个设置并运行副作用渲染函数的方法,之前我们只是介绍了该方法处理同步 setup 的情况,而对于 <Suspense> 组件来说,setup 会返回个 promise。我们再来看看对于这种情况的处理:
function setupStatefulComponent(instance, isSSR) {
// ...
// 对于 setup 返回是个 promise 的情况
if (isPromise(setupResult)) {
setupResult.then(unsetCurrentInstance, unsetCurrentInstance)
if (__FEATURE_SUSPENSE__) {
// 在 suspense 模式下,为实例 asyncDep 赋值为 setupResult
instance.asyncDep = setupResult
}
}
}可以看到对于 Suspense 组件来说,其中的 default 内容的 setup 如果返回的是个 pormise 对象的话,则会为将 setup 函数执行的结果 setupResult 赋值给实例属性 asyncDep。那 asyncDep 有什么用呢?
在渲染器执行 mountComponent 的时候,如果存在 asyncDep 变量,则会调用 suspense 上的 registerDep 方法,并为 default 中的插槽节点创建了一个占位符:
const mountComponent = (initialVNode, container, anchor, parentComponent, parentSuspense, isSVG, optimized) => {
// ...
// 依赖于 suspense 的异步 setup
if (__FEATURE_SUSPENSE__ && instance.asyncDep) {
parentSuspense && parentSuspense.registerDep(instance, setupRenderEffect)
// 为插槽 vnode 创建注释节点
if (!initialVNode.el) {
const placeholder = (instance.subTree = createVNode(Comment))
processCommentNode(null, placeholder, container, anchor)
}
return
}
// ...
}这里的 parentSuspense 就是 default 插槽内的第一个父级 suspense 对象。接下来看看 registerDep 的执行逻辑:
function createSuspenseBoundary(vnode, parent, parentComponent, container, hiddenContainer, anchor, isSVG, slotScopeIds, optimized, rendererInternals, isHydrating = false) {
// ...
const suspense = {
// ...
registerDep(instance, setupRenderEffect) {
// 是否有异步未处理的分支
const isInPendingSuspense = !!suspense.pendingBranch
if (isInPendingSuspense) {
// deps 这里会被递增,记录依赖的异步数量
suspense.deps++
}
// asyncDep promise 执行
instance
.asyncDep.catch(err => {
// setup return 的 promise 异常捕获
handleError(err, instance, ErrorCodes.SETUP_FUNCTION)
})
.then(asyncSetupResult => {
// 处理一些异常结果
if (
instance.isUnmounted ||
suspense.isUnmounted ||
suspense.pendingId !== instance.suspenseId
) {
return
}
instance.asyncResolved = true
const {vnode} = instance
// setup 处理完成调用
handleSetupResult(instance, asyncSetupResult, false)
// 占位内容,就是 mountComponent 中创建的注释节点
const placeholder = !hydratedEl && instance.subTree.el
// 执行 render 挂载节点
setupRenderEffect(
instance,
vnode,
// 找到注释占位内容的父节点,作为容器节点,也就是我们之前创建的隐藏 dom
parentNode(hydratedEl || instance.subTree.el),
hydratedEl ? null : next(instance.subTree),
suspense,
isSVG,
optimized
)
// 移除占位符
if (placeholder) {
remove(placeholder)
}
// 更新 vnode el 属性
updateHOCHostEl(instance, vnode.el)
// 当所有的异步依赖处理完成后执行 suspense.resolve()
if (isInPendingSuspense && --suspense.deps === 0) {
suspense.resolve()
}
})
},
}
return suspense
}这里在执行 createSuspenseBoundary 函数的时候,有一个变量需要先了解一下,就是 suspense.deps。这个变量记录着需要处理的异步数量,比如我们上面的图例:
这里生成的 deps = 3。
然后会对 instance.asyncDep 的执行结果进行处理,如果有异常,则进入到 handleError 的逻辑,handleError 内部会调用 onErrorCaptured 钩子,可以让我们监听到组件的错误。
如果正常返回,则会进入到 then 的处理逻辑中,这里的处理主要做了以下几件事儿:
- 首先对一些异常场景进行降级,这里的异常场景包含了组件实例在异步执行完成后被卸载,或者
Suspense实例被卸载等情况。 - 然后就是为组件设置
render函数。如果setup promise返回的时候函数,那么这里也会将这个函数设置为渲染函数。 - 接着就是通过
setupRenderEffect函数的调用,完成渲染函数的调用执行,生成DOM节点 - 最后,根据
deps判断是否所有的异步依赖都已执行完,如果执行完,则进入suspense.resolve()的逻辑。
介绍完了 patch 的过程,再回到 mountSuspense 函数体当中,如果存在异步依赖,此时的 suspense.deps > 0 会进入到对异步处理的逻辑中:
// 触发 onPending,onFallback 钩子函数
triggerEvent(vnode, 'onPending')
triggerEvent(vnode, 'onFallback')
// 初始化挂载 fallback 插槽内容
patch(
null,
vnode.ssFallback,
container,
anchor,
parentComponent,
// fallback tree 不会有 suspense context
null,
isSVG,
slotScopeIds
)
// 将 fallback vnode 设置为 activeBranch
setActiveBranch(suspense, vnode.ssFallback)这里的核心逻辑就是在 default 插槽中的异步未执行完成时,先挂载 fallback 的内容。然后将 activeBranch 设置为 fallback。
如果不存在异步依赖,suspense.deps = 0 此时,也会直接执行 suspense.resolve()。
接下来,我们看看这个 resolve 到底做了哪些事:
function createSuspenseBoundary(vnode, parent, parentComponent, container, hiddenContainer, anchor, isSVG, slotScopeIds, optimized, rendererInternals, isHydrating = false) {
// ...
const suspense = {
// ...
resolve(resume = false) {
const {
vnode,
activeBranch,
pendingBranch,
pendingId,
effects,
parentComponent,
container
} = suspense
// 服务端渲染的逻辑,这里不关心
if (suspense.isHydrating) {
suspense.isHydrating = false
} else if (!resume) {
// ...
let {anchor} = suspense
// 卸载当前激活分支,即 fallback
if (activeBranch) {
anchor = next(activeBranch)
unmount(activeBranch, parentComponent, suspense, true)
}
if (!delayEnter) {
// 将 default 容器中的内容移动到可视区域
move(pendingBranch, container, anchor, MoveType.ENTER)
}
}
// 将 pendingBranch 设置为激活分支
setActiveBranch(suspense, pendingBranch)
suspense.pendingBranch = null
suspense.isInFallback = false
// 获取父节点
let parent = suspense.parent
// 标记是否还有未处理完成的 suspense
let hasUnresolvedAncestor = false
while (parent) {
if (parent.pendingBranch) {
// 如果存在还未处理完的父级 suspense,将当前 effect 合并到父级当中
parent.effects.push(...effects)
hasUnresolvedAncestor = true
break
}
parent = parent.parent
}
// 全部处理完suspense,一次性 queuePostFlushCb
if (!hasUnresolvedAncestor) {
queuePostFlushCb(effects)
}
suspense.effects = []
// 调用 onResolve 钩子函数
triggerEvent(vnode, 'onResolve')
},
}
return suspense
}这里要做的事情也是比较明确的,我们也来一一列举一下
- 卸载
fallback的插槽内容,因为已经完成了异步逻辑,所以没必要了。 - 将之前缓存在内存中的
default节点移动到可视区域。 - 遍历父节点,找到是否还有未完成的
suspense节点,将当前的渲染effects合并到父节点上进行统一更新。 - 触发
onResolve钩子函数。
这里我想重点说一下第三点,什么情况下会出现子节点已经完成异步依赖执行单父节点还有未完成的异步依赖呢?可以来看一个 demo:
import { createApp, ref, h, onMounted } from 'vue'
// 构造一个异步渲染容器
function defineAsyncComponent(
comp,
delay = 0
) {
return {
setup(props, { slots }) {
return new Promise(resolve => {
setTimeout(() => {
resolve(() => h(comp, props, slots))
}, delay)
})
}
}
}
// 定义一个外层异步组件
const AsyncOuter = defineAsyncComponent(
{
setup: () => {
onMounted(() => {
console.log('outer mounted')
})
return () => h('div', 'async outer')
}
},
2000
)
// 定义一个内层异步组件
const AsyncInner = defineAsyncComponent(
{
setup: () => {
onMounted(() => {
console.log('inner mounted')
})
return () => h('div', 'async inner')
}
},
1000
)
// 定义一个内层 Suspense 组件
const Inner = {
setup() {
return () =>
h(Suspense, null, {
default: h(AsyncInner),
fallback: h('div', 'fallback inner')
})
}
}
createApp({
setup() {
return () =>
// 定义一个外层 Suspense 组件
h(Suspense, null, {
default: h('div', [h(AsyncOuter), h(Inner)]),
fallback: h('div', 'fallback outer')
})
},
}).mount('#app')这里呢,我们构造了一个包含了 Suspense 异步渲染的 Outer 组件,Outer 中又包含了另一个通过 Suspense 渲染的 Inner 组件。我们通过 defineAsyncComponent 函数来模拟组件的异步过程,此时的 AsyncInner 组件是优先于 AsyncOuter 组件的异步完成的,对于这种情况,就满足了存在父的 Suspense 且父级 Suspense 还有 pendingBranch 待处理的情况,那么会把子组件的 suspense.effects 合入父组件当中。
suspense.effects 是个什么呢?
// queuePostRenderEffect 在 suspense 模式下指的是 queueEffectWithSuspense
export const queuePostRenderEffect = __FEATURE_SUSPENSE__
? queueEffectWithSuspense
: queuePostFlushCb
export function queueEffectWithSuspense(fn, suspense) {
// 针对 suspense 处理,会将渲染函数推送到 suspense.effects 中
if (suspense && suspense.pendingBranch) {
if (isArray(fn)) {
suspense.effects.push(...fn)
} else {
suspense.effects.push(fn)
}
} else {
queuePostFlushCb(fn)
}
}suspense.effects 在 suspense 模式下,就是通过 queuePostRenderEffect 生成的副作用函数的数组。我们的示例中,会在组件中调用 onMounted 钩子函数,在组件被挂载的时候,就会执行通过 queuePostRenderEffect 函数,将 onMounted 推入 suspense.effects 数组中:
// 设置并运行带副作用的渲染函数
const setupRenderEffect = (...) => {
const componentUpdateFn = () => {
if (!instance.isMounted) {
// ...
const { m } = instance
// mounted hook 推入到 suspense.effects
if (m) {
queuePostRenderEffect(m, parentSuspense)
}
} else {
// ...
let { u } = instance
// updated hook 推入到 suspense.effects
if (u) {
queuePostRenderEffect(u, parentSuspense)
}
}
}
// ...
}所以上述的示例中,父子组件的 onMounted 钩子将会被在父组件异步完成后统一执行。
Suspense 更新
接下来我们看一下 Suspense 更新的逻辑,这块的逻辑都集中在 patchSuspense 函数中:
function patchSuspense(n1, n2, container, anchor, parentComponent, isSVG, slotScopeIds, optimized, { p: patch, um: unmount, o: { createElement } }) {
// 初始化赋值操作
const suspense = (n2.suspense = n1.suspense)
suspense.vnode = n2
n2.el = n1.el
// 最新的 default 分支
const newBranch = n2.ssContent
// 最新的 fallback 分支
const newFallback = n2.ssFallback
const { activeBranch, pendingBranch, isInFallback, isHydrating } = suspense
// 存在旧的 pendingBranch
if (pendingBranch) {
suspense.pendingBranch = newBranch
// 新旧分支是属于 isSameVNodeType
if (isSameVNodeType(newBranch, pendingBranch)) {
// 新旧分支进行 diff
patch(
pendingBranch,
newBranch,
suspense.hiddenContainer,
null,
parentComponent,
suspense,
isSVG,
slotScopeIds,
optimized
)
// 没有依赖则直接 resolve
if (suspense.deps <= 0) {
suspense.resolve()
} else if (isInFallback) {
// 处于 fallback 中,激活分支和 newFallback 进行 diff
patch(
activeBranch,
newFallback,
container,
anchor,
parentComponent,
null, // fallback tree will not have suspense context
isSVG,
slotScopeIds,
optimized
)
// 更新激活分支为 newFallback
setActiveBranch(suspense, newFallback)
}
} else {
suspense.pendingId++
// ...
// 卸载旧分支
unmount(pendingBranch, parentComponent, suspense)
// ...
// 创建隐藏容器
suspense.hiddenContainer = createElement('div')
// 处于 fallback 态
if (isInFallback) {
// 挂载新的分支到隐藏容器中
patch(
null,
newBranch,
suspense.hiddenContainer,
null,
parentComponent,
suspense,
isSVG,
slotScopeIds,
optimized
)
// 没有依赖则直接 resolve
if (suspense.deps <= 0) {
suspense.resolve()
} else {
// 激活分支和 newFallback 进行 diff
patch(
activeBranch,
newFallback,
container,
anchor,
parentComponent,
null, // fallback tree will not have suspense context
isSVG,
slotScopeIds,
optimized
)
setActiveBranch(suspense, newFallback)
}
} else if (activeBranch && isSameVNodeType(newBranch, activeBranch)) {
// 激活分支和新分支进行 diff
patch(
activeBranch,
newBranch,
container,
anchor,
parentComponent,
suspense,
isSVG,
slotScopeIds,
optimized
)
suspense.resolve(true)
} else {
// 挂载新分支到隐藏分支
patch(
null,
newBranch,
suspense.hiddenContainer,
null,
parentComponent,
suspense,
isSVG,
slotScopeIds,
optimized
)
if (suspense.deps <= 0) {
suspense.resolve()
}
}
}
} else {
if (activeBranch && isSameVNodeType(newBranch, activeBranch)) {
// activeBranch 和 newBranch 进行 diff
patch(
activeBranch,
newBranch,
container,
anchor,
parentComponent,
suspense,
isSVG,
slotScopeIds,
optimized
)
setActiveBranch(suspense, newBranch)
} else {
// ...
// 挂载新分支到隐藏分支
patch(
null,
newBranch,
suspense.hiddenContainer,
null,
parentComponent,
suspense,
isSVG,
slotScopeIds,
optimized
)
// ...
}
}
}这个函数核心作用是通过判断 ssConent、ssFallback、pendingBranch、activeBranch 的内容,进行不同条件的 diff。 diff 完成后的工作和上面初始化的过程是大致一样的,会进行异步依赖 deps 数目的判断,如果没有依赖 deps 则直接进行 suspense.resolve。
该函数看起来分支逻辑比较多,我们可以通过一个简单的脑图捋顺其中的逻辑:
总结
<Suspense> 组件的实现原理,本质上就是通过一个计数器 deps 来记录需要被处理的依赖数量,当异步状态执行完成后,响应的计数器进行递减,当所有 deps 清空时,则达到统一完成态。于此同时,如果有父子嵌套的情况出现,会根据父节点的 suspense 状态来判断是否需要统一处理 effects。
特殊元素&指令:双向绑定是如何实现的
我们在理解 Vue 的响应式原理的时候,可能会认为 Vue 的响应式是双向绑定的,但实际上这是不准确的,所谓数据的双向绑定可以体现为以下两部分:
- 数据流向
DOM的绑定:数据的更新最终映射到对应的视图更新。 DOM流向数据的绑定:操作DOM的变化引起数据的更新。
我们在前面的章节花了不少篇幅介绍了响应式原理,其实这块就是着重在介绍数据流向 DOM 的过程。
在 Vuejs 中,我们则会经常通过 v-model 指令来实现数据的 “双向绑定”。 v-model 指令既可以作用在普通表单元素,也可以作用在一些组件上。接下来我们将分别介绍这两种情况的实现原理。
表单元素
在使用 Vuejs 编写表单类的 UI 控件时,经常会使用 v-model 指令来为 <input>、<select>、<textarea> 进行数据的双向绑定。
我们使用 Vue 提供的官方模版转换工具来尝试一下在 <input>、<select>、<textarea> 输入类型的表单中使用 v-model 指令会被编译成什么样子:
模版:
<input v-model='value1' />
<textarea v-model='value2' />
<select v-model='value3' />编译结果
import { vModelText as _vModelText, createElementVNode as _createElementVNode, withDirectives as _withDirectives, vModelSelect as _vModelSelect, Fragment as _Fragment, openBlock as _openBlock, createElementBlock as _createElementBlock } from "vue"
const _hoisted_1 = ["onUpdate:modelValue"]
const _hoisted_2 = ["onUpdate:modelValue"]
const _hoisted_3 = ["onUpdate:modelValue"]
export function render(_ctx, _cache, $props, $setup, $data, $options) {
return (_openBlock(), _createElementBlock(_Fragment, null, [
_withDirectives(_createElementVNode("input", {
"onUpdate:modelValue": $event => ((_ctx.value1) = $event)
}, null, 8 /* PROPS */, _hoisted_1), [
[_vModelText, _ctx.value1]
]),
_withDirectives(_createElementVNode("textarea", {
"onUpdate:modelValue": $event => ((_ctx.value2) = $event)
}, null, 8 /* PROPS */, _hoisted_2), [
[_vModelText, _ctx.value2]
]),
_withDirectives(_createElementVNode("select", {
"onUpdate:modelValue": $event => ((_ctx.value3) = $event)
}, null, 8 /* PROPS */, _hoisted_3), [
[_vModelSelect, _ctx.value3]
])
], 64 /* STABLE_FRAGMENT */))
}可以看到通过 v-model 绑定的元素,在转成渲染函数的时候,最外层都被套上了一个 withDirectives 函数,这个函数传入了两个变量,一个通过 createElementVNode 创建的 vnode 节点,另一个是一个数组类型的参 directives,这个我们后面再介绍。我们先来简单看一下 withDirectives 这个函数的实现:
export function withDirectives(vnode, directives) {
const internalInstance = currentRenderingInstance
if (internalInstance === null) {
return vnode
}
const instance = getExposeProxy(internalInstance) || internalInstance.proxy
// 获取指令集
const bindings = vnode.dirs || (vnode.dirs = [])
// 遍历 directives
for (let i = 0; i < directives.length; i++) {
let [dir, value, arg, modifiers = EMPTY_OBJ] = directives[i]
// 如果存在指令
if (dir) {
// 指令是个函数,构造 mounted、updated 钩子
if (isFunction(dir)) {
dir = {
mounted: dir,
updated: dir
}
}
// 存在 deep 属性,遍历访问每个属性
if (dir.deep) {
traverse(value)
}
// bindings 中添加构造好的指令元素
bindings.push({
dir,
instance,
value,
oldValue: void 0,
arg,
modifiers
})
}
}
return vnode
}可以看到 withDirectives 函数主要就是为 vnode 节点上添加 dirs 属性,对于我们示例中的 <input> 节点而言,生成的 dir 内容大致为( select 节点类似,这里就不再介绍了,有兴趣的可以在源码详细了解):
{
dir: vModelText,
value: _ctx.value1,
...
}其中 vModelText 是一个对象,内置了 v-model 指令相关的生命周期的实现:
export const vModelText = {
// created 生命周期
created(el, { modifiers: { lazy, trim, number } }, vnode) {
// 获取 props 上 onUpdate:modelValue 函数
el._assign = getModelAssigner(vnode)
const castToNumber =
number || (vnode.props && vnode.props.type === 'number')
// 注册 input/change 事件
addEventListener(el, lazy ? 'change' : 'input', e => {
// ...
let domValue = el.value
// .trim 修饰符
if (trim) {
domValue = domValue.trim()
}
if (castToNumber) {
domValue = looseToNumber(domValue)
}
// 执行 onUpdate:modelValue 函数
el._assign(domValue)
})
if (trim) {
addEventListener(el, 'change', () => {
el.value = el.value.trim()
})
}
// ...
},
mounted(el, { value }) {
// 赋值
el.value = value == null ? '' : value
},
beforeUpdate(el, { value, modifiers: { lazy, trim, number } }, vnode) {
// 更新 el._assign
el._assign = getModelAssigner(vnode)
if (el.composing) return
if (document.activeElement === el && el.type !== 'range') {
if (lazy) {
return
}
if (trim && el.value.trim() === value) {
return
}
if (
(number || el.type === 'number') &&
looseToNumber(el.value) === value
) {
return
}
}
// 更新值
const newValue = value == null ? '' : value
if (el.value !== newValue) {
el.value = newValue
}
}
}可以看到 vModelText 内置了 created、mounted、beforeUpdate 钩子函数。
在 created 的时候,会从 pops 上获取 onUpdate:modelValue 函数,这个函数也就是我们在遇到 v-model 指令后,Vue 的编译器自动转换生成的。然后再监听对应 DOM 上的 change 或者 input 事件,事件触发时再回调执行 onUpdate:modelValue 函数。
在 mounted 的时候,会将当前的值 value 赋值给 el.value。
指令生命周期的触发
前面我们提到了 v-model 注册的指令节点,会生成一个带有 dirs 的属性,属性中会包含类似于 vModelText 这样的对象,这个对象内部包含了一些生命周期函数,那这些生命周期函数又是在何时执行的呢?再回到我们之前的 mountElement 函数内,这次我们着重看一下与指令相关的代码实现:
const mountElement = (vnode, container, anchor, parentComponent, parentSuspense, isSVG, optimized) => {
// ...
const { type, props, shapeFlag, transition, dirs } = vnode
if (dirs) {
// 执行 created 钩子函数
invokeDirectiveHook(vnode, null, parentComponent, 'created')
}
// ...
if (props) {
// 处理 props,比如 class、style、event 等属性
}
if (dirs) {
// 执行 beforeMount 钩子函数
invokeDirectiveHook(vnode, null, parentComponent, 'beforeMount')
}
// 挂载 dom
hostInsert(el, container, anchor)
if (
(vnodeHook = props && props.onVnodeMounted) ||
needCallTransitionHooks ||
dirs
) {
queuePostRenderEffect(() => {
vnodeHook && invokeVNodeHook(vnodeHook, parentComponent, vnode)
needCallTransitionHooks && transition!.enter(el)
// 执行 mounted 钩子函数
dirs && invokeDirectiveHook(vnode, null, parentComponent, 'mounted')
}, parentSuspense)
}
}可以看到指令相关的钩子函数在进行 vnode 初始化挂载的时候,会在挂载的各个阶段被分别调用,从而完成生命周期函数的执行过程。
组件
我们首先来看一下,v-model 在组件中一些常规的使用方式:
<Component v-model="value1" />
<Component v-model:title="bookTitle" />
<Component v-model:first-name="first" v-model:last-name="last" />在组件上,v-model 不仅仅可以使用 modelValue 作为 prop,以 update:modelValue 作为对应的事件,还支持了给 v-model 一个自定义参数来更改这些名字。因为有了自定义参数的功能,所以也就支持了一个组件多个 v-model 绑定的功能。
接下来再看看通过 Vue 3 Template Explorer 将上述模版转出来的渲染函数的表达形式:
import { resolveComponent as _resolveComponent, createVNode as _createVNode, Fragment as _Fragment, openBlock as _openBlock, createElementBlock as _createElementBlock } from "vue"
export function render(_ctx, _cache, $props, $setup, $data, $options) {
const _component_Component = _resolveComponent("Component")
return (_openBlock(), _createElementBlock(_Fragment, null, [
_createVNode(_component_Component, {
modelValue: _ctx.value1,
"onUpdate:modelValue": $event => ((_ctx.value1) = $event)
}, null, 8 /* PROPS */, ["modelValue", "onUpdate:modelValue"]),
_createVNode(_component_Component, {
title: _ctx.bookTitle,
"onUpdate:title": $event => ((_ctx.bookTitle) = $event)
}, null, 8 /* PROPS */, ["title", "onUpdate:title"]),
_createVNode(_component_Component, {
"first-name": _ctx.first,
"onUpdate:firstName": $event => ((_ctx.first) = $event),
"last-name": _ctx.last,
"onUpdate:lastName": $event => ((_ctx.last) = $event)
}, null, 8 /* PROPS */, ["first-name", "onUpdate:firstName", "last-name", "onUpdate:lastName"])
], 64 /* STABLE_FRAGMENT */))
}可以看到,编译器在处理组件带有 v-model 指令的时候,会将其根据相关参数进行解析,最后组成一个 props 传入组件中。拿一个 v-model:title = 'bookTitle' 举例,生成的 props 大致是这样的:
{
title: value,
"onUpdate:title": $event => _ctx.bookTitle = $event
}所以这也解释了为什么组件内部需要定义一个 props 用来承接 title 的值;定义一个 emit,在 title 值变化的时候,用来触发 onUpdate:title,并传入更新后的值。
<!-- Component.vue -->
<script setup>
defineProps(['title'])
defineEmits(['update:title'])
</script>
<template>
<input
type="text"
:value="title"
@input="$emit('update:title', $event.target.value)"
/>
</template>接下来我们再看看这个 $emit 是如何触发 onUpdate:title 函数的执行的。先来看看 $emit 函数的实现:
export function emit(instance, event, ...rawArgs) {
if (instance.isUnmounted) return
const props = instance.vnode.props || EMPTY_OBJ
let args = rawArgs
// 定义事件名称
let handlerName
// update:xxx => onUpdate:xxx
let handler =
props[(handlerName = toHandlerKey(event))] ||
props[(handlerName = toHandlerKey(camelize(event)))]
// 找到了 handler 触发调用
if (handler) {
callWithAsyncErrorHandling(
handler,
instance,
ErrorCodes.COMPONENT_EVENT_HANDLER,
args
)
}
// ...
}其中第一个参数是当前组件实例,$emit 自动为我们绑定了当前组件,event 为事件名称,rawArgs 就是传入的一些参数。整个函数逻辑还是很清晰的,就是将传入的 event 名称转成 onUpdate:xxx 的写法,然后在 props 上找对应的函数,也就是我们传入的那个事件函数。找到了后就通过 callWithAsyncErrorHandling 方法进行调用,完成事件的执行。
总结
v-model 不管是在表单元素还是在组件元素上都会被编译器转成一个 props 对象,在表单元素上是这样的:
{
"onUpdate:modelValue": $event => _ctx.bookTitle = $event
}而在组件时则会编译成:
{
title: value,
"onUpdate:title": $event => _ctx.bookTitle = $event
}那么,所谓的双向数据绑定的 DOM 操作触发数据的更新就可以理解为:
在表单元素上,事件名 modelValue 是默认的,通过 vModelText 函数在内部实现了一个监听 DOM 变更的事件 change/input 来实现对数据值的更新操作。
在组件元素上,则是通过组件内部自定义值接受和事件派发机制完成对数据的更新操作。
特殊元素&指令:slot 插槽元素是如何实现的
Vue 提供了一个 <slot> 插槽的内置特殊元素,用来实现为子组件传递一些模板片段,然后由子组件完成对这些模版的渲染工作。一个简单的例子,这里有一个父组件,写入了一段插槽模版内容:
<ChildComponent>
<!-- 插槽内容 -->
hello world
</ChildComponent>在子组件 <ChildComponent> 中则通过 <slot> 元素来实现对插槽内容的出口渲染:
<div>
<!-- 插槽出口 -->
<slot></slot>
</div><slot> 元素是一个插槽出口 (slot outlet),标示了父元素提供的插槽内容 (slot content) 将在哪里被渲染。
插槽内容渲染
一个组件如果携带一些插槽内容,那么这个组件在渲染的时候,会有哪些变化。先来看一个较为常规的 <slot> 插槽内容用法:
<ChildComponent>
<template #header>header</template>
<template #content>content</template>
<template #footer>footer</template>
</ChildComponent>经过编译器转换后,生成的渲染函数如下:
import { createTextVNode as _createTextVNode, resolveComponent as _resolveComponent, withCtx as _withCtx, openBlock as _openBlock, createBlock as _createBlock } from "vue"
export function render(_ctx, _cache, $props, $setup, $data, $options) {
const _component_ChildComponent = _resolveComponent("ChildComponent")
return (_openBlock(), _createBlock(_component_ChildComponent, null, {
header: _withCtx(() => [
_createTextVNode("header")
]),
content: _withCtx(() => [
_createTextVNode("content")
]),
footer: _withCtx(() => [
_createTextVNode("footer")
]),
_: 1 /* STABLE */
}))
}可以看到,createBlock 的第三个参数 children 相对于普通父子节点来说,由一个数组变成一个对象的形式,这个对象包含了以插槽内容名称命名的函数,以及一个 _ 属性,这个属性的含义是 slotFlag。
下面我们再详细看一下 createBlock 这个函数的实现,前面的章节中,我们提到 createBlock 函数本质就是调用了 createVNode 函数创建 vnode 节点,不过会增加一些和编译时优化相关的属性 dynamicChildren 罢了。那么核心看一下在创建 vnode 的时候产生的一些变化:
function _createVNode(type, props, children, patchFlag, dynamicProps = null, isBlockNode = false) {
// ...
if (isVNode(type)) {
// clone vnode
const cloned = cloneVNode(type, props, true /* mergeRef: true */)
if (children) {
// 标准化子节点
normalizeChildren(cloned, children)
}
return cloned
}
// ...
}createVNode 函数在执行的时候,针对 vnode 节点如果存在子节点的话,会调用 normalizeChildren 函数:
export function normalizeChildren(vnode, children) {
let type = 0
const { shapeFlag } = vnode
if (children == null) {
children = null
} else if (isArray(children)) {
// 子节点是数组的情况
type = ShapeFlags.ARRAY_CHILDREN
} else if (typeof children === 'object') {
// 针对 children 是对象的处理内容
// 对于 ELEMENT 或者 TELEPORT slot 的处理
if (shapeFlag & (ShapeFlags.ELEMENT | ShapeFlags.TELEPORT)) {
const slot = (children as any).default
if (slot) {
slot._c && (slot._d = false)
normalizeChildren(vnode, slot())
slot._c && (slot._d = true)
}
return
} else {
// 标记子节点类型为 SLOTS_CHILDREN
type = ShapeFlags.SLOTS_CHILDREN
const slotFlag = (children as RawSlots)._
if (!slotFlag && !(InternalObjectKey in children!)) {
// 如果 slots 还没有被标准化,添加上下文实例
;(children as RawSlots)._ctx = currentRenderingInstance
} else if (slotFlag === SlotFlags.FORWARDED && currentRenderingInstance) {
// 处理 slotFlag 为 FORWARDED 的情况
// 处理 STABLE slot
if (
(currentRenderingInstance.slots as RawSlots)._ === SlotFlags.STABLE
) {
;(children as RawSlots)._ = SlotFlags.STABLE
} else {
// 添加 DYNAMIC slot
;(children as RawSlots)._ = SlotFlags.DYNAMIC
vnode.patchFlag |= PatchFlags.DYNAMIC_SLOTS
}
}
}
}
// ...
vnode.children = children
vnode.shapeFlag |= type
}这里我们只需要关注,如果传入的子节点类型是个 Object 的情况下,会为 vnode.shapeFlag 属性添加 SLOTS_CHILDREN 类型。那这个 shapeFlag 在哪里会被用到了?再回到我们之前的组件挂载过程中的 setupComponent 函数中:
export function setupComponent(instance) {
// 1. 处理 props
// 取出存在 vnode 里面的 props
const { props, children } = instance.vnode;
initProps(instance, props);
// 2. 处理 slots
initSlots(instance, children);
// 3. 调用 setup 并处理 setupResult
setupStatefulComponent(instance);
}这里我们重点看一下是如何处理 slots 的:
export const initSlots = (instance, children) => {
// shapeFlag 有 SLOTS_CHILDREN 类型
if (instance.vnode.shapeFlag & ShapeFlags.SLOTS_CHILDREN) {
// 对于我们的示例中,slotFlag 类型是 STABLE
const type = (children as RawSlots)._
if (type) {
// 用户可以使用 this.$slots 来获取 slots 对象的浅拷贝内部实例上的 slots
// 所以这里应该避免 proxy 对象污染
// 为 instance slots 属性赋值 children
instance.slots = toRaw(children)
// 标记不可枚举
def(children, '_', type)
}
// ...
} else {
instance.slots = {}
// ...
}
def(instance.slots, InternalObjectKey, 1)
}针对我们上面的示例,首先 slots 渲染的 slotFlag 类型为 STABLE,所以这里的 initSlot 所做的操作就是为 instance.slots 赋值为 toRaw(children)。
到这里,我们可以认为,对于一个组件中如果包含 slot 内容,那么这个组件实例在被渲染的时候,这些内容将会被添加到当前组件实例的 instance.slots 属性上:
// ChildComponent 组件实例
{
type: {
name: "ChildComponent",
render: render(_ctx, _cache) { ... },
// ...
},
slots: {
header: _withCtx(() => [
_createTextVNode("header")
]),
content: _withCtx(() => [
_createTextVNode("content")
]),
footer: _withCtx(() => [
_createTextVNode("footer")
]),
},
vnode: {...}
// ...
}TIP
注意,slots 是被挂载到了子组件实例 ChildComponent 中,而非父组件中。
插槽出口渲染
插槽除了有内容外,还需要制定对象的出口,我们再一起看一下上述示例中对应的出口内容:
<div>
<slot name="header"></slot>
<slot name="content"></slot>
<slot name="footer"></slot>
</div>上面的模版会被编译器编译成如下渲染函数:
import { renderSlot as _renderSlot, openBlock as _openBlock, createElementBlock as _createElementBlock } from "vue"
export function render(_ctx, _cache, $props, $setup, $data, $options) {
return (_openBlock(), _createElementBlock("div", null, [
_renderSlot(_ctx.$slots, "header"),
_renderSlot(_ctx.$slots, "content"),
_renderSlot(_ctx.$slots, "footer")
]))
}可以看到,带有 <slot> 内容的元素,会被 renderSlot 函数进行包裹,一起来看一下这个函数的实现:
export function renderSlot(slots, name, props, fallback, noSlotted) {
// ...
// 根据 name 获取 slot 内容
let slot = slots[name]
openBlock()
const validSlotContent = slot && ensureValidVNode(slot(props))
// 创建 slot vnode
const rendered = createBlock(
Fragment,
{
key:
props.key ||
(validSlotContent && (validSlotContent as any).key) ||
`_${name}`
},
validSlotContent || (fallback ? fallback() : []),
validSlotContent && (slots as RawSlots)._ === SlotFlags.STABLE
? PatchFlags.STABLE_FRAGMENT
: PatchFlags.BAIL
)
// ...
// 返回 slot vnode
return rendered
}可以看到,renderSlot 函数核心功能就是根据 slot 的 name 属性去子组件实例上的 slots 中查找对应的执行函数,然后创建一个以 slot 为子节点的 Fragment 类型的 vnode 节点。
上述 slot 容器中的内容是通过 withCtx(...) 函数进行封装执行的,那么这个函数的作用是什么呢?先来看一下这个函数的实现:
export function withCtx(fn, ctx= currentRenderingInstance, isNonScopedSlot) {
// ...
const renderFnWithContext: ContextualRenderFn = (...args: any[]) => {
if (renderFnWithContext._d) {
setBlockTracking(-1)
}
// 暂存子组件实例
const prevInstance = setCurrentRenderingInstance(ctx)
let res
try {
// 运行创建 vnode 的函数
res = fn(...args)
} finally {
// 重置回子组件实例
setCurrentRenderingInstance(prevInstance)
}
return res
}
// ...
return renderFnWithContext
}withCtx 函数巧妙的利用了闭包的特性,在运行父组件的时候,通过 withCtx 保存了父组件的实例到 currentRenderingInstance 变量上,然后在子组件执行 renderFnWithContext 函数时,先恢复父组件的实例上下文,再执行生成 vnode 函数,执行完成后,再重置回子组件的实例。这样做的好处是在做 <slot> 渲染内容的时候,让 slot 的内容可以访问到父组件的实例,因为 slot 内容本身也是在父组件中定义的,只是被渲染到了指定的子组件中而已。
Dynamic Slots
什么是 dynamic slots ? 我们之前还有一种动态类型叫做 dynamic children 在 DOM 更新时做靶向更新。而 dynamic slots 则是用于判断 slot 内容是否需要更新。
那么 Vue 3 会为哪些组价添加 dynamic slots 属性呢?
Vue 3 中,对于动态的插槽名、条件判断、循环等场景的 <slot>,则会被标记为 dynamic slots,拿动态的插槽名举例:
<child-component>
<template #[dynamicSlotName]>header</template>
</child-component>则会被渲染成:
import { createTextVNode as _createTextVNode, resolveComponent as _resolveComponent, withCtx as _withCtx, openBlock as _openBlock, createBlock as _createBlock } from "vue"
export function render(_ctx, _cache, $props, $setup, $data, $options) {
const _component_child_component = _resolveComponent("child-component")
return (_openBlock(), _createBlock(_component_child_component, null, {
[_ctx.dynamicSlotName]: _withCtx(() => [
_createTextVNode("header")
]),
_: 2 /* DYNAMIC */
}, 1024 /* DYNAMIC_SLOTS */))
}可以看到,对于动态的插槽名,组件渲染函数会为 patchFlag 标记为 DYNAMIC_SLOTS。在执行组件更新时,则会根据这个标记来判断当前组件是否需要更新:
const updateComponent = (n1, n2, vnode) => {
if (shouldUpdateComponent(n1, n2, optimized)) {
// ...
// 执行更新逻辑
}
}
function shouldUpdateComponent(prevVNode, nextVNode, optimized) {
// ...
const { props: nextProps, children: nextChildren, patchFlag } = nextVNode
// patchFlag 是 DYNAMIC_SLOTS 的情况,shouldUpdateComponent 返回 true
if (optimized && patchFlag >= 0) {
if (patchFlag & PatchFlags.DYNAMIC_SLOTS) {
return true
}
}
}总结
<slot> 内置元素的实现原理,本质上就是父组件在渲染的时候,如果遇到了 <slot> 内容,则会暂时将其缓存到组件实例上,然后在组件实例化的过程中,从父组件中取出对应的 slots 按照名称进行渲染到指定位置。
同时配合 PatchFlags 属性,可以做到只有在 DYNAMIC_SLOTS 的情况下,才去更新含有 slot 的组件,减少了不必要的渲染性能负担。
再回首看 Vue 3 设计
前面的章节,我们分别学完了 渲染器、响应式原理、编译器、内置组件、特殊元素&指令 这五大部分的内容,也大致清楚了各个部分的设计细节和原理,现在,让我们再把这些知识串联,回顾课程开篇中的那张核心运行机制图:
相信这个时候我们再看这张图,相对而言理解起来就比较容易了。那么让我们再来宏观的梳理一遍整体的运作流程吧:
1. 渲染器
我们通常在使用 Vue.js 的时候,最开始的入口使用大多数场景如下:
import { createApp } from 'vue'
import App from './App.vue'
createApp(App).mount('#app')我们通过 createApp 的方式创建了一个渲染器对象 renderer,所谓渲染器,就是是用来执行渲染任务的,另外也能够进行框架跨平台能力的渲染任务,而这里我们讨论的是渲染器针对于浏览器端渲染成真实 DOM 的场景。
渲染器在初始化挂载阶段,通过渲染器内部的 patch 函数进行初始化挂载任务。将编译器输出的 render 函数执行后生成 vnode 节点,然后再将 vnode 渲染成真实的 DOM 挂载到指定容器中。
渲染器在更新阶段,则会根据编译器中输出的标记 PatchFlags 和 dynamicChildren 在 patch 时做到靶向更新。
2. 编译器
编译器的作用简单概括就是将源代码 A 转换成目标代码 B。Vue.js 的源代码就是我们写的 template 函数,编译器的目标代码就是渲染函数:

编译器的核心流程经历了:
parse:接收字符串模板作为参数,并将解析后得到的 模版AST作为返回值返回。transform:接受 模板AST做为参数,语义化转换为JavaScript AST并返回。generate:接受JavaScript AST生成渲染函数并返回。
3. 响应式
响应式是 Vue.js 的核心部分,简而言之,响应式就是为了实现对需要侦测的状态数据进行监听,当状态数据变化时反馈给与状态数据相关的副作用函数重新执行。
Vue 3 通过 proxy API 完成了对响应式状态数据的定义,当在副作用函数中访问响应式数据时,进行副作用函数的收集(这里的副作用函数也可以是渲染函数)。当触发响应式状态数据更新时,再重新执行副作用函数。
针对于渲染函数(render)这种副作用函数而言,在重新执行的时候,则会比对新老的 vnode 节点情况进行选择性更新(diff)。
const render = (vnode, container) => {
if (vnode == null) {
// 销毁组件
if (container._vnode) {
unmount(container._vnode, null, null, true)
}
} else {
// 创建或者更新组件
patch(container._vnode || null, vnode, container)
}
// 缓存 vnode 节点,表示已经渲染
container._vnode = vnode
}4. 性能优化
另外值得一提的是,Vue 3 不管是在编译时还是在运行时都做了大量的性能优化。例如在编译时,Vue 3 通过标记 /*#__PURE__*/ 来为打包工具提供良好的 Tree-Shaking 机制,通过 静态提升 机制,避免了大量静态节点的重复渲染执行;在运行时又通过批量队列更新机制优化了更新性能,通过 PatchFlags 和 dynamicChildren 进行了 diff 的靶向更新...
通过这些精细的设计,我们可以在不了解 Vue.js 运行原理的基础上,写出性能卓越的前端代码,降低了开发者的心智负担。
Vue2原理
- snabbdom
著名的虚拟dom库, diff算法的鼻祖, vue源码借鉴了 snabbdom
h函数
用来生成虚拟节点( vnode ) 可嵌套, 一个子元素可以直接当参数传入, 多个需要用数组包裹
h('a', { props: { href: 'http://www.baidu.com' } }, '高江华')
//生成的虚拟节点
{
"sel": "a",
"data": { props: { href: 'http://www.baidu.com' } },
"text": "高江华"
}
//真实的DOM节点
<a href="http://www.baidu.com">高江华</a>示例 ( 基于snabbdom ) :
//创建patch函数
const patch = init([classModule, propsModule, styleModule, eventListenersModule])
//创建虚拟节点
const myVnode = h('a', { props: { href: 'http://www.baidu.com } }, '高江华')
//让虚拟节点上树
const container = document.getElementById('container')
patch(container, myVnode)简易版手写虚拟DOM:
function vnode(sel, data, children, text, elm) {
return {
sel, data, children, text, elm
}
}
function h(sel, data, c) {
if (arguments.length !== 3){
throw new Error('必须传入3个参数')
}
if (typeof c == 'string' || typeof c == 'number'){
return vnode(sel, data, undefined, c, undefined)
}else if (Array.isArray(c)){
let children = []
for (let i = 0; i < c.length; i++){
if (!(typeof c[i] == 'object' && c[i].hasOwnProperty('sel')))
throw new Error('传入的数组参数中有项不是h函数')
children.push(c[i])
}
return vnode(sel, data, children, undefined, undefined)
}else if (typeof c == 'object' && c.hasOwnProperty('sel')){
let children = [c]
return vnode(sel, data, children, undefined, undefined)
}else {
throw new Error('传入的第三个参数不对')
}
}
let myVnode = h('div', {}, [
h('ul', {}, [
h('li', {}, '苹果'),
h('li', {}, '香蕉'),
h('li', {}, '桔子'),
h('li', {}, [
h('p', {}, '123'),
h('p', {}, '456')
]),
])
])
console.log(myVnode)DIFF算法
最小量更新, key很重要, key是这个节点的唯一标识, 告诉diff算法, 在更改前后它们是同一个DOM节点
只有是同一个虚拟节点,才进行精细化比较, 否则暴力删旧插新
选择器相同且key相同就是同一虚拟节点
只进行同层比较, 不会进行跨层比较, 即使同一虚拟节点,但是跨层了也不会精细化比较, 只会删旧插新
四种命中查找: 设置四个指针 ( 新前 旧前 新后 旧后 )
- 新前与旧前
- 新后与旧后
- 新后与旧前 ( 此种发生了, 涉及移动节点, 那么新前指向的节点, 移动到旧后之后 )
- 新前与旧后 ( 此种发生了, 涉及移动节点, 那么新前指向的节点, 移动到旧前之前 )
注: 命中一种就不再进行命中判断, 若没命中则继续顺序使用命中判断, 若都未命中则循环旧子节点查找有没有对应的新子节点

精细化比较如下:
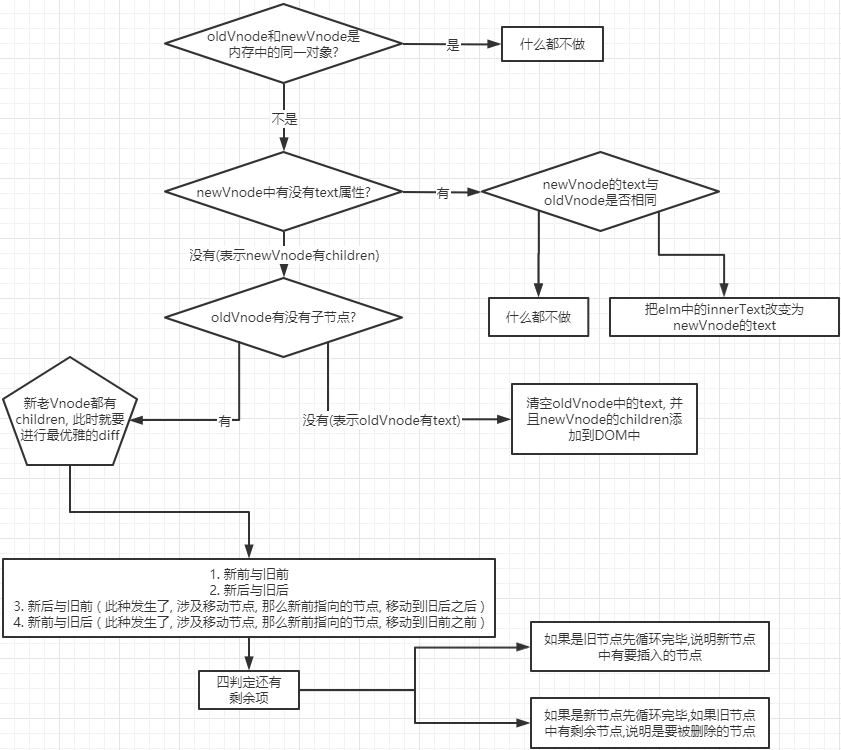 简易版diff算法:
function vnode(sel, data, children, text, elm) {
const key = data.key
return {
sel, data, children, text, elm, key
}
}
function h(sel, data, c) {
if (arguments.length !== 3){
throw new Error('必须传入3个参数')
}
if (typeof c == 'string' || typeof c == 'number'){
return vnode(sel, data, undefined, c, undefined)
}else if (Array.isArray(c)){
let children = []
for (let i = 0; i < c.length; i++){
if (!(typeof c[i] == 'object' && c[i].hasOwnProperty('sel')))
throw new Error('传入的数组参数中有项不是h函数')
children.push(c[i])
}
return vnode(sel, data, children, undefined, undefined)
}else if (typeof c == 'object' && c.hasOwnProperty('sel')){
let children = [c]
return vnode(sel, data, children, undefined, undefined)
}else {
throw new Error('传入的第三个参数不对')
}
}
function createElement(vnode) {
let domNode = document.createElement(vnode.sel)
if (vnode.text != '' && (vnode.children == undefined || vnode.children.length == 0)){
domNode.innerText = vnode.text
vnode.elm = domNode
}else if (Array.isArray(vnode.children) && vnode.children.length > 0){
for (let i = 0; i < vnode.children.length; i++){
let ch = vnode.children[i]
let chdom = createElement(ch)
domNode.appendChild(chdom)
}
}
vnode.elm = domNode
return vnode.elm
}
function checkSameVnode(a, b) {
return a.sel == b.sel && a.key == b.key
}
function updateChildren(parentElm, oldCh, newCh){
//旧前
let oldStartIdx = 0
//新前
let newStartIdx = 0
//旧后
let oldEndIdx = oldCh.length - 1
//新后
let newEndIdx = newCh.length - 1
//旧前节点
let oldStartVnode = oldCh[0]
//旧后节点
let oldEndVnode = oldCh[oldEndIdx]
//新前节点
let newStartVnode = newCh[0]
//新后节点
let newEndVnode = newCh[newEndIdx]
//标杆
let keyMap = null
//循环精细化比较开始
while (oldStartIdx <= oldEndIdx && newSrartIdx <= newEndIdx) {
if (oldStartVnode === null || oldCh[oldStartIdx] === undefined){
oldStartVnode = oldCh[++oldStartIdx]
}else if (oldEndVnode === null || oldCh[oldEndIdx] === undefined){
oldEndVnode = oldCh[--oldEndIdx]
}else if (newStartVnode === null || newCh[newStartIdx] === undefined){
newStartVnode = newCh[++newStartIdx]
}else if (newEndVnode === null || newCh[newEndIdx] === undefined){
newEndVnode = newCh[--newEndIdx]
}else if (checkSameVnode(oldStartVnode, newSrartIdx)){
patchVnode(oldStartVnode, newStartVnode)
oldStartVnode = oldCh[++oldStartIdx]
newStartVnode = newCh[++newSrartIdx]
}else if (checkSameVnode(oldEndVnode,newEndVnode)){
patchVnode(oldEndVnode, newEndVnode)
oldEndVnode = oldCh[--oldEndIdx]
newEndVnode = newCh[--newEndIdx]
}else if (checkSameVnode(oldStartVnode,newEndVnode)){
patchVnode(oldStartVnode, newEndVnode)
parentElm.insertBefore(oldStartVnode.elm, oldEndVnode.elm.nextSibling())
oldStartVnode = oldCh[++oldStartIdx]
newEndVnode = newCh[--newEndIdx]
}else if (checkSameVnode(oldEndVnode,newStartVnode)){
patchVnode(oldEndVnode,newStartVnode)
parentElm.insertBefore(oldEndVnode.elm, oldStartVnode.elm.nextSibling())
oldEndVnode = oldCh[--oldEndIdx]
newStartVnode = newCh[++newStartIdx]
}else {
//四种命中都未命中,则制作keyMap映射对象
keyMap = {}
if (!keyMap){
//从oldStartIdx开始, 到oldEndIdx结束, 创建keyMap映射对象
for (let i = oldStartIdx; i <= oldEndIdx; i++){
const key = oldCh[i].key
if (key !== undefined){
keyMap[key] = i
}
}
}
const idxInOld = keyMap[newStartVnode.key]
if (idxInOld === undefined){
//是全新的项, 被加入的项(就是newStartVnode)现不是真正的DOM节点
parentElm.insertBefore(createElement(newStartVnode), oldStartVnode.elm)
}else {
//不是全新的项,需要移动
const elmToMove = oldCh[idxInOld]
patchVnode(elmToMove, newStartVnode)
oldCh[idxInOld] = undefined
parentElm.insertBefore(elmToMove.elm, oldStartVnode.elm)
}
newStartVnode = newCh[++newStartIdx]
}
}
//判断还有没有剩余的,start比end小
if (newStartIdx <= newEndIdx){
//new还有剩余节点没处理
//const before = newCh[newEndIdx + 1] == null ? null : newCh[newEndIdx + 1].elm
for (let i = newStartIdx; i <= newEndIdx; i++){
//insertBefore方法可以自动识别null, 如果是null就会自动排到队尾去, 和appendChild是一致的
parentElm.insertBefore(createElement(newCh[i]), oldCh[oldStartIdx].elm)
}
}else if (oldStartIdx <= oldEndIdx){
//old还有剩余节点没处理
for (let i = oldStartIdx; i <= oldEndIdx; i++){
if (oldCh[i]){
parentElm.removeChild(oldCh[i].elm)
}
}
}
}
function patchVnode(oldVnode, newVnode) {
if (oldVnode === newVnode) return ;
if (newVnode.text != undefined && newVnode.children == undefined || newVnode.children.length == 0){
if (newVnode.text != oldVnode.text){
oldVnode.elm.innerText = newVnode.text
}
}else {
if (oldVnode.children != undefined && oldVnode.children.length > 0){
updateChildren(oldVnode.elm, oldVnode.children, newVnode.children)
}else {
oldVnode.elm.innerText = ''
for (let i = 0; i < newVnode.children.length; i++){
let dom = createElement(newVnode.children[i])
oldVnode.elm.appendChild(dom)
}
}
}
}
function patch(oldVnode, newVnode){
if (oldVnode.sel == '' || oldVnode.sel == undefined){
oldVnode = vnode(oldVnode.tagName.toLowerCase(), {}, [], undefined, oldVnode)
}
if (oldVnode.key == newVnode.key && oldVnode.sel == oldVnode.sel){
patchVnode(oldVnode, newVnode)
}else {
let newVnodeElm = createElement(newVnode)
if (oldVnode.elm && newVnodeElm) {
oldVnode.elm.parentNode.insertBefore(newVnodeElm, oldVnode.elm)
}
oldVnode.elm.parentNode.removeChild(oldVnode.elm)
}
}
let myVnode1 = h('ul', {}, [
h('li', {key: 'A'}, 'A'),
h('li', {key: 'B'}, 'B'),
h('li', {key: 'C'}, 'C'),
h('li', {key: 'D'}, 'D'),
h('li', {key: 'E'}, 'E'),
])
const container = document.getElementById('container')
const btn = document.getElementById('btn')
patch(container, myVnode1)
const myVnode2 = h('ul', {}, [
h('li', {key: 'A'}, 'A'),
h('li', {key: 'B'}, 'B'),
h('li', {key: 'C'}, 'C'),
h('li', {key: 'D'}, 'D'),
h('li', {key: 'E'}, 'E'),
h('li', {key: 'F'}, 'F'),
h('li', {key: 'G'}, 'G'),
])
btn.onclick = function(){
patch(myVnode1, myVnode2)
}